-
Notifications
You must be signed in to change notification settings - Fork 395
Data Filters
You can apply custom filters to table contents or query results. There are several ways in which you can filter data in the table.
One of the ways is to use the filter field above the table next to the top toolbar. To filter data, enter an SQL expression into the field and click the Apply filter criteria button  next to the field or press Enter.

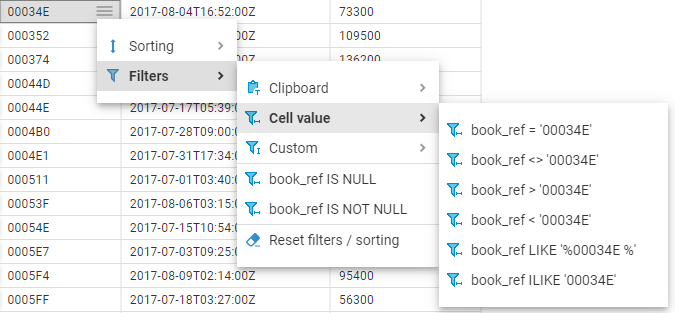
You can apply ready-to-use SQL expressions or SQL expression templates via the context menu. To select a ready SQL expression or a template, select or focus cell and press Cell context button  , then click Filters -> Cell value in the context menu and choose one of the expressions.

The data updates dynamically. To remove a filter, click Filters -> Delete filter for ... If you want to delete all filters, click Filters -> Reset all filters. You can also delete filters by clicking Reset filter criteria button  in the top toolbar.

Another tool for managing the data appearance is the column headers. In the data table, every column header contains two elements which each has its own function: Data (column) type icon, column name and ordering icon.

- Clicking the column name or column type allows you to select the whole column.
- Clicking the ordering icon allows you to order the data in the column in ascending or descending order - see the 'Ordering Data in Columns' section, further in this article
You can order data in columns in one of the following ways:
-
Click the ordering icon
 in the header of the column.
The icon has three states:
- Clicking once establishes ascending order

- Clicking a second time changes the order to descending

- Clicking a third time removes the ordering from the column

- Clicking once establishes ascending order
To order data by several columns, go column by column, holding the ctrl (windows) or cmd (mac) button, setting the order with the Ordering icon, starting from the column by which you want to order data first.
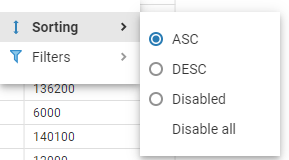
- Open context menu, click Sorting. Choose from several ordering states we've mentioned before. When we choose ordering state from the context menu, there is no need to hold ctrl or cmd button to order data by multiple columns.

To reset the column data ordering to its initial state, open Cell context menu and click Sorting -> Disable. If you want to reset all data ordering, open Cell context menu, then click Sorting -> Disable all. You can also click Ordering icon in the header of the any column to reset all data ordering.

- Application overview
- Demo Server
- Administration
- Server configuration
- Create Connection
- Connection Templates Management
- Access Management
-
Authentication methods
-
Local Access Authentication

- Anonymous Access Configuration
- Reverse proxy header authentication
- LDAP
-
Single Sign On

-
SAML

-
OpenID

-
AWS OpenID

-
AWS SAML

-
AWS IAM

-
AWS OpenId via Okta

-
Snowflake SSO

-
Okta OpenId

-
Cognito OpenId

-
JWT authentication

-
Kerberos authentication

-
NTLM

-
Microsoft Entra ID authentication

-
Google authentication

-
Local Access Authentication
- User credentials storage
-
Cloud Explorer

-
Cloud storage

-
Query Manager

-
Drivers Management

- Supported databases
- Accessibility
- Keyboard shortcuts
- Features
- Server configuration
- CloudBeaver and Nginx
-
Domain manager

- Configuring HTTPS for Jetty server
- Product configuration parameters
- Command line parameters
- Local Preferences
- API
-
CloudBeaver Community
-
CloudBeaver AWS
-
CloudBeaver Enterprise
-
Deployment options
-
Development