-
Notifications
You must be signed in to change notification settings - Fork 19
Troubleshooting
This page is designed to help you get round any problems that you have while building the UKMARSBOT. it is divided into sections for different types of problems
First check that you have the USB cable connected to both the PC and the Arduino Nano. If not, plug it in and try again.
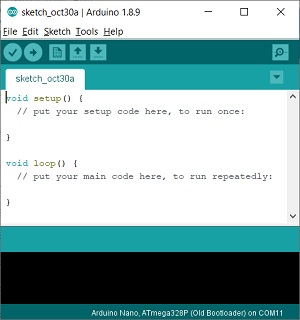
Next, assuming that you have managed to download the Arduino IDE, you should be able to open the Arduino program and see a window like this:

Click on Tools then Board and make sure you have selected Arduino Nano
Click on Tools then Processor and select ATmega328P (Old Bootloader)
With a USB cable connected at the PC and to the Arduino Nano, look to see if when you click on Tools the Port item is greyed out or selectable.
If it is greyed out you have a problem with the driver for your PC. If it is a cheap Nano the odds are that you need to install the CH340 driver so that the PC can see the Arduino Nano. If you have not already installed this, refer to the Arduino wiki page and download and install the driver as described there.
Once installed and with the cable connected to the Nano if you go to device manager on your PC you should see an entry under Ports(COM & LPT) for something like USB-SERIAL CH340(COMnn) where nn is port number. When you get this you should go to Tools again and then to Port where you should now be able to select this port number.
If you have an authentic Arduino Nano and you still cannot download programs, try changing the Tools Processor setting to just ATmega328P and try again.
If this does not work with the Nano on the main robot PCB, take it out and with the USB cable connected try again. If it works with the Nano out of the board but not with it in it, the problem is almost certainly one with the soldering on the connector that holds the Arduino so check this thoroughly, especially for any shorts.
The example Blink program that you can get to from File - Examples - 01 Basics is a good one to use to test this as it should compile and load easily and you should be able to see the LED on the Nano flashing when it runs.
If the Nano power LED lights up when connected with the USB cable but not when just running from the battery, you have a power supply problem to the Nano. Check the battery voltage with a multi-meter and make sure that it is 6 volts or more.
Next check the battery connections to the board. The red positive lead should go to the middle one of the 3 holes on J4 and the black negative lead should go to one of the outside connections on J4.
Next look at the soldered connections on the on/off switch for any dry joints and that it is actually switched on.
Finally check that the battery polarity protection diode is the right way round. The grey line at the end of the diode should be closest to the Sparkfun motor driver board. If it is not, take it out and put it back in the other way round.
Getting Started Pages
Building Guide
- Tools and Materials
- Assemble the main board
- Addendum for V1.3a main board
- Assemble the basic line sensor
- Assemble the mini wide line sensor board
- Assemble the basic wall sensor
- Mounting sensor boards
- Choosing motors
- Fitting Encoders
- Mounting the motors
- Choosing batteries
- Mounting the battery
Reference Pages
Troubleshooting
Developer Notes