-
Notifications
You must be signed in to change notification settings - Fork 0
Release Management
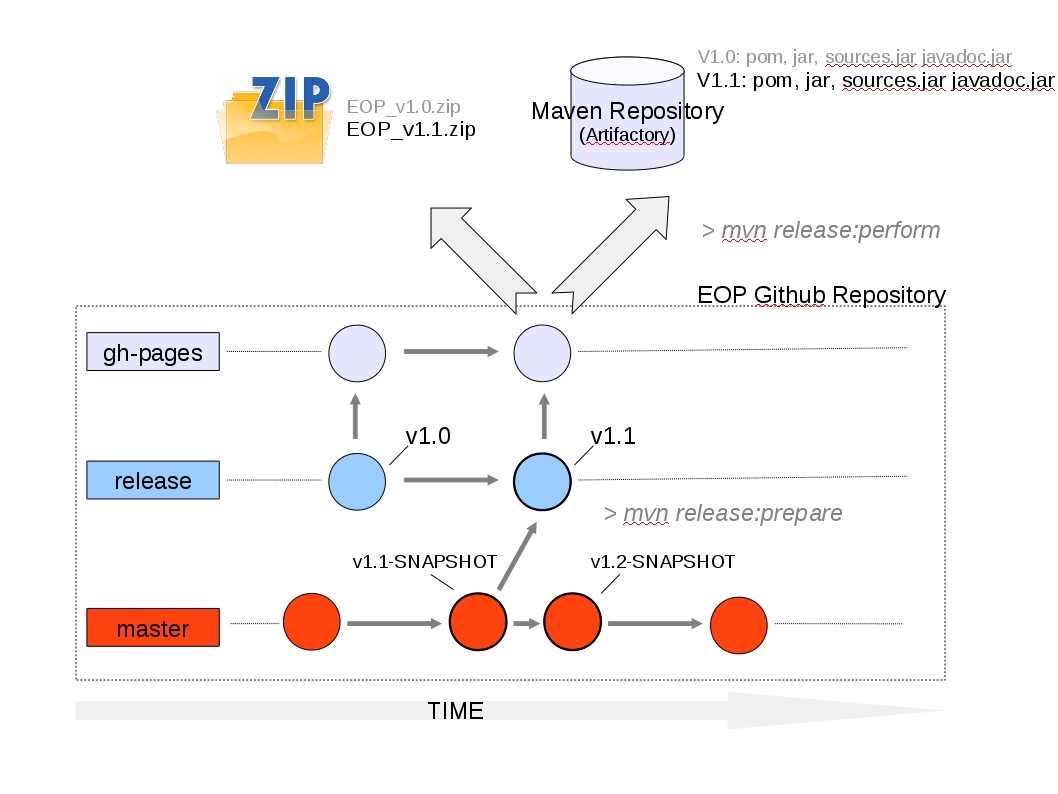
As shown in the picture below, the EOP repository contains three main branches, namely master, release and gh-pages. The release branch is the branch containing the code that is supposed to be in a production-ready state whereas the master branch is the main branch containing the code to be incorporated into the next release. gh-pages is instead the branch containing the EOP web site generated by the maven site plugin. Developers commit the work done in their private forks into this branch. When the source code in the master branch reaches a stable point and is ready to be released, all of the changes have to be merged back into release and tagged with a release number. The releases are then downloaded from the EOP repository and distributed as zip files and/or maven artifacts.

At the end of the procedure the created artifacts will be available from the EOP maven repository (i.e. this operation is done automatically by the maven release plugin) whereas the zip file will be available form the EOP web site. In addition to the code release, its documentation has to be created too. This is done by the GitHub wikis new editor whereas the created documentation is reachable by a link from the EOP entry point web site created by the GitHub Automatic Page Generator only once.
- Creating a New Code Release
- [Creating the Resources Archive File](#Creating_the_Resources_Archive File)
- Creating the Documentation Release
- Fixing Discovered Bugs
- Release Numbering Policy
This procedure allows for preparing and deploying the EOP maven artifacts in an “automatic” way (i.e. the maven plugins take care of a number of operations that otherwise should be done manually). At the end of the procedure the maven artifacts will be in the EOP internal artifactory maven repository (i.e. http://hlt-services4.fbk.eu:8080/artifactory) whereas the version of the SNAPSHOT in the master branch will have been incremented (e.g. 1.1.0-SNAPSHOT will be 1.1.1-SNAPSHOT) and the releases in the release branch will have been tagged (e.g. v1.1.0) and their SNAPSHOT suffixes removed.
Before starting the procedure, the following checks need to be performed:
- Make sure that the code on your local machine is update-to-date:
> git fetch upstream (Getting changes from the EOP repository)
> git merge upstream/master (Merges changes fetched into your local copy)
- Make sure the user and password for the internal repository are in the local maven setting, i.e.
.../.m2/settings.xml, like this:
<?xml version="1.0" encoding="UTF-8"?>
<settings>
  <servers>
    <server>
        <id>hlt-services4.fbk.eu</id>
         <username>..............</username>
         <password>..............</password>
    </server>
  </servers>
  <profiles>
    <profile>
      <id>default</id>
      <repositories>
          <repository>
              <id>hlt-services4.fbk.eu</id>
              <url>http://hlt-services4.fbk.eu:8080/artifactory/repo</url>
          </repository>
      </repositories>
    </profile>
  </profiles>
  <activeProfiles>
    <activeProfile>default</activeProfile>
  </activeProfiles>
</settings>
-
Make sure the
JAVA_HOMEvariable is probably set (maybe for Mac OS only, no need for Ubuntu). -
In case you want to rebuild an existing release: you probably won't need to do this often but just in case, here is how to delete a tag from a remote Git repository. If for example you have a tag named '1.1.0' then you would just do this:
- git tag -d 1.1.0
- git push origin :refs/tags/1.1.0
Following we report the step by step procedure for creating a release. v0.1 is the placeholder here, which should be replaced by the real release version number (please consider the release numbering policy).
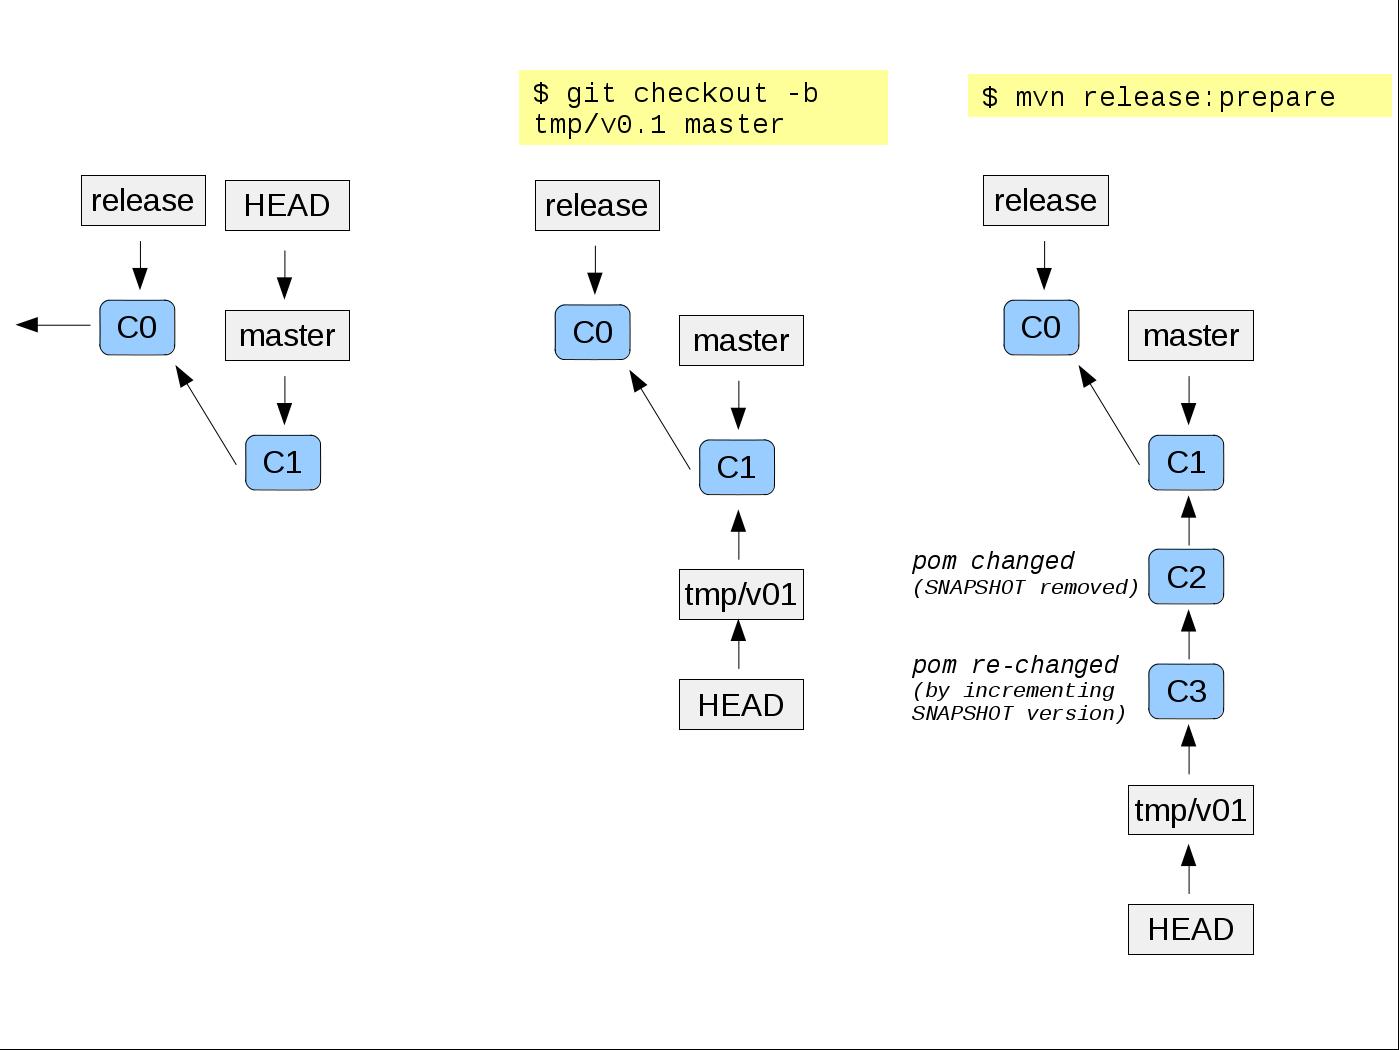
- Create a tmp branch from master and switch to it:
> git checkout -b tmp/v0.1 master
- Change the pom (by removing the SNAPSHOT suffix), commit and tag version, re-change pom (by adding the SNAPSHOT suffix and incrementing the SNAPSHOT version and commit:
> mvn release:prepare
Note that during this step, the correct release version number and the development version number need to be entered, e.g.
What is the release version for "Free Open Source Platform for Recognizing Textual Entailments (RTE)"? (eu.excitementproject:eop) 0.1: :**0.1**
What is the release version for "common"? (eu.excitementproject:common) 0.1: :**0.1**
...................
What is SCM release tag or label for "Free Open Source Platform for Recognizing Textual Entailments (RTE)"? (eu.excitementproject:eop) v0.1: :**0.1**
...................
What is the new development version for "Free Open Source Platform for Recognizing Textual Entailments (RTE)"? (eu.excitementproject:eop) 0.2-SNAPSHOT:
What is the new development version for "common"? (eu.excitementproject:common) 0.2-SNAPSHOT: :
...................
- Get the tagged version, compile and deploy:
mvn -U -Dmaven.repo.local=/user_home/.m2/ release:perform
At this point the created maven artifacts should be available from artifactory/releases/
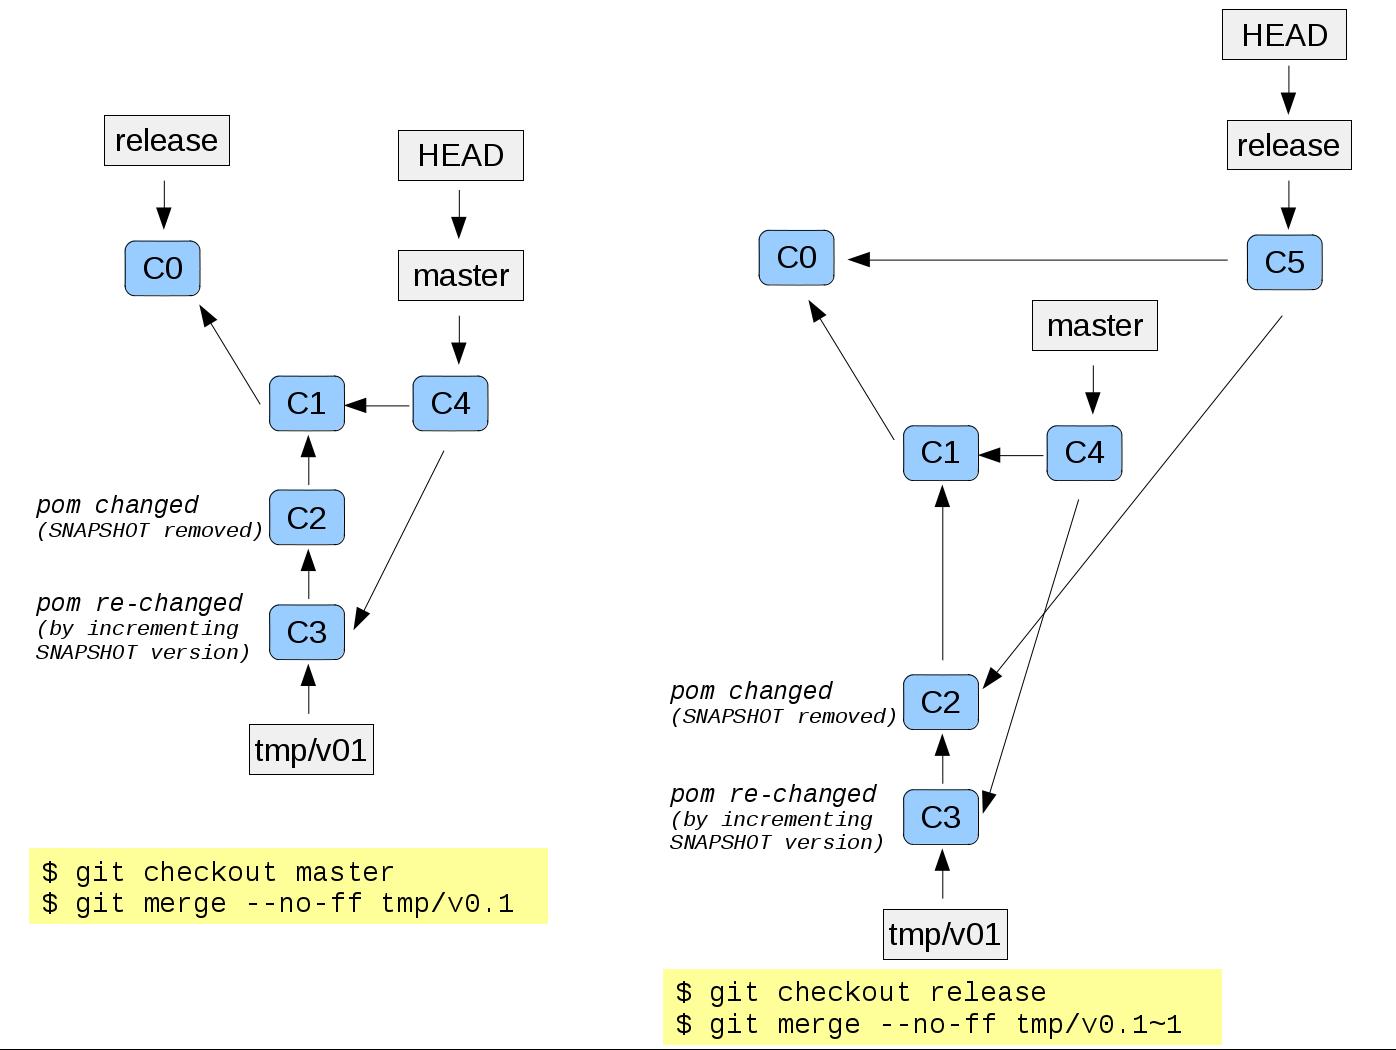
- Switch back to the master branch:
> git checkout master
- Merge the version back into master:
> git merge --no-ff tmp/v0.1
Note that merging the tmp branch into the master branch generating a merge commit (even if it was a fast-forward merge).
- Switch to the release branch:
> git checkout release
Please note that, when you do a fetch that brings down new remote branches (like release could be), you do not automatically have local, editable copies of them. In other words you do not have a new release branch; what you have is only an origin/release pointer that you cannot modify. If you want your own release branch that you can work with, you need base it off your remote branch. Before running the command listed above check if the release branch already exists:
> git branch -a
If you can see the remotes/origin/release branch but not the local release one you have to base it off:
> git checkout -b release origin/release
then run the following git command to see that such a branch has been created:
> git branch -a
- Merge the version back into release but the tagged version instead of the tmp/v0.1 HEAD:
> git merge --no-ff tmp/v0.1~1
This means merging into release the commit before the HEAD of the branch tmp/v0.1. This step could create conflicts when it merges the code. In that case follow the instructions reported running the command git status (generally you will have to add or remove files: git rm file1, git add file1) and finally you have to commit the changes by the command git commit.
- Removing the tmp branch:
> git branch -D tmp/v0.1
- Push everything, branches and tags into your server-side copy of the repository on GitHub:
> git push --all && git push --tags
- Update the EOP upstream:
The updated code as well as the created release is located on your server-side copy on GitHub. Before making these changes available from the EOP upstream we need to test it by getting Jenkins test both master and release in your server-side copy of EOP. Then we need to merge the changes into the upstream itself by doing a pull request:
- a pull request to merge from your master branch into the EOP upstream one
- a pull request to merge from your release branch into the EOP upstream one
Please not that a pull request does not include tags. To assign a tag to the created release in the EOP release branch you can use the GitHub web interface functionalities:
- Select releases from the menu bar on top of the GitHub web interface
- Press the Draft a new release button
- Choose the tag version (e.g. v1.1.0)
- Set Release title (e.g. Release 1.1.0)
- Set the branch where the code is: release
- Press the Publish release button
At the end of the procedure the new release should be available from the release branch whereas its generated maven artifacts should be available from the EOP maven repository: http://hlt-services4.fbk.eu:8080/artifactory/simple/releases/eu/excitementproject/ Note about the Release Numbering Policy can be found in: Release Numbering Policy whereas the following figures depict the main git operations of the proposed procedure:


Resources like WordNet and Wikipedia as well as the configuration files of the platform, the pre-trained models created training the platform on the data sets and the data sets themselves are distributed in a separated archive file that can be created with the procedure described in the rest of this section. However it should be noticed that the archive must contain internal/external libraries and resources whose licence is compatible with General Public License (GPL) version 3. Others whose licences are not compatible with this one will have to be downloaded and installed separately by users.
To create a new resources file we start from the resources file of the previous release version. Let us to call the version of the previous release previous-version in contrast to version that is the new version to be produced.
- Downloading it from the artifactory repository:
http://hlt-services4.fbk.eu:8080/artifactory/simple/private-internal/eu/excitementproject/eop-resources/eop-resources-{previous-version}.tar.gz
- From the directory where the file has been downloaded, unzip it:
> tar -xvzf eop-resources-{previous-version}.tar.gz
- Creating a copy of it:
> cp -r eop-resources-{previous-version} eop-resources-{version}
- Getting the new files from the GitHub repository:
git clone [email protected]:user_account/Excitement-Open-Platform.git
- Copying the files into the new eop-resources file:
> cp -r ....../Excitement-Open-Platform/core/src/main/resources/configuration-file/* ..../eop-resources-{version}/configuration-file/
-
Getting the script to change some paths in the configuration files The script is available from the artifactory repository: private-internal:eu/excitementproject/eop-resources/script/editConfigFiles.sh. To download it you can use the download Button available from artifactory.
-
Running the script to change the paths:
> ./editConfigFiles.sh -d eop-resources-{version} -p ......./eop-resources-{version}/configuration-file/
it substitutes all the occurrences of:
- .*resources (e.g. ../core/src/main/resources/) with eop-resources-{version}
- .*target (e.g. ./target/EN/dev/) with /tmp/ (e.g. ./tmp/EN/dev/).
BIUTEE_Environment is stored in the artifactory under version 0.0.0, which Bar-Ilan may update occasionally and independently, and that for each release, this version will be taken.
- Downloading the Environment from:
http://hlt-services4.fbk.eu:8080/artifactory/simple/private-internal/eu/excitementproject/biutee_env/0.0.0
- Unzip the archive file into eop-resources-{version}:
> unzip biutee_env-0.0.0.zip -d eop-resources-{version}
It will create a directory BIUTEE_Environment containing some subdirectories too (e.g. workdir).
Add new resources or update the existing ones
- Creating it:
> tar -cvzf eop-resources-{version}.tar.gz eop-resources-{version}
- Uploading it:
Use artifactory to upload it (from its main web page there is the Upload button to do that). The file shoud be stored in: private-internal:eu/excitementproject/eop-resources
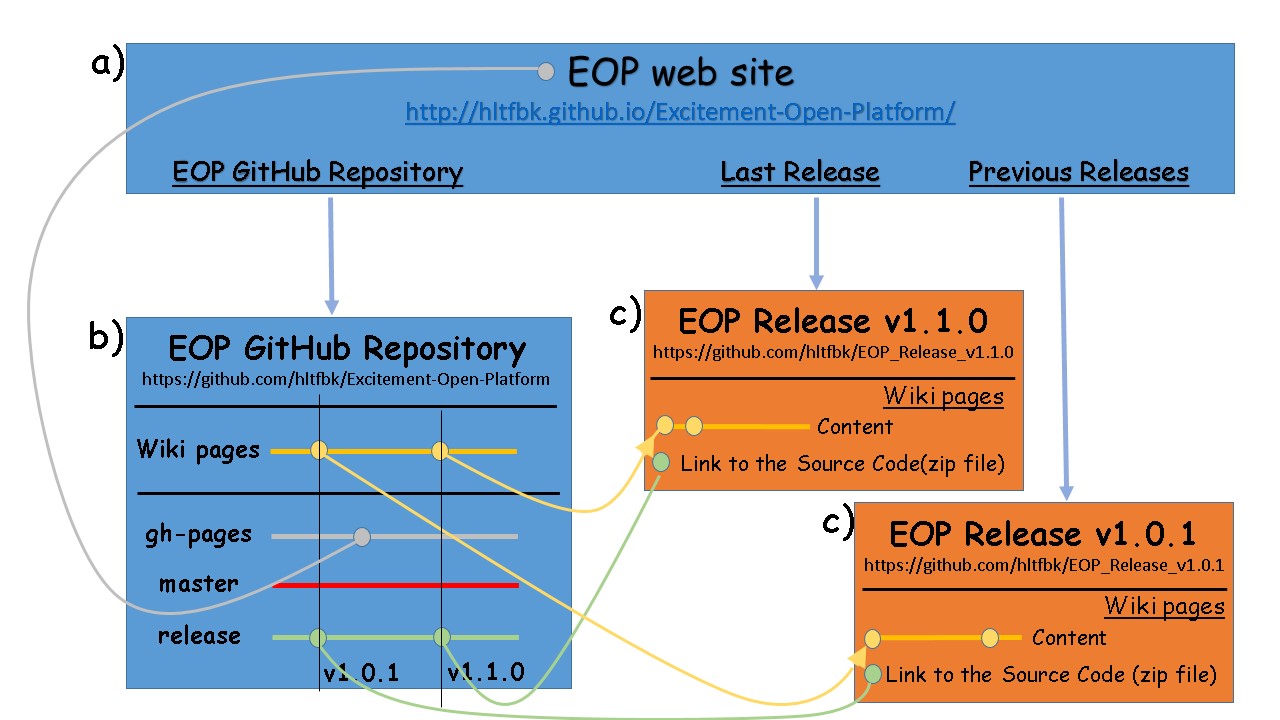
For each new release, after the creation of the code release, the release managers should also upgrade the EOP website. The EOP website consists of 1+N different web sites with N depending of the releases number. The first one (i.e http://hltfbk.github.io/Excitement-Open-Platform/) is the entry point containing the static information of the web site (e.g. the project description). Here for static information we mean something that we think doesn't change frequently. It is build by the GitHub Automatic Page Generator and is shared among the different N EOP releases. The other N web sites (i.e. https://github.com/hltfbk/EOP-1.0.2/wiki), a web site for each of the N releases, contain instead the documentation that belongs to the specific releases. They are created by the GitHub wikis new editor and they are reachable by a link from the entry point web site. The picture below reports such a structure and the mechanism we used to manage it:

EOP web site (a): We used the Automatic Page Generator available in GitHub to quickly create the EOP web site. This web site should contain general information about the EOP platform that is common to all the releases and that doesn’t change frequently (e.g. the project description) whereas it definitely contains the links to the EOP GitHub repository, the last EOP release and the previous ones. The EOP web site is available at: http://hltfbk.github.io/Excitement-Open-Platform/.
The following step were done to create this site. Please note that these steps do not need to be done each time a new release is created. That is because the EOP web site is shared among the different releases. We reported the procedure to create it to document the adopted procedure only.
- Go to the repository's settings page Page Generator Button
- Click the Automatic Page Generator button
- Author your content in the Markdown editor
- Click the Continue To Layouts button
- Preview your content in our themes
- Publish button
- When you find a theme that you like, click Publish
EOP GitHub repository (b): The EOP repository (i.e. https://github.com/hltfbk/Excitement-Open-Platform) is the GitHub repository containing:
- the code under developing; it is in the master branch.
- the releases; they are in the release branch.
- the EOP web site; it is in the gh-pages branch.
- the wiki pages documentation of the NEXT release.
EOP release repository (c): Each of the EOP releases is stored in a GitHub repository (i.e. a repository for each of the releases). Each repository contains the wiki pages of the documentation of that release as well as a link to the code of the release that is stored in the EOP GitHub central repository (b). The wiki pages are both readable and writable whereas no code is stored in the repository (i.e. only a link to the code).
A release of EOP consists of its code as well as its documentation. The wiki pages in the EOP GitHub central repository contain the documentation that has to be copied into the repository of the new release; after that the wiki pages in the EOP GitHub central repository are used to store the documentation of the next release (e.g. v1.1.1). These are the main steps to create the documentation of a new release:
-
Wiki pages review Before creating a release documentation the new created pages or those that have been changed (that is during the period of time from the last release and the new one) need to be reviewed. Looking for new pages or changed ones is easy given that they have been marked with a proper label on top of pages. In fact we adopt these labels to mark a page:
- [under development] --> developers have created or changed this page and they are still working on it
- [to be reviewed] --> the work on this page has been completed. Developers use this mark to let reviewers see that they can start reviewing it.
- [under reviewing] --> reviewers are reviewing it. Developers can't change it during this phase.
- [reviewed] --> the page has been reviewed. Comments and suggestions can be added by reviewers, e.g. [reviewed: this section is well written however subsection "How to prepare it" would need to make more explicit]. After that a page has been reviewed no other changes are possible. When all the pages have been reviewed (all of them have the label [reviewed] then we can move to the next step.
-
Create a new repository in GitHub (e.g. https://github.com/hltfbk/EOP-1.1.0) to store the documentation of the new release (e.g. v1.1.0).
-
Clone the wiki pages that are in the EOP GitHub central repository and copy them into the repository that has been created before
- Get a clone of the Wiki of the EOP GitHub central repository; move into the tmp directory (i.e. cd /tmp/) and run the following commands:
> mkdir Wiki-Pages-Project > cd Wiki-Pages-Project > git clone https://github.com/hltfbk/Excitement-Open-Platform.wiki.git- From the web page of the new GitHub repository, create a dummy Home.md Wiki page for (basically double click on the Wiki item)
- clone the Wiki of of the new repository
> git clone [email protected]:hltfbk/EOP-1.1.0.wiki.git- Remove unused pages and substitute the label 1.1.4 with the EOP release number (e.g. 1.1.0). To do that we have to download and compile the following Java code: http://hlt-services4.fbk.eu:8080/artifactory/repo/eu/excitementproject/eop-resources/script/Replace.java as well as downloading the file containing the list of the pages to be removed: http://hlt-services4.fbk.eu:8080/artifactory/repo/eu/excitementproject/eop-resources/script/pages_list.txt. Then we have to run the following command:
> java Replace ./Excitement-Open-Platform.wiki/ "\{_version_\}" 1.1.0 pages_list.txt- Copy all the Wiki pages of the EOP GitHub central repository into the new repository
> cp -r Excitement-Open-Platform.wiki/* EOP-1.1.0.wiki/- add and commit all files to the new repository
> cd EOP-1.1.0.wiki/ > git add . > git commit -m 'Wiki for EOP-1.1.0 release'- Finally push everything into the new repository
> git push -u origin master -
The Wiki pages in the new repository contains links to images that are in the gh-pages branch of the EOP GitHub central repository so that we need to copy that branch too.
- Get a clone of the EOP GitHub central repository
> cd Wiki-Pages-Project > git clone [email protected]:hltfbk/Excitement-Open-Platform.git- Push the gh-pages branch of the EOP GitHub central repository
> cd Excitement-Open-Platform
> git push [email protected]:hltfbk/EOP-1.1.0.git gh-pages
Please note that, when you do a fetch that brings down new remote branches (like gh-pages could be), you do not automatically have local, editable copies of them. In other words you do not have a new gh-pages branch; what you have is only an origin/gh-pages pointer that you cannot modify. If you want your own gh-pages branch that you can work with, you need base it off your remote branch. Before running the command listed above check if the gh-pages branch already exists:
> git branch -aIf you can see the remotes/origin/gh-pages branch but not the local gh-pages one you have to base it off:
> git checkout -b gh-pages origin/gh-pages -
Browse all the cloned wiki pages and remove the label [reviewed] on top of them.
-
Remove the development section from the menu on the right and add a new item containing a link to the EOP GitHub Central repository:
* [[EOP Central Repository | https://github.com/hltfbk/Excitement-Open-Platform]] -
Add a direct link (in the Download wiki page) to the code of this release that is in the EOP GitHub central repository.
-
Update the html pages of the EOP web site that are in the site directory in the EOP code to include a link to the repository of the new release.
Despite the test passing it could happen to find a bug after shipping a release. To address such bugs we create a maintenance branch off of release, fix the bugs by the needed commits. As soon as the fix is complete, it is merged into both release and master, and release is then tagged with an updated version number. For example suppose finding bug_15 in release 1.1.0:
> git checkout -b issue-#15 release
# Fix the bug, i.e. do the needed commits
> git checkout release
> git merge issue-#15
> git push origin release
> git tag -a 1.1.1 -m "v1.1.1" release
> git push origin --tags
Maintenance branch (i.e. issue-#15) contain important updates that need to be included in master, so we need to do that merge too. Finally we can remove the maintenance branch:
> git checkout master
> git merge issue-#15
> git push origin master
> git branch -d issue-#15
The updated code as well as the created release is located on your server-side copy on GitHub. Before making these changes available from the EOP upstream we need to merge the changes into the upstream itself by doing a pull request:
- a pull request to merge from your master branch into the EOP upstream one
- a pull request to merge from your release branch into the EOP upstream one
Please not that a pull request does not include tags. To assign a tag to the created release in the EOP release branch you can use the GitHub web interface functionalities:
- Select releases from the menu bar on top of the GitHub web interface
- Press the Draft a new release button
- Choose the tag version (e.g. v1.1.1)
- Set Release title (e.g. Release 1.1.1)
- Press the Publish release button
(K. Fogel, Producing Open Source Software: How to Run a Successful Free Software Project, 2011)
In each new release of a software project a number of previously reported bugs are fixed and on the other hand, a number of new bugs are introduced! Furthermore, new features and configuration options might be added. The purpose of release numbering is two-fold: the numbers should unambiguously communicate the ordering of releases (i.e. by looking at any two releases’ numbers, one can know which came later), but also they should indicate as compactly as possible the degree and nature of the changes in the release. Release numbers are groups of digits separated by dots: e.g. 5.0.1. While the dots are merely separators and not decimal points, some projects like the Linux Kernel Project have exceptionally treated them as decimals, leading to the sequence of releases like: 0.95, 0.96, ..., 0.99, 1.0, etc. However, the convention that the dots are not decimals is now firmly established and should be considered a standard. There is no limit to the number of components (digit portions containing no dots), but most projects do not go beyond three or four.
Most projects have rules about what kinds of changes are allowed into a release if one is only incrementing the micro number, different rules for the minor number, and still different ones for the major number. While there is no set standard for these rules yet, here is one policy which has been followed by a number of successful open source projects. This policy is adapted from the numbering system used by the APR project:
-
Changes to the micro number only (that is, changes within the same minor line) must be both forward- and backward-compatible. That is, the changes should be bug fixes only, or very small enhancements to existing features. New features should not be introduced in a micro release.
-
Changes to the minor number (that is, within the same major line) must be backward-compatible, but not necessarily forward-compatible. It’s normal to introduce new features in a minor release, but usually not too many new features at once.
-
Changes to the major number mark compatibility boundaries. A new major release can be forward- and backward-incompatible. A major release is expected to have new features, and may even have entire new feature sets.
Some projects like the Linux Kernel Project, use the parity of the minor number component to indicate the stability of the software: even means stable, odd means unstable. This applies only to the minor number, not the major and micro numbers. Increments in the micro number still indicate bug fixes (no new features), and increments in the major number still indicate big changes, new feature sets, etc.
In the EOP, we are also going to follow the same policies which are mentioned for the ARP and the Linux Kernel projects for our distribution release numbering.
- Licence
- Requirements
- Installation
- Quick Start
- Step by Step Tutorial
- Entailment Algorithms
- BIUTEE
- EDITS
- TIE
- Lexical Resources
- Configuration Files
- FAQ