-
Notifications
You must be signed in to change notification settings - Fork 0
RESTful API documentation and hypermedia
📑 Chapter summary
In this chapter, the students must modify their API to use hypermedia following REST principles and document their RESTful API. The minimum requirements are summarized in the Minimum Requirements section of the Project Work Assignment. Note that if you do not meet Minimum Requirements this section wont be evaluated.- Understand connectedness and/or hypermedia
- Write API documentation
You have two options:
- Implement the API using a non-hypermedia format (RESTful CRUD). In this case, it is recommended that all your resources are connected (linking to other resources). Anyhow, you cannot get full points in this section if you do not design your API using an hypermedia format
- Using an hypermedia format. Lots of examples provided in Exercise 3. You can get full points. In this case you need to clearly include in the documentation a profile with link relations and semantic descriptors.
✔️ Chapter evaluation (max 18 points)
You can get a maximum of 18 points after completing this section. More detailed evaluation is provided in the evaluation sheet in Lovelace.📑 Content that must be included in the section
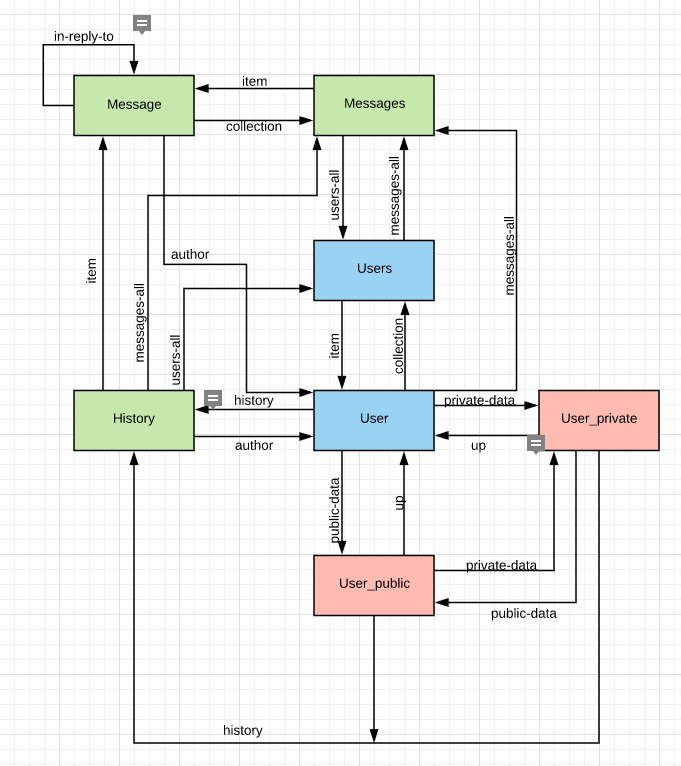
Include a state diagram of your application, with all the application states. Each resource must be an application state. Describe also the state transitions. To build this diagram you should reuse the diagram created in DL1. You can use online tools such as draw.io or lucidchart to create the diagrams. You have an example in the following image
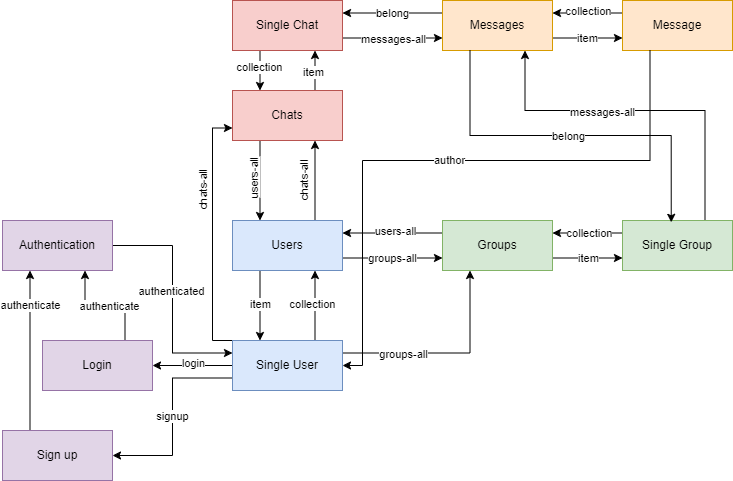
✏️ Draw here your state machine diagram

This state diagram outlines the flow of a chat application, user can login/register to authenticate. Users can access chats, groups, and from there can access messages.
💻 TODO: SOFTWARE TO DELIVER IN THIS SECTION
The code repository must contain:- The source code of the RESTful API incorporating hypermedia. The source coude should be documented using the same quality criteria in Deliverable 3. Please, remember to include original source if you have not written the code (even if you have used an AI).
- Necessary scripts to run your server
- The README.md file with all the information described in the Deliverable 3.
✏️ You do not need to write anything in this section, just complete the implementation.
💻 TODO: SOFTWARE TO DELIVER IN THIS SECTION
The code repository must contain:- The code to test your RESTful API (Functional test)
- The code of the test MUST be commented indicating what you are going to test in each test case.
- The test must include values that force error messages
- The external libraries that you have used
- We recommend to include a set of scripts to execute your tests.
- A database file or the necessary files and scripts to automatically populate your database.
- A README.md file containing:
- Dependencies (external libraries)
- Instructions on how to run the different tests for your application.
Remember that you MUST implement a functional testing suite. A detailed description of the input / output in the a REST client plugin.
In this section it is your responsibility that your API handles requests correctly. All of the supported methods for each resource should work. You also need to show that invalid requests are properly handled, and that the response codes are correct in each situation.
✏️ Most important part of this section is completing the implementation. Write down here a short reflection on the main errors you have solved thanks to the functional tests.
Functional testing has played an important role in enhancing the quality and reliability of our API. The main errors we have discovered thanks to the functional tests are:
- Missing fields provided by the api.
- Some fields of api are in the wrong format.
- The api doesn't update the database but still returns code 201.
📑 Content that must be included in this section. Fill this section if your API uses hypermedia
Declare your chosen mediatype, and provide your reasoning for choosing that mediatype. For each custom link relation defined in your API's namespace, explain why it was needed (i.e. why there wasn't a suitable relation in the IANA standard). Explain how Connectedness is achieved in your API.✏️ The chosen mediatype is application/json. This mediatype was chosen due to its simplicity and flexibility. And for our application it provides a human-readable format and it is very easy in debugging. It has many key benefits in our context, as it provides real-time communication through efficient data exchange due to JSON's lightweight nature and simplicity for real-time events. In addition, it provides flexbile data representation which we require in our application to represent complex nested structures such as messages with nested attachments. Also, it provides ways representation of dynamic data structures accommodating varying message types such as text, image and video. application/json also helped us in terms of ease of development and maintenance. Choosing application/json for our chatting API provides numerous advantages, including simplicity, efficiency, and wide compatibility. These benefits madfe application/json a practical and effective choice for developing and maintaining our chatting API.
Here is a list of custom link relations our API uses (that are not in the IANA standard): authenticate, authenticated, login, signup, users-all, chats-all, messages-all, belong, groups-all.
authenticate: is used to represent a link that provides a way to authenticate a user or client. This link relation is not part of the standard IANA link relations but is defined in our API to allow the client to perform authentication. It involves submitting credentials to obtain an authentication session.
authenticated: The "authenticated" link relation points to resources or endpoints that are available only to users who have successfully authenticated. It helps to guide clients on what actions or resources they can access once they are authenticated.
login: The "login" link relation points to a resource or endpoint where the client can perform the login operation. This involves sending a POST request with authentication details to obtain access.
signup: The "signup" custom link relation represents a link to an endpoint where users can register or create a new account. This custom link relation is manually defined to provide a clear way for clients to perform the signup action.
users-all: The "users-all" custom link relation in our hypermedia API is used to represent a link to an endpoint that provides access to a collection of all user resources within the application. This custom link relation is defined to provide a clear and explicit way for clients to retrieve the complete list of users.
chats-all:The "chats-all" custom link relation in our hypermedia API is used to represent a link to an endpoint that provides access to a collection of all chat resources within the application. This custom link relation is defined to provide a clear and explicit way for clients to retrieve the complete list of chats.
messages-all:The "messages-all" custom link relation in our hypermedia API is used to represent a link to an endpoint that provides access to a collection of all message resources within the application. This custom link relation is defined to provide a clear and explicit way for clients to retrieve the complete list of messages.
belong: The "belong" link relation points to a parent or container resource to which the current resource belongs. This is useful for indicating hierarchical structures or membership relationships within our API as in the case of messages belonging to a single chat. The "belong" custom link relation was chosen over the standard IANA "item" relation because "belong" indicates that a resource can be associated with multiple resources simultaneously. In contrast, "item" suggests that the resource is a part of or an item within a single parent resource.
group-all: The "group-all" custom link relation in our hypermedia API is used to represent a link to an endpoint that provides access to a collection of all group resources within the application. This custom link relation is defined to provide a clear and explicit way for clients to retrieve the complete list of groups.
Achieving Connectedness in our API:
Connectedness in our API is achieved through the thoughtful design of our hypermedia controls. Each resource representation includes links to related resources, enabling clients to navigate the API intuitively and discover resources dynamically. It is achieved in our API through Collection Navigation in which resources that belong to a resource representing a collection of resources structure include links enabling clients to navigate these links.
By implementing these hypermedia controls, our API ensures that clients can efficiently discover and interact with the resources they need, fostering a robust and flexible integration experience.
Additionally, if we examine the API map, we can view it as a well-defined pathway where a user must first go through either the login or signup process. Both paths converge at a common resource: authentication. Once authenticated, the client can navigate the API map through a series of well-defined link relations, ensuring seamless connectedness. Seamless connectedness is achieved by looking at the map as a series of phases: through initial pathways, convergence at authentication, and post-authentication navigation.
By implementing these well-defined link relations and ensuring each step in the process is clearly mapped out, the API provides connectedness. This ensures that clients can intuitively find and access the resources they need, improving both usability and efficiency.
📑 Content that must be included in the section
Use any of the tools presented in Exercise 3 to document the API.
For all resources you must cover:
- The possible HTTP methods exposed by this resource
- The headers in the request and responses
- The media type utilized (in the response Content-Type header). If you are utilizing your own media-type you must describe it in the section Own media type implementation.
- The format of the HTTP request body (just for PUT/POST), providing a clear example. If necessary, comment the example.
- The format of the HTTP response body, providing a clear example. If necessary, comment the example.
- The error conditions, status code and format of the error response, providing a clear example.
-
If you are using an hypermedia type you must provide the profile utilized, including:
- Link relations. Include methods and format of the requests if they are defined in the media type. Use as much as possible IANA defined relations.
- Semantic descriptors. If you utilize a descriptor used in some other profile (e.g. schema.org) provide the link.
- If you are extending other profiles, do not forget to link to the extended profile.
✏️ Put the link to your API documentation here
We ultilize Swagger module provided by Nest. This is how we install the package, you can read more here: https://docs.nestjs.com/openapi/introduction
npm install --save @nestjs/swaggerAfter running the backend code, you can access the API documentation via this link:
http://localhost:8080/docs/Here is how it looks:

| Task | Student | Estimated time |
|---|---|---|
| Draw state diagram and documenting | Hung | 4 hours |
| Swagger documentation | Toseef + Hung +Ahktar + Mazen | 10 hours |