Hospital Management System using MySQL, Php and Bootstrap
Video Demo : Hospital Management System - Youtube
Bootstrap is an open-source Javascript framework developed by the team at Twitter. It is a combination of HTML, CSS, and Javascript code designed to help build user interface components. Bootstrap was also programmed to support both HTML5 and CSS3.Also it is called Front-end-framework.
Bootstrap is a free collection of tools for creating a websites and web applications. It contains HTML and CSS-based design templates for typography, forms, buttons, navigation and other interface components, as well as optional JavaScript extensions.
Some Reasons for programmers preferred Bootstrap Framework:
1. Easy to get started
2. Great grid system
3. Base styling for most HTML elements(Typography,Code,Tables,Forms,Buttons,Images,Icons)
4. Extensive list of components
5. Bundled Javascript plugins
Following are the main advantage of Bootstrap:
• It is very easy to use. Anybody having basic knowledge of HTML and CSS can use Bootstrap.
• It facilitates users to develop a responsive website (can automatically adjust itself to look good on all devices, from smart phones to desktops etc.).
• It is compatible on most of browsers like Chrome, Firefox, Internet Explorer, Safari and Opera etc.
Scaffolding: Bootstrap provides a basic structure with Grid System, link styles, and background.
CSS: Bootstrap comes with the feature of global CSS settings, fundamental HTML elements style and an advanced grid system.
Components: Bootstrap contains a lot of reusable components built to provide iconography, dropdowns, navigation, alerts, pop-overs, and much more.
JavaScript Plugins: Bootstrap also contains a lot of custom jQuery plugins. You can easily include them all, or one by one.
Customize: Bootstrap components are customizable and you can customize Bootstrap's components, LESS variables, and jQuery plugins to get your own style.
As a front-end framework, Bootstrap has three primary files:
• bootstrap.js - which is a jQuery/JavaScript framework.
• bootstrap.css - which is a CSS framework
• glyphicons - which is a set of icon fonts
• PHP stands for Hypertext Preprocessor.
• PHP is an interpreted language, i.e., there is no need for compilation.
• PHP is a server-side scripting language.
• PHP is faster than other scripting languages, for example, ASP and JSP.
• PHP is open source and free.
• Short learning curve compared to other languages such as JSP, ASP etc.
• Large community document
• Most web hosting servers support PHP by default unlike other languages such as ASP that need IIS. This makes PHP a cost effective choice.
• PHP is regular updated to keep abreast with the latest technology trends.


• Other benefit that you get with PHP is that it’s a server side scripting language; this means you only need to install it on the server and client computers requesting for resources from the server do not need to have PHP installed; only a web browser would be enough.
• PHP has in-built support for working hand in hand with MySQL; this doesn’t mean you can’t use PHP with other database management systems. You can still use PHP with
    ◦ Postgres
    ◦ Oracle
    ◦ MS SQL Server
    ◦ ODBC etc.
• PHP is cross platform; this means you can deploy your application on a number of different operating systems such as windows, Linux, Mac OS etc.
MySQL is a fast, easy-to-use RDBMS being used for many small and big businesses. MySQL is developed, marketed and supported by MySQL AB, which is a Swedish company. MySQL is becoming so popular because of many good reasons

•      MySQL is a very powerful program in its own right. It handles a large subset of the functionality of the most expensive and powerful database packages.
•      MySQL uses a standard form of the well-known SQL data language.
•      MySQL works on many operating systems and with many languages including PHP, PERL, C, C++, JAVA, etc.
•      MySQL works very quickly and works well even with large data sets.
•      MySQL is very friendly to PHP, the most appreciated language for web development.
•      MySQL supports large databases, up to 50 million rows or more in a table. The default file size limit for a table is 4GB, but you can increase this (if your operating system can handle it) to a theoretical limit of 8 million terabytes (TB).
•      MySQL is customizable. The open-source GPL license allows programmers to modify the MySQL software to fit their own specific environments.
- XAMPP was installed on the Ubuntu 19.04 machine and APACHE2 Server and MySQL were initialized. And, files were built inside opt/lampp/htdocs/myhmsp
- Sublime Text 3.2 was used as a text editor.
- Google Chrome Version 77.0.3865.90 was used to run the project (localhost /myhmsp was used as the url).
XAMPP stands for Cross-Platform (X), Apache (A), MariaDB (M), PHP (P) and Perl (P). It is a simple, lightweight Apache distribution that makes it extremely easy for developers to create a local web server for testing and deployment purposes. Everything needed to set up a web server – server application (Apache), database (MariaDB), and scripting language (PHP) – is included in an extractable file. XAMPP is also cross-platform, which means it works equally well on Linux, Mac and Windows.
The XAMPP Control Panel allows you to manually start and stop Apache and MySQL. To start Apache or MySQL manually, click the ‘Start’ button under ‘Actions’.
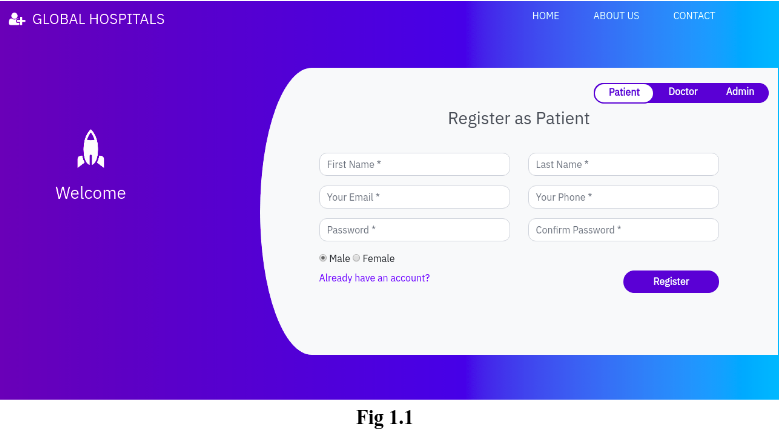
Hospital Management System in php and mysql. This system has a ‘Home’ page from where the patient, doctor & administrator can login into their accounts by toggling the tabs accordingly. Fig 1.1 shows the ‘Home’ page of our project.
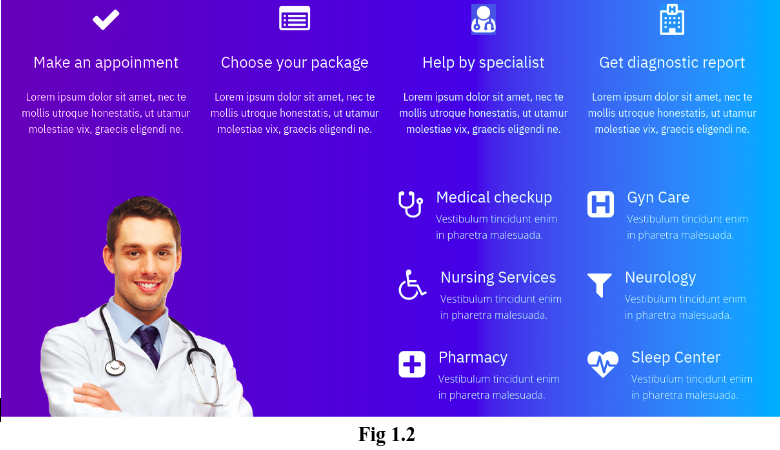
'About Us' page (Fig 1.2) allows us to get some more information about the quality and the services of the hospital.
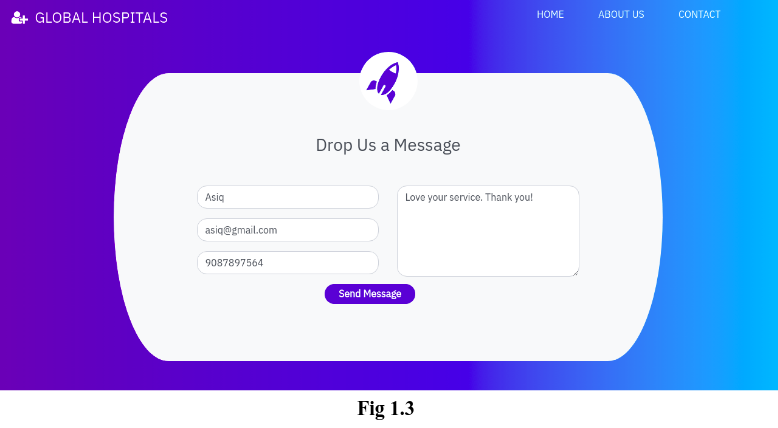
‘Contact’ page allows users to provide feedback or queries about the services of the hospital. Fig 1.3 shows the ‘Contact’ page.
The ‘Home’ page consists of 3 modules:
- Patient Module
- Doctor Module
- Admin Module
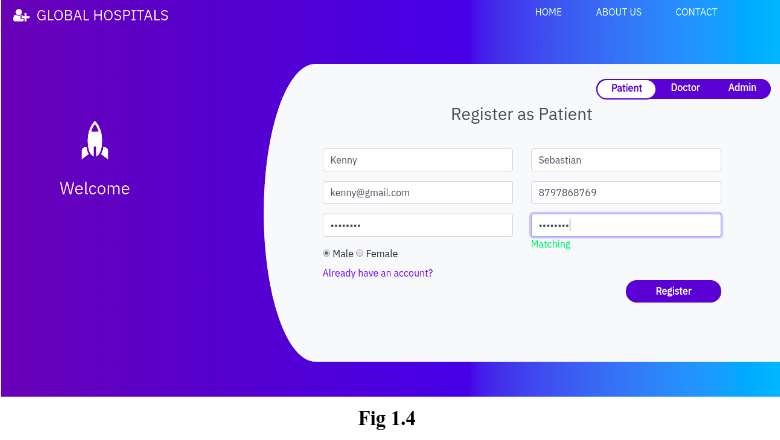
This module allows patients to create their account, book an appointment to see a doctor and see their appointment history. The registration page(in the home page itself) asks patients to enter their First Name, Last Name, Email ID, Contact Number, Password and radio buttons to select their gender.
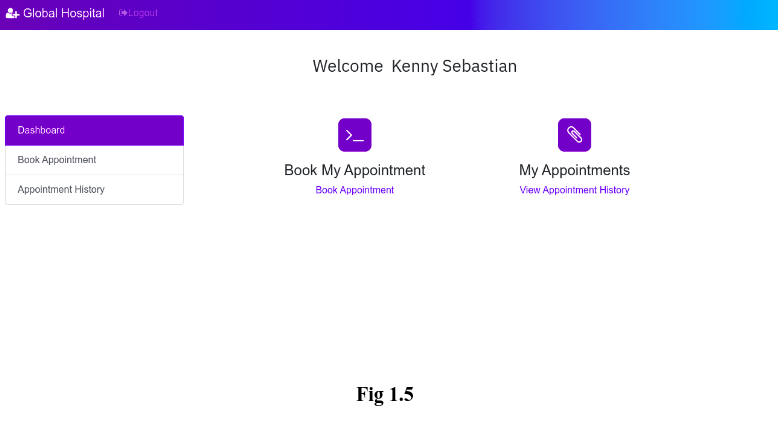
Once the patient has created his/her own account after clicking the ‘Register’ button, then he will be redirected to his/her Dashboard(Fig 1.5).
The Dashboard page allows patients to perform two operations:
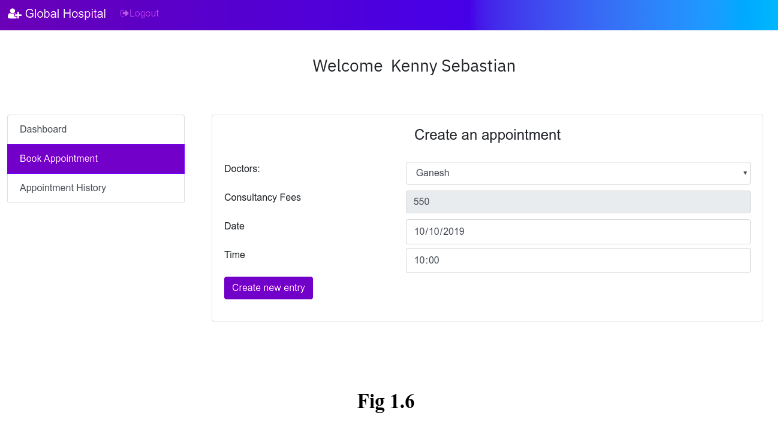
1. Book his/her appointment:
Here, the patients can able to book their appointments to see a doctor. The appointment form(Fig 1.6) requires patients to select the doctor that they want to see, Date and Time that they want to meet with the doctor. The consultancy fee will be shown accordingly to the patient as it was already determined by the doctor.
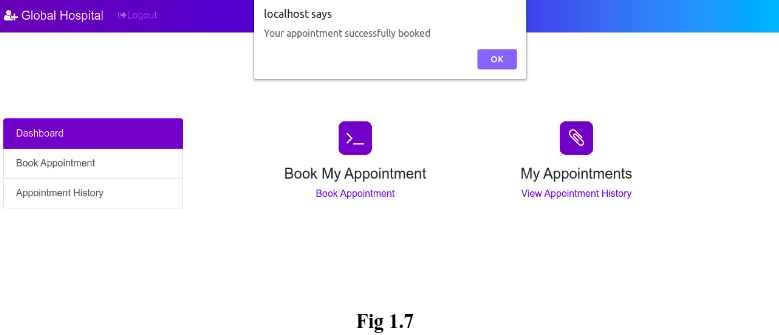
After clicking on the ‘Create new entry’ button, the patient will receive an alert that acknowledges the successful appointment of the patient.(See Fig 1.7)
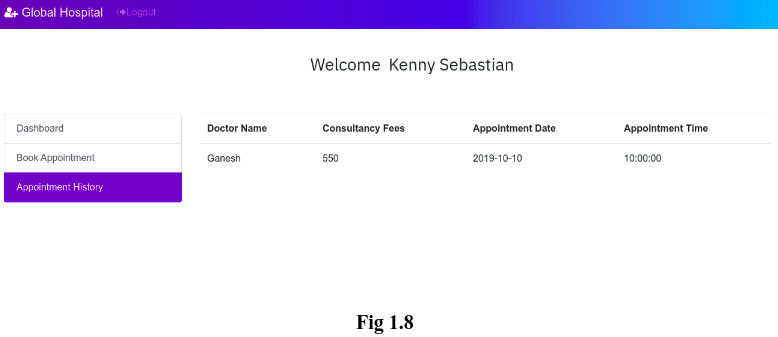
2. View patients’ Appointment History:
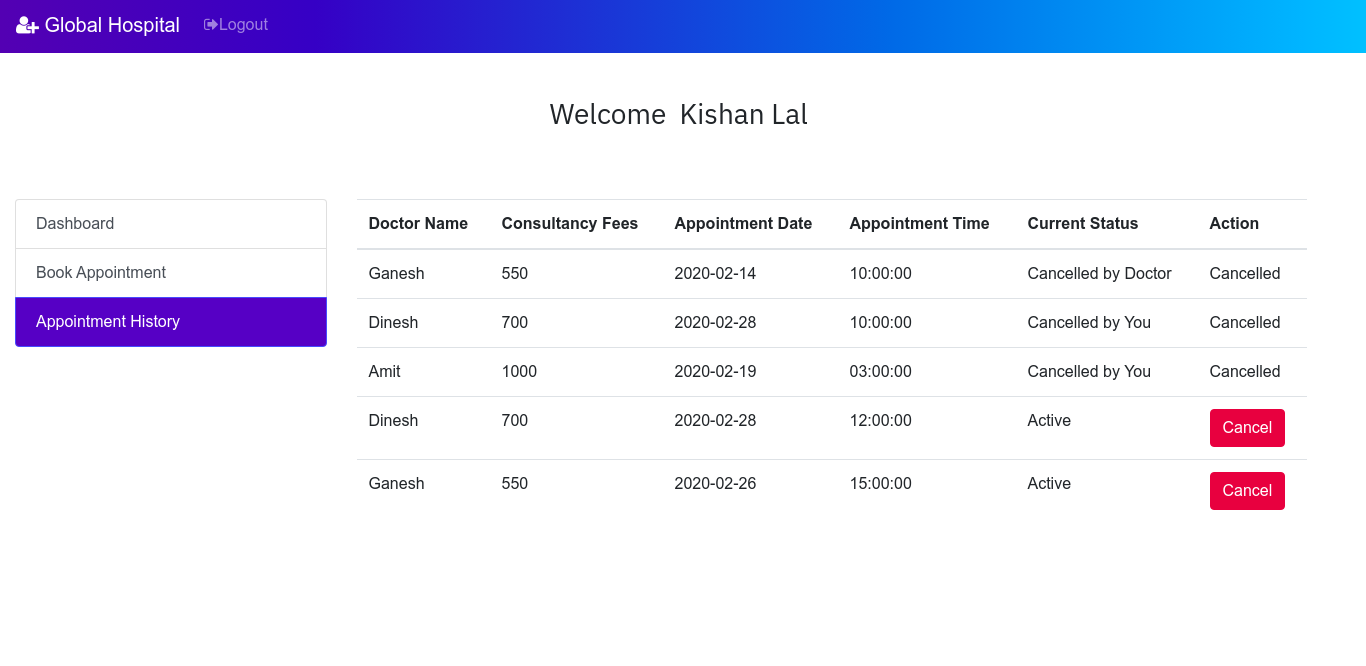
Here, the patient can see their appointment history which contains Doctor Name, Consultancy Fee, Appointment Date and Time.(See Fig 1.8).
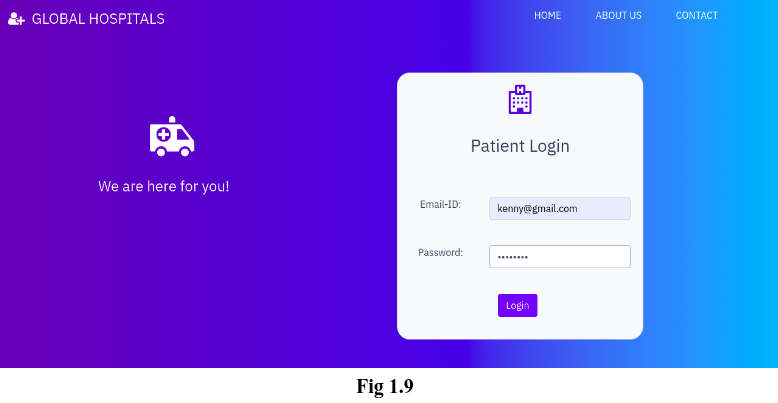
Once the patient has logged out of his account, if he wants to go into his account again, he can login his account, instead of register his account again. Fig 1.9 shows the login page. Clicking on ‘Login’ button will redirect the patient to his dashboard page which we have seen earlier (Fig 1.5)
This is how the patient module works. On the whole, this module allows patients to register their account or login their account(if he/she has one), book an appointment and view his/her appointment history.
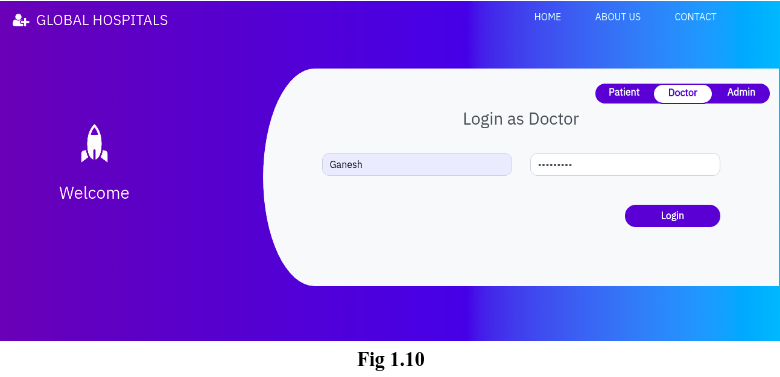
The doctors can login into their account which can be done by toggling the tab from ‘Patient’ to ‘Doctor’. Fig 1.10 shows the login form for a doctor. Registration of a doctor account can be done only by admin. We will discuss more about this in Admin Module.
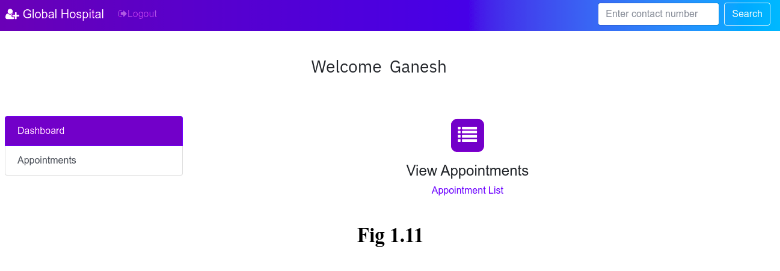
Once the doctor clicking the ‘Login’ button, they will be redirected to their own dashboard which is shown in Fig 1.11
In this page, doctor can able to see their appointments which has been booked by the patients. Fig 1.12 shows the appointment of the doctor ‘Ganesh’ which has been booked by the patient ‘Kenny Sebastian’ (Fig 1.6). This means that the doctor ‘Ganesh’ will have an appointment with the patient ‘Kenny Sebastian’ on 10-10-2019 10AM.
In real-time, the doctors will have thousands of appointments. It will be easier for a doctor to search for appointment in the case of more appointments. To make it easier, I have a ‘Search’ box in the navigation bar (See Fig 1.12) which allows doctors to search for a patient by their contact number. Once everything is done, the doctor can logout of their account. Thus, in general, a doctor can login into his/her account, view their appointments and search for a patient. This is all about Doctor Module.
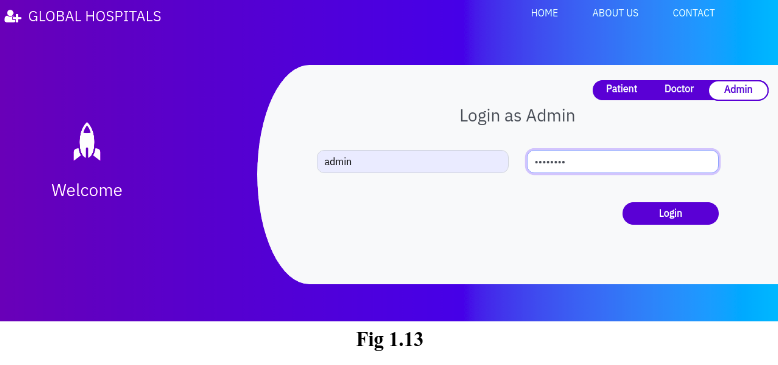
This module is the heart of our project where an admin can see the list of all patients. Doctors and appointments and the feedback/queries received from the ‘Contact’ page. Also admin can add doctor too. Login into admin account can be done by toggling into admin tab of the Home page. Fig 1.13 shows the login page for admin.
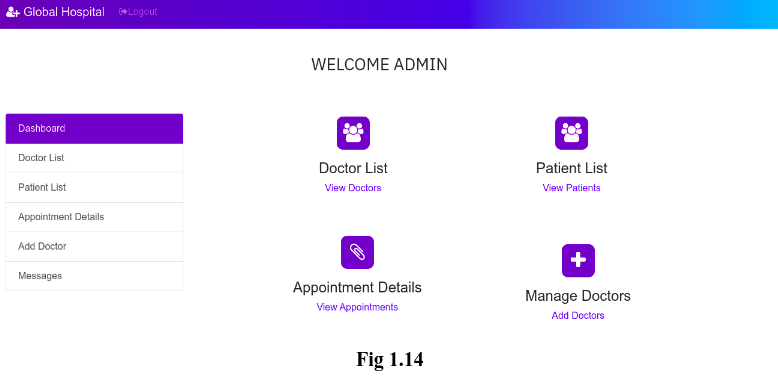
On clicking the ‘Login’ button, the admin will be redirected to his/her dashboard as shown in Fig 1.14.
This module allows admin to perform five major operations:
1. View the list of all patients registered:
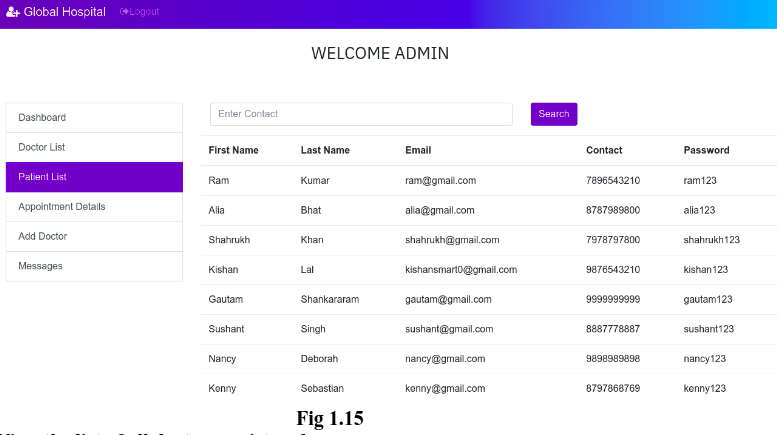
Admin can able to view all the patients registered. This includes the patients’ First Name, Last Name, Email ID, Contact Number and Password. (See Fig 1.15).As like in doctor module, admin can also search for a patient by their contact number in the search box.
2. View the list of all doctors registered:
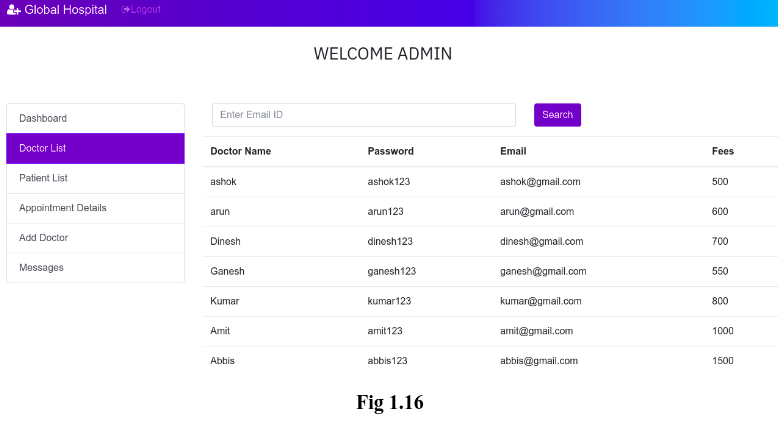
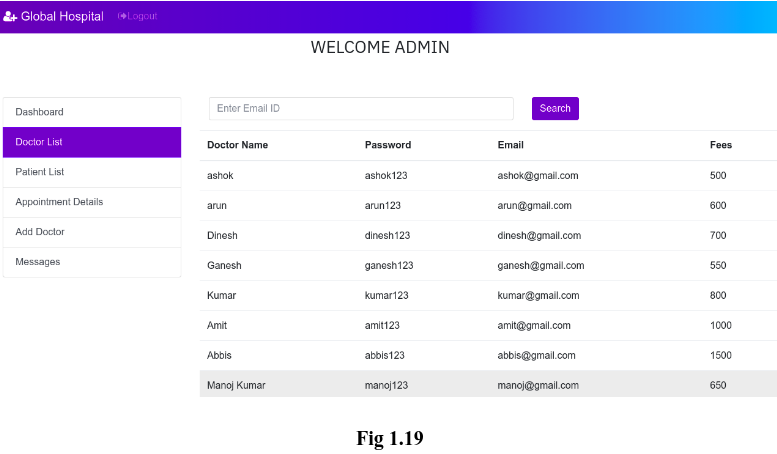
Details of the doctors can also be viewed by the admin. This details include the Name of the doctor, Password, Email and Consultancy fees, shown in Fig 1.16. Searching for a doctor can be done by using the doctor’s Email ID in the search box.
3. View the Appointment lists:
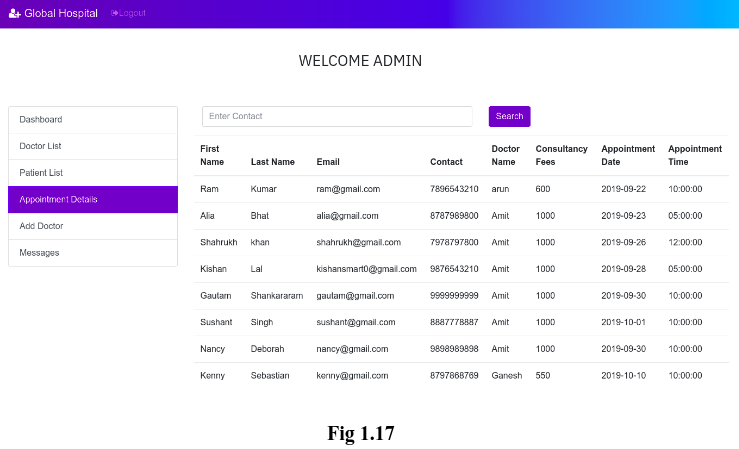
Admin can also able to see the entire details of the appointment that shows the appointment details of the patients with their respective doctors. This includes the First Name, Last Name, Email and Contact Number of patients, doctor’s name, Appointment Date, Time and the Consultancy Fees. (See Fig 1.17).
4. Add Doctor:
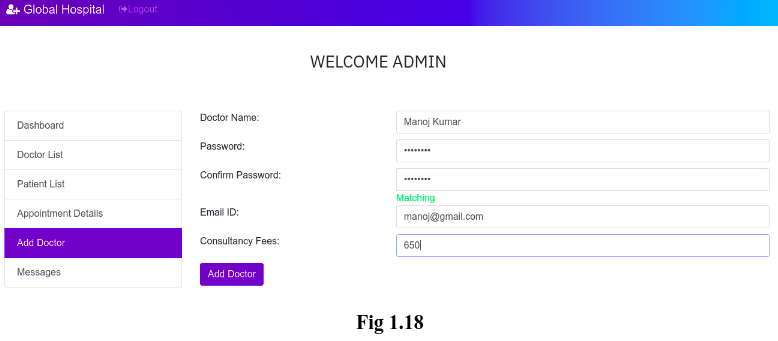
Admin alone can add a new doctor since anyone can register as a doctor if we put this section on the home page. This form asks Doctor’s Name, Email ID, Password and his/her Consultancy Fees.(See Fig 1.18)
After adding a new doctor, if we check the doctor’s list, we will see the details of new doctor is added to the list as shown in the Fig 1.19
5. View User’s feedback/Queries:
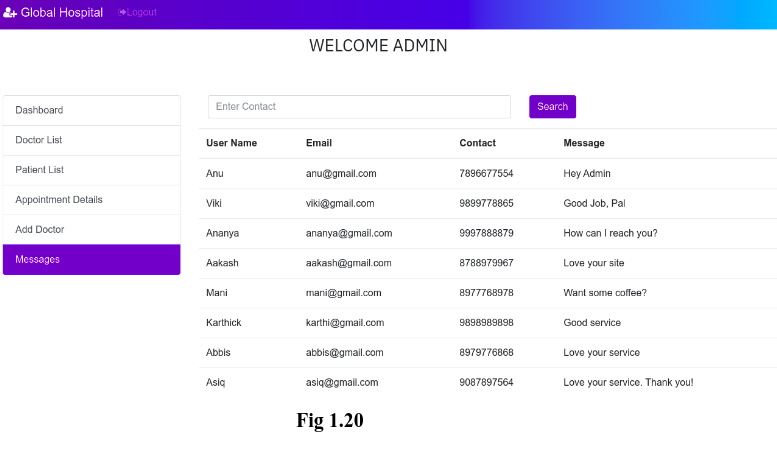
Admin is allowed to view the feedback/Query that has been given by the user in the ‘Contact’ page (Refer Fig 1.3). This includes User’s Name, Email Id, Contact Number and the message(Feedback/ Query) as shown in the Fig 1.20.
Taking everything into consideration, admin can able to view the details of patients and doctors, appointment details, Feedback by the user and can add a new doctor. Once everything is done, the admin can logout from his account.
Patients and doctors can able to delete their appointments.
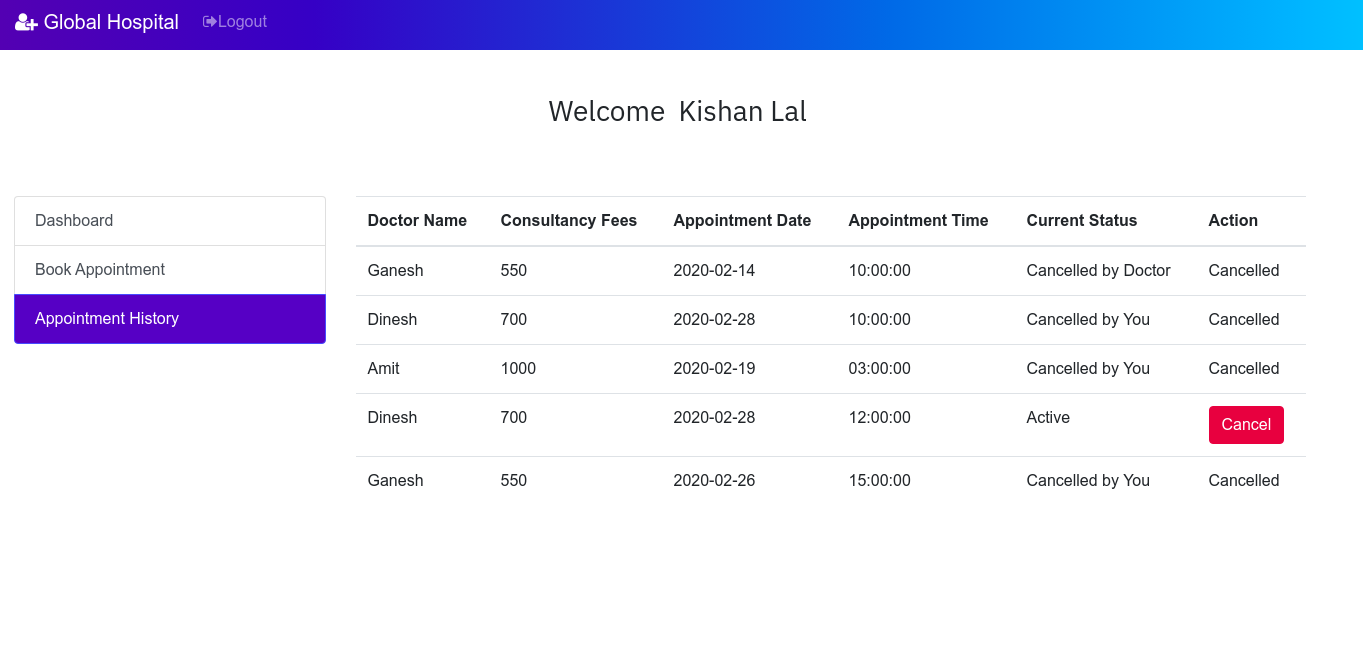
If the patient deletes the last record (for doctor Ganesh), then a label "deleted by you" will be displayed in the column 'Current Status' and the action will change to cancel state.
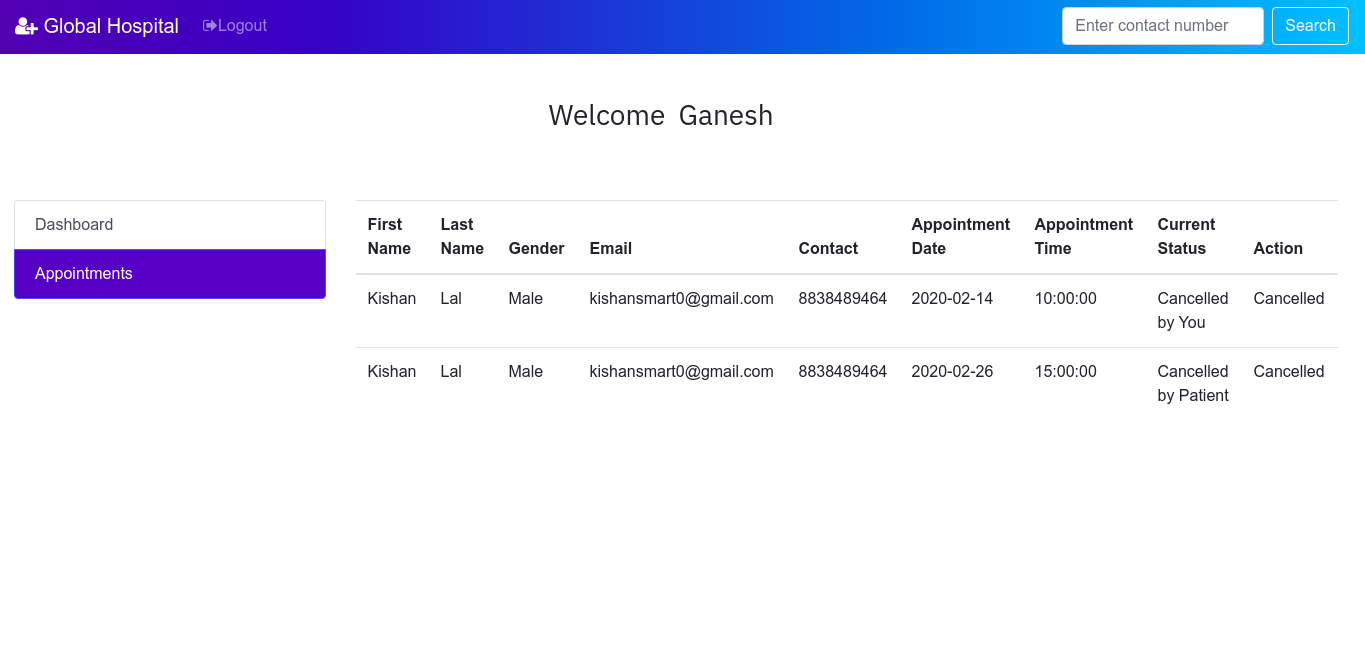
Now if we login to the doctor Ganesh's account and view his appointment details, then it will look like this:
Similarly doctors can also delete their appointments and patients can view their updated appointment details.
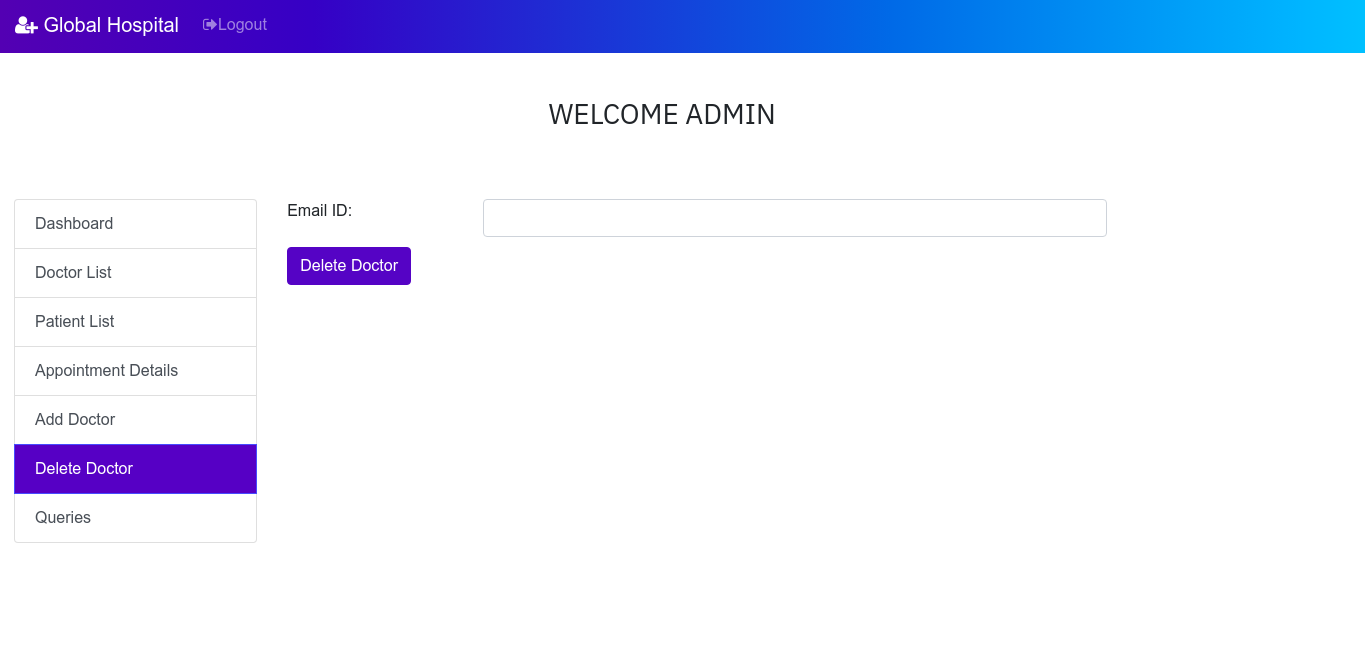
Admin can also delete the doctors from the system. This let admin to have more control over the system.

