-
Notifications
You must be signed in to change notification settings - Fork 0
Template Builder
One of the simplest ways to customize the system is to alter what information is presented to an applicant on an application form. Another simple way is to alter what data the applicant must provide when filling out an application form. Methods to do each of these are explained below.
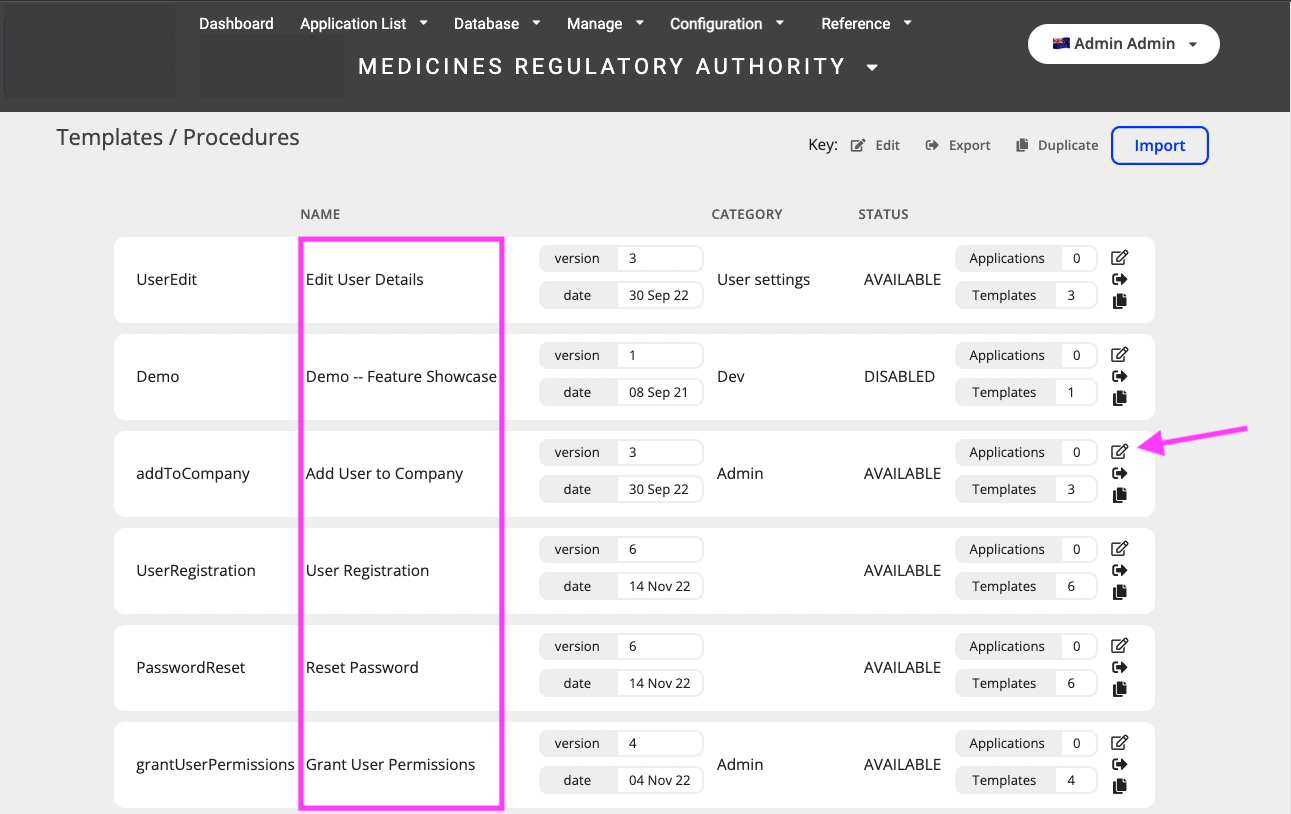
To find the Template Builder (visible only to Admin users), go to: Configurations > Templates/Procedures

Select the edit button for the Form Template you wish to edit. The names of the templates are highlighted in pink:

Note:
- Form Templates can only be altered if there are no existing applications for this template version.
- If applications exist for this version then first you must duplicate and then the copy of this Template can then be altered.
- To change a copy of the current template, click once on the row to see all versions
- Then click on the edit icon on the last version (In Draft) to edit!
When you open one Template to view and edit the landing page is the General. As you can see below following our example of editing "Add user to company" template.
Note: Form Templates must be in ‘DRAFT’ status before they can be edited.
Click the ‘Make Draft’ button in the config builder

In this tab is possible to change the status of this Template version to Make Available, Make Draft or Disable the application (for all end-users).
| option | template_column | optional | default | description |
|---|---|---|---|---|
| Name | name | no | - | Name of a single application displayed to users (in different areas of the App) |
| Name plural | name_plural | no | - | Name of the group of applications displayed to users (in different areas of the App) |
| Code | code | no | - | Reference to application type. In case a new code is created this template version will be displayd as a new template type! |
| Serial Pattern | serial_pattern | yes | ? | The pattern to be used when generating a new application - uses Generate Text String |
| Linear | is_linear | yes | true | Determine if user is blocked from moving to the next page before filling all required fields |
| Interactive | can_applicant_make_changes | yes | true | When this option is set to false it means no Reviewer can interact with Applicant, so option for "List of Questions" is hidden |
| Category | category | no | - | Used to group different template types in a category. The category visibility in areas of Conforma is also configurable |
| Filters | - | yes | - | Selectable filters to display to users applications grouped by action to take in Dashboard |
| Start Message | start_message | yes | Don't show | The start message display on a Optinal start page before creating the application. An Evaluator Expression for more complex messages or a simple string message is displayed as defined |
| Submission Message | submission_message | yes | - | The submission page always show after the application is submitted. An Evaluator Expression for more complex messages or a simple string message can be also displayed on the submission page - if defined |
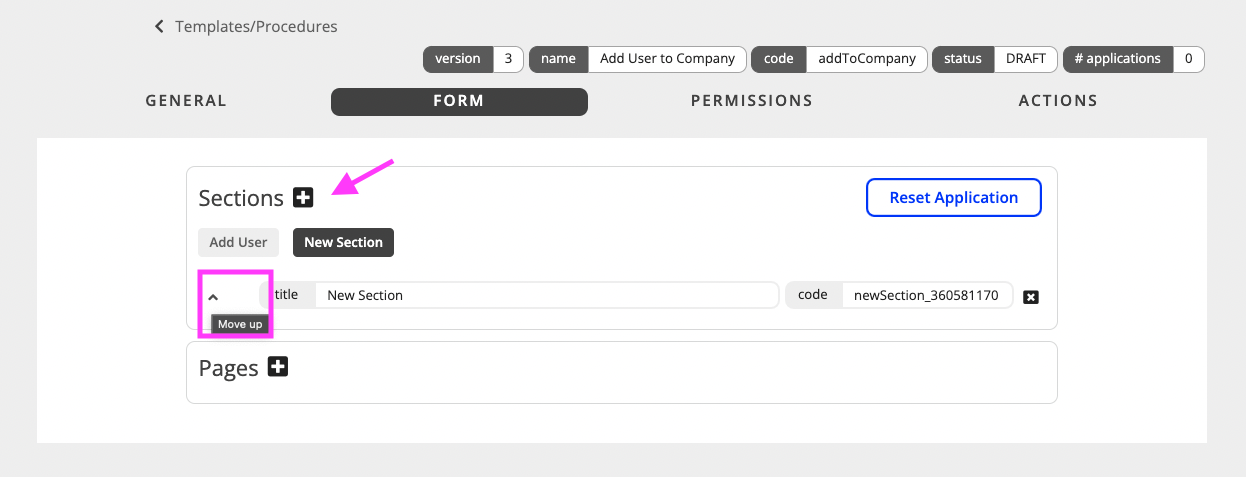
The second tab called Form is displaying the layout of the application similar to what applicant's see when filling the form. Here is where sections and fields are defined. There is specific configuration required for each field, please check the plugin documentation to understand more.
For new applications there will be already a section and one field created. It's possible to add new sections, delete or move them up or down on sections list. Sections also have code which are referenced, index (automatic and sequential) and title which is what is displayed to users on the progress side bar.


A section has to have at least one page. Pages are defined inside each section. It's possible to add, remove and move pages within a section and between sections.
Each field needs a unique code (per template) and which is used to reference this element in actions or other elements.
When adding a new field (using the Add Element button) it is defined using the most basic element type: Static text. There is a dropdown for selecting other plugins of element types currently available in the App. New plugins can be added for other element types.
Otherwise to view the configuration and edit an existing field click on the cog on the side of the element:

Primary defining the plugin type is required for a field. Other imporatant common properties are a title, code, category, is_reviewable, help_tip and validation_message. The description for each of the common fields is described in Template element fields specs.

Each plugin will have specific parameters to be passed on. These can be a simple string, number or have more elegant and complex logic, using the Evaluator Expression function. To use these a lot of expertise is required, we definitely recommend having TMF support while working on this area of the App.
There are compulsory and optional parameters depending on each Plugin, which are added to this fields in the Parameters area:

This area is used to define permissions for: Apply, Assign, View and Review applications of this type. Each permission is explained below.
Is simple to define permissions to Apply or View applications. Just select one existing permission from the dropdown to use an existing permission_name.
An Apply permission will allow applicants (that were granted this permission) to create a new applications.
And the View permission is meant to be for Supervisors of reviewers to view ALL submitted reviews related to applications of this template type.

The reviews configuration on the other hand, have many options available for procedures. In the example below we can see how it looks having just one review stage and a single level - meaning there is no consolidation involved. The user can start editing the current existing stage (or add a new stage) and:
-
Set the Assign permission to assign reviewers in that level/stage

-
Clicks on the plus button to add the new Level of review

-
Select the Review permission to be assigned to this level/stage

-
Then by clicking the add button next will add the new Review permission

Some of the Core-actions will be defined for every reviewable application, and don't show currently in this tab.
The Actions tab displays (and defines) any action behaviour that is specific to this application type that will run on the specified Trigger events. Please see Triggers & Actions for an explanation of how the trigger/action system works. Some common specific actions are: sendNotification, modifyRecord and addUserToOrganisation as showed in the example.

TODO - Add images
- Select the Form section in the config builder
- In here you will see the different Sections of the Form Template, select the one containing the element you wish to edit.
- In this particular Form Template there is only one Section, ‘Grant Permissions’
- Next, select the Page containing the element you wish to edit. In this case there is only one Page: You will now see a preview of the Form Template and its elements.
- Click the cog icon next to the element you wish to edit.
- A new screen will appear. This is where you can edit all the parameters that govern the appearance and behaviour of the element.
- To change the title expand the ‘Plugin specific parameters’ box by clicking on the down arrow:
- In the expanded box you will see a list of parameters. The parameter that governs the element’s label has the Parameter Name ‘label’.
- Expand this parameter by clicking on the down arrow:
- The value for the parameter is displayed in the box on the left. Changing this value will change how the element is displayed to the applicant.
- Make an alteration to the text.
- Scroll to the bottom of the page and click the ‘Save’ button.
- You will now see that the Form Template preview is displaying the changes made to the element:
- The final task is to set the Form Template to ‘AVAILABLE’ so that the applicant can see the newly updated application form.
- Go back to the ‘General’ tab and select the ‘Make Available’ button: The Form Template has now been updated and any applications that the applicant starts will show the updated changes made to the form element.

Powered by mSupply