-
Notifications
You must be signed in to change notification settings - Fork 2
quickstart
Jeff Beman edited this page Dec 12, 2023
·
8 revisions
- Lay the display face down on a smooth surface.
- Snap the two feet onto the bottom of the display, one foot on the left and the other on the right. Make sure the display corners are set all the way inside each foot—there should be no gaps between the display face corner and foot insets.
- Set the ON/OFF switch to the “OFF” position. Note the ON/OFF switch is found on the back of the display behind digit 3.
- Remove the power supply from its package and plug the USB-C cable into the female receptacle found just above the right foot behind digit 3.
- Plug the power supply into a ~120v wall outlet.
- Turn on the power supply and verify the RED and GREEN LEDs are lit. The LEDs are located on the back of the face next to the ON/OFF switch.
- Turn the ON/OFF switch to the “ON” position.
- Set the display upright on its feet.
- Open your default web browser from your phone, laptop, or desktop WIFI enabled device.
- Open your device WIFI settings and locate the list of WIFI networks.
- Connect to the “clock” SSID with “12oclock” as the password.
- Return to your open web browser and type 192.168.4.1 into the address bar and hit enter.
- The Admin page should appear in your browser.
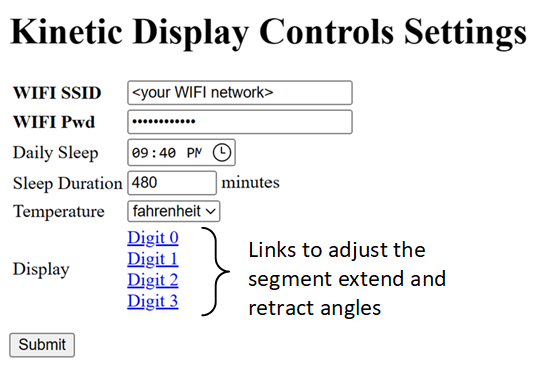
This page connects the display to your WIFI network. Note that your display will not work until you successfully provide a valid SSID and Password to your WIFI network and select the “Submit” button.

Following the diagram above:
- Provide your WIFI network name and password in the text fields “WIFI SSID” and “WIFI Pwd”. Avoid using the built-in “clock” SSID as your home WIFI network.
- Optionally set the “Daily Sleep” field with a new time for the clock to go to sleep.
- Optionally change the default the “Sleep Duration” field with the number of minutes the display will sleep each day. For example, if you set the daily sleep time to 8:30 PM with 600 minutes of sleep (10 hour * 60 minutes), the display will show 8:29 PM then retract all its segments before reaching 8:30 PM. At 6:00 AM the following day the display will wake up and start its display with 6:00 AM.
- Optionally set the “Temperature” dropdown to Fahrenheit or Celsius. The default is Fahrenheit.
- Skip the “Display” settings for digits 0-3. See the instructions on Segment Retract and Extend Adjustments that detail how settings are used to fine tune the distance each segment extends or retracts.
- Select the “submit” button to complete your settings as follows,

- The LEDs in the back of the display will turn on and off in the following sequence:
| Seq | LED | Action | Duration |
|---|---|---|---|
| 1 | Red | Connecting to your WIFI network. | 5 seconds. If the LED continues to switch on for 5 seconds, turn off, then back on for 5 seconds then your WIFI password or SSID may be incorrect. Set the ON/OFF switch to “OFF” then turn off and on the power supply and try again. |
| 2 | Green | Connecting to your WIFI network and obtaining its regional location and sync to the local time from the internet. | 5 seconds. If the LED continues to remain green longer than 5 seconds, then your WIFI network may be slow or not have internet connectivity. Set the ON/OFF switch to “OFF” then turn off and on the power supply and try again. |
| 3 | Blue | Reading its DHT11 temperature and humidity sensor to obtain the interior temperature and humidity. | 1 second. If the LED turns on/off 5 times then the sensor may be disconnected or may be faulty. Check the connection under the controller PCB. Note it is rare for the DHT11 sensor to be disconnected or faulty. |
| 4 | Green | Obtaining its longitude and latitude then connect to a local weather station to internally store the outdoor temperature and humidity. | 5 seconds. If the LED continues to remain green longer than 5 seconds, then your WIFI network may be slow or not have internet connectivity. Set the ON/OFF switch to “OFF” then turn off and on the power supply and try again. |