Streaming MySQL Database Activity to AWS Kinesis
Contents Introduction 1 Project Goals 2 Implementation 2 Building and Installation in AWS EC2 3 How to Build EC2 Instance and view it remotely 3 How to setup MySQL 4 How install the SDK’s and all tools needed to run program 4 How to link SDK Libraries 4 How to install/uninstall the plugin in MySQL 5 How to view stream console activity 5 How to fix errors in MySQL 6 How to Demo 6 Summary of Functional Requirements 9 Primary Constraints 9 Maintenance 10 References 10
Introduction
Connecting Amazon RDS MySQL engine with AWS Kinesis is a feature that RDS customers have often requested. A good example indicating customer demand is demonstrated on AWS’ forum post at https://forums.aws.amazon.com/thread.jspa?messageID=697516. Upon completion, this project enables Amazon RDS to pick up the MySQL open source project, integrate the MySQL plugin with Amazon RDS MySQL and deliver this feature to Amazon RDS MySQL customers. Other open source engine projects can follow and build upon my project. Amazon Aurora delivered similar capability to the project. See details at https://aws.amazon.com/about-aws/whats-new/2016/10/amazon-aurora-new-features-aws-lambda-integration-and-data-load-from-amazon-s3-to-aurora-tables/
Project Goals
The goal of this project is to create and implement a plugin to stream all MySQL database server activity to AWS Kinesis. The plugin should be written in a C or C++ language to be compatible with MySQL. Since the plugin was built using the MySQL plugin SDK, it can be reused in other MySQL compatible databases such as Maria DB.
Implementation
After reviewing the MySQL architecture and SDK, my approach was to use the MySQL Plugin Architecture Model, described in the mysql_declare_plugin structure, specified in the MySQL native plugin.h file (https://dev.mysql.com/doc/dev/mysql-server/8.0.0/plugin_8h_source.html) MySQL has many community inspired plugins that have a template that can be added to any C++ (or C) program. The specific plugin that monitors server activity is the audit-query plugin, referred from here simply as audit plugin. The audit plugin has functions to monitor server activity and reports these activities to a local file. My project design centered on taking the activities stored in local files and instead have them streamed to the AWS cloud ecosystem. The AWS Kinesis service can be used by MySQL customers to do detailed analytics of these MySQL Server activities. Since the MySQL audit plugin satisfied the basic needs of getting server activity in real time, I chose to build upon it. A key benefit of using the MySQL audit plugin is the fact that not only it has access to the database server queries and activities in real time, it also acts as an event handler. This code leverages this model to intercept every activity and send this information to the AWS Kinesis. As a next step, this project can be enhanced with additional features including the ability to notify users when a certain type of queries or activities could be harmful to the MySQL database. For example, notifying the admin user when database users are deleting or uninstall a MySQL plugin. The AWS Kinesis service allows their client services, once it hears such notify events, to output alerts via email. See details at https://aws.amazon.com/kinesis/data-analytics/, AWS Kinesis service provides notification service as an out-of-the-box feature. As such, MySQL admin users do not have to subscribe to additional email notification services. AWS Kinesis can automatically enable this feature using custom AWS Lambda functions that integrate with the rest of the AWS ecosystem.
One important thing to note is that using MySQL audit plugin templates is quite like the inheritance model in JAVA. The only difference is that you can only integrate one plugin template at a time. So, as an example, if I create a plugin that monitors server activity and parses full text, this would not be allowed. Adding more features to a plugin is still possible using external SDKs such as the AWS SDK. Using the AWS SDK in conjunction with MySQL audit functions allow MySQL Server activity information to be moved to another destination. Building and Installation in AWS EC2
How to Build EC2 Instance
The first step required to build an EC2 instance is to create an account for AWS Console. After creating the account, the developer needs to log in to the console and click on the hyperlink for EC2. You can find EC2 under the ‘Compute’ link. Then, click on ‘Instances’ and ‘Launch Instance.’ The developer needs to follow the instructions and pick the free tier instance (e.g., t2.micro). After the instance is created, the developer needs to click on the ‘Connect’ button and follow the instructions to grab the PEM files and on the instructions on how to SSH into the specific EC2 instance just created.
How to setup MySQL
To setup MySQL properly for a plugin, a developer needs to download the community edition of MySQL version 5.7.20. It is very important to download this specific version because it has the proper support necessary for the audit plugin. Once the download is complete, navigate to the My.cnf file (located in the /etc/ directory) and add a location for binary log. A binary location can be added by using the following code right below the ‘mySQL’ line in the My.cnf file: “log_bin =/var/log/mysql/bin/mysql-bin.log” and also “log_error = /var/log/mysql/error.log.” These commands set up the binary and error logs which are helpful for debugging MySQL errors. When a user creates a plugin and adds it to MySQL, it is easy to crash the MySQL server system accidentally. A developer can quickly learn what went wrong with their plugin by using the error log.
How to install the SDK’s and all tools needed to run program
The following tools are needed by a developer to build and run my program: • AWS SDK (make individual library then sudo make install), • CMake, • BoostLibrary (building mysql similar to java vast library for C++), • Curl Library (to install the SDK's), and • gnu gcc (development environment) The tools needed to install libraries is different depending on what Linux environment is being used. If using Ubuntu, just type generic, as an example, “sudo apt-get install CMake.”
How to link SDK Libraries
The steps to link the AWS SDK library are already done in the CMakeLists.txt file below. There are 3 CMakeLists files. The first is in the main folder of MySQL directory, the second one is in the plugin folder under the MySQL directory, and the third one in the AWS SDK directory. Before running these CMAKE commands, the developer needs to make sure VNC is disabled if using a t2.micro instance. Disabling the VNC is needed because it consumes a significant amount of RAM. Since t2,micro does not have a large RAM; the CMAKE commands will not work. The first step needed to generate the AWS SDK libraries is done by calling CMake in the AWS SDK main folder. Since dynamic libraries do not link properly with MySQL, the developer needs to generate a ‘.a’ file which represents a static library in Linux. Run the command” cmake -DBUILD_SHARED_LIBS=OFF -DBUILD_ONLY="kinesis"”. Doing so builds the kinesis folder. The developer needs to go into that folder and type “sudo make install”l. This command will generate the ‘.a’ static library file for AWS Kinesis. After this is done, go back to the main directory of AWS SDK and rerun the command “cmake -DBUILD_SHARED_LIBS=OFF -DBUILD_ONLY="core"”. The next step is to run the “sudo make install” command in the core library, then move both generated “.a” files to the plugin folder in the MySQL Server. It is important to build the core and AWS Kinesis libraries separately because there is not enough RAM in the t2.micro instance. This project only uses the Kinesis and core libraries. If you want to add more features like talk to Simple Storage Service (S3), you would need to add the S3 libraries and follow same steps for building the AWS Kinesis and core libraries above. At this point, it is time to build the make file for C++ plugin. The command must run from within the main folder for MySQL server , i.e. “cmake -DDOWNLOAD_BOOST=1 -DWITH_BOOST=/home/ubuntu/Desktop/mysql-server/boost/boost_1_59_0/”.This command generates a CMakeLists.txt file and make file in all the plugin folders under MySQL. The developer needs to edit the CMakeLists.txt file to match mine shown in the Code section below Once the cmake command has been completed, and the files are edited, it is time to run the makefile to generate the shared object. If everything is written properly, this should generate a shared object. Note that cmake command needs the boost libraries. These libraries are basic standard and important for C++ libraries and are very similar to standard API for Java.
How to install/uninstall the plugin in MySQL
The plugin which is generated as a shared object, (.so) for Windows, would be a “.dll” object. In my case the plugin name that was installed into MySQL was Binary_Stream.so. This shared object must first be moved into the MySQL server plugin directory, and it must be found at location “/usr/lib/mysql/plugin”. This plugin directory will be in a different location then what was made to generate the shared object. After moving the shared object to the correct location, it is time to login to MySQL. To do this, type “mysql -u root –p” type in the password and the shell will pop up. To install the plugin into MySQL, type the following command into the MySQL shell: “INSTALL PLUGIN Binary_Log_Streamer SONAME 'Binary_Stream.so';”. An important way to check if the plugin has been installed correctly is by running the command “show plugins;”. This command shows what plugins are active on a local MySQL system. To uninstall the plugin, use the command: “UNINSTALL PLUGIN Binary_Log_Streamer;”.
How to view stream console activity
The first step in viewing stream console activity is to install some terminal for Windows. If you have a Mac computer, then you can ignore this since there is a terminal already installed in it.
Once that has been installed, a developer needs to download from Amazon the Command Line Interface tool which then needs to be linked to an AWS account through the terminal. The developer needs to know some important information such as the AWS Access Key and the secret access key. To set up enter “aws configure” and provide the required information.
After that is all filled out, a developer needs to get the shard-id of the stream that was created by the program using the command “aws kinesis get-shard-iterator --shard-id shardId-000000000000 --shard-iterator-type TRIM_HORIZON --stream-name Foo”. The Stream name is defined globally in the CPP file below and can be changed to any name desired. In this example, the stream name is “Foo,” and it can be changed in the code. This last command outputs a shard-id that must be used within a couple of minutes, or it expires, i.e., issue the command “aws kinesis get-records --shard-iterator ”. To properly view the content in the stream console, it is helpful to have a base64 decoder to interpret the binary data being passed (check out the references base64decode link used the project source code).
How to fix errors in MySQL
When errors arise such as “cannot connect to mysql” it is a good idea for a developer to reinitialize MySQL, see the script in the source code below, as a way to remove the files. Run “sh reinitMysql.sh”.This cleans out the MySQL data directory. Next, switch to root user by typing “sudo su” (works in Ubuntu only). Run the following command under the Linux root shell “/usr/bin/mysqld –initialize-insecure –user=mysql”. This reinitializes MySQL for the user and is completed if you type ‘exit’ to switch out of root user.
Once out of root user, restart MySQL using the command “sudo service mysql start”. Because no password has been created for the root user type the command “mysql -u root –skip-password” which logs into MySQL. There the developer should then reset the password. Once inside MySQL type the command “alter user ‘root’@’localhost’ identified by ‘’;”. Once this has been completed, quit MySQL and login with the password just created. How to Demo
Login to the EC2 instance. There must be a ‘.pem’ file of a SSH info. I labeled it “SeniorProject.pem” and run a command similar to this to tunnel into EC2.
Navigate to the folder where the C++ files reside and make sure all the static library are installed in this folder (see below).
If there is a Shared object already and an attempt is made to make it, it will not generate a new one so make sure to remove the old shared object. The Binary_Stream.so needs to be moved to the MySQL plugin directory, which should be the same location on any Linux system. The command to login to MySQL is: “mysql -u root -p ” and a user does not need to type a password until prompted.
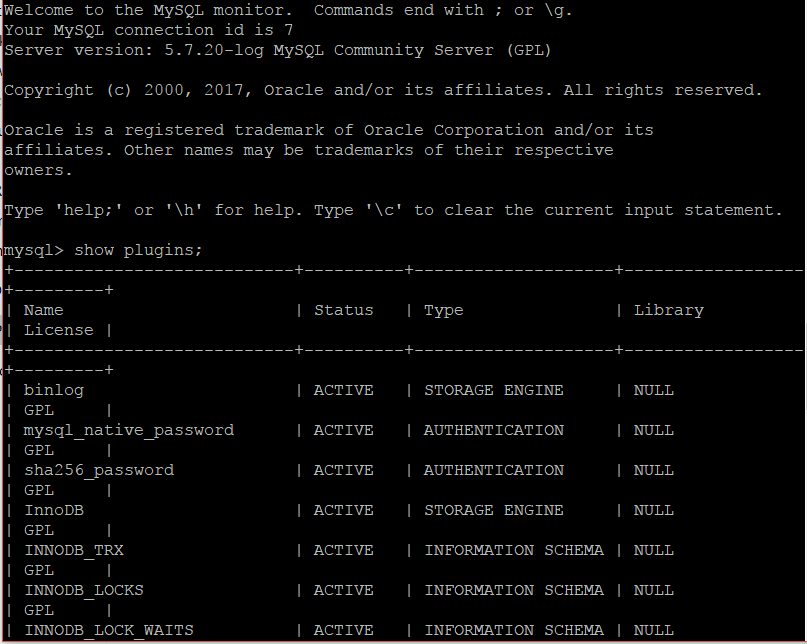
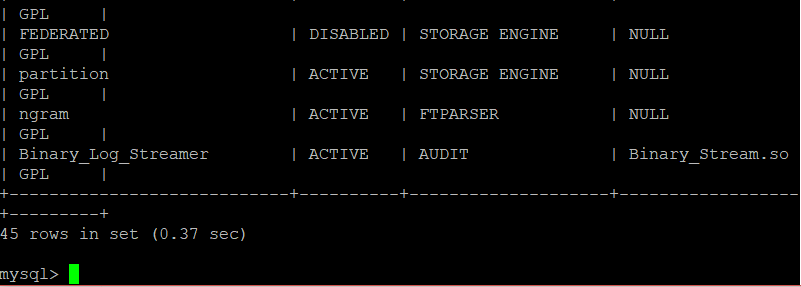
In the image above, there is a shared object called ‘server_audit.so’. It is very important not to have this shared object installed at the same time as the plugin, or it can create a race condition which would make both shared objects not work. Once a developer has logged into MySQL they need to check what plugins are active. As per below image, I have the plugin already active. You can check using the “show plugins;” command. To install the plugin, run the command shown in Figure 1 Show Plugins Result Part 1.
Figure 1 Show Plugins Result Part 1
…
Figure 2 Show Plugins Result Part 2
This plugin below stores server activity information in the AWS Kinesis for a single day because the account used is on the AWS free tier. Nevertheless, now that the plugin is installed the developer can type any command they want. This information is streamed to the stream name the code created. In this case, the stream name is BinLogStream32. Go back to the terminal on the local machine and run some AWS CLI command tools. First, grab the shard-id with the command in the picture below.
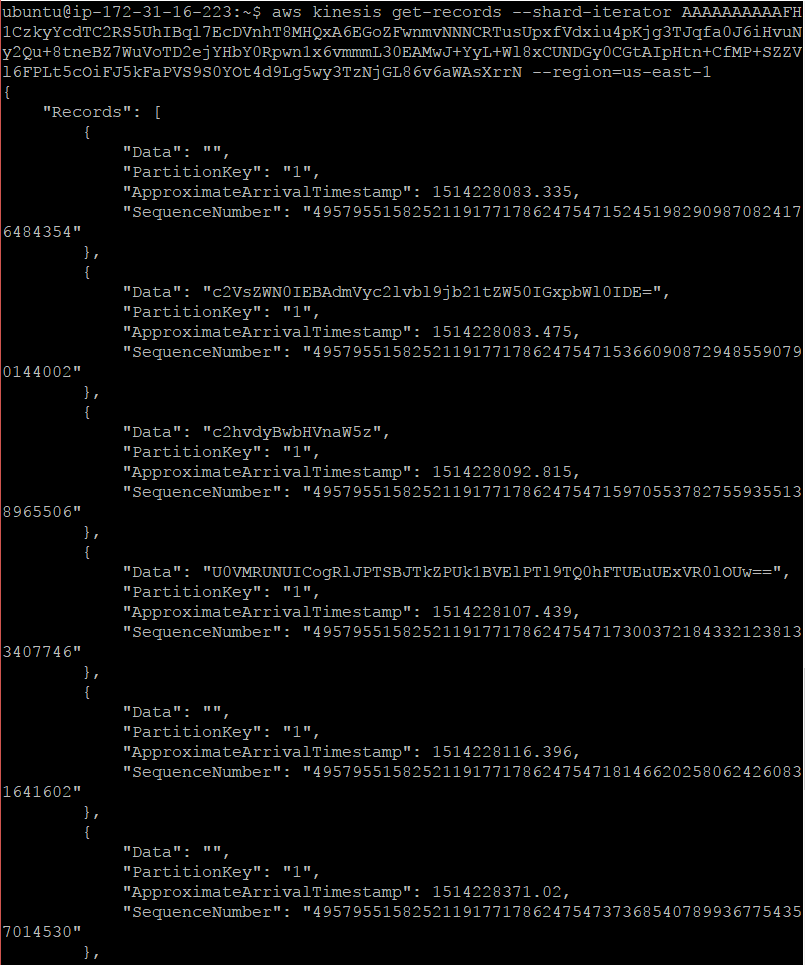
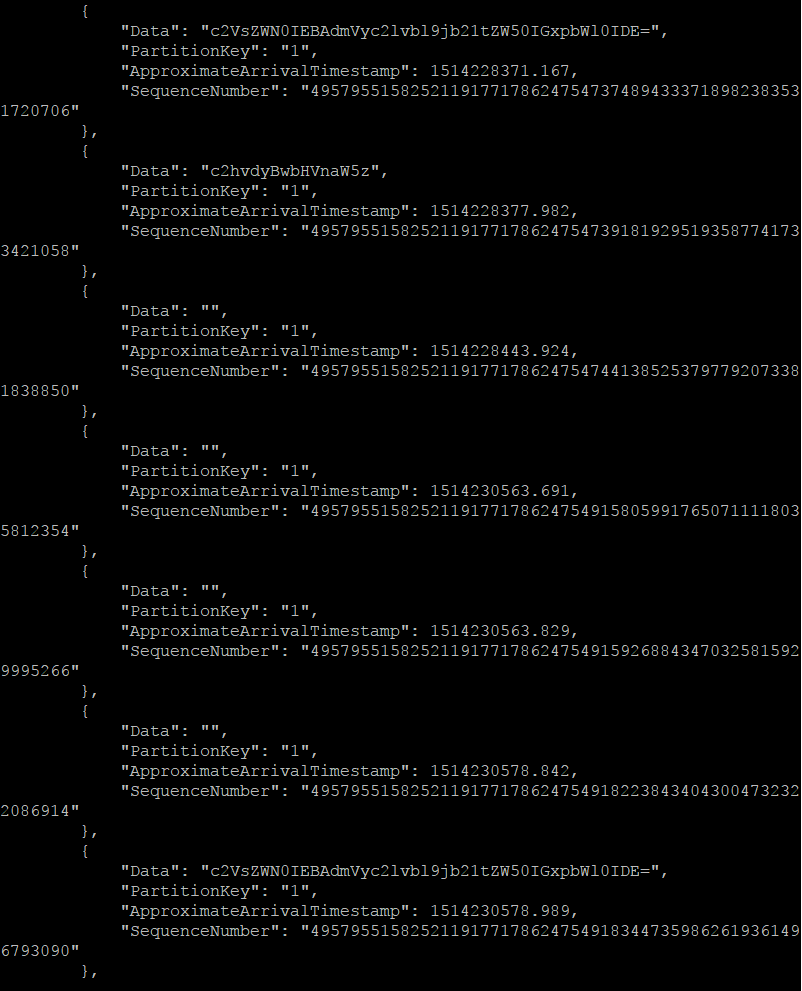
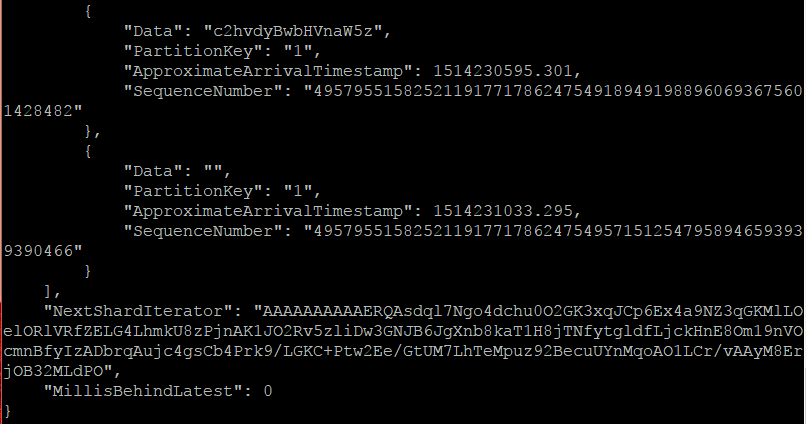
Now that the shard id has been obtained it can be put at the end of the get-records command as shown in Figure 3 AWS Kinesis Stream Records Part 1 below. After running this command, the stream should be populated with data activity in Base 64 (see Figure 4 AWS Kinesis Stream Records Part 2 and Figure 5 AWS Kinesis Stream Records Part 3).
Figure 3 AWS Kinesis Stream Records Part 1
Figure 4 AWS Kinesis Stream Records Part 2
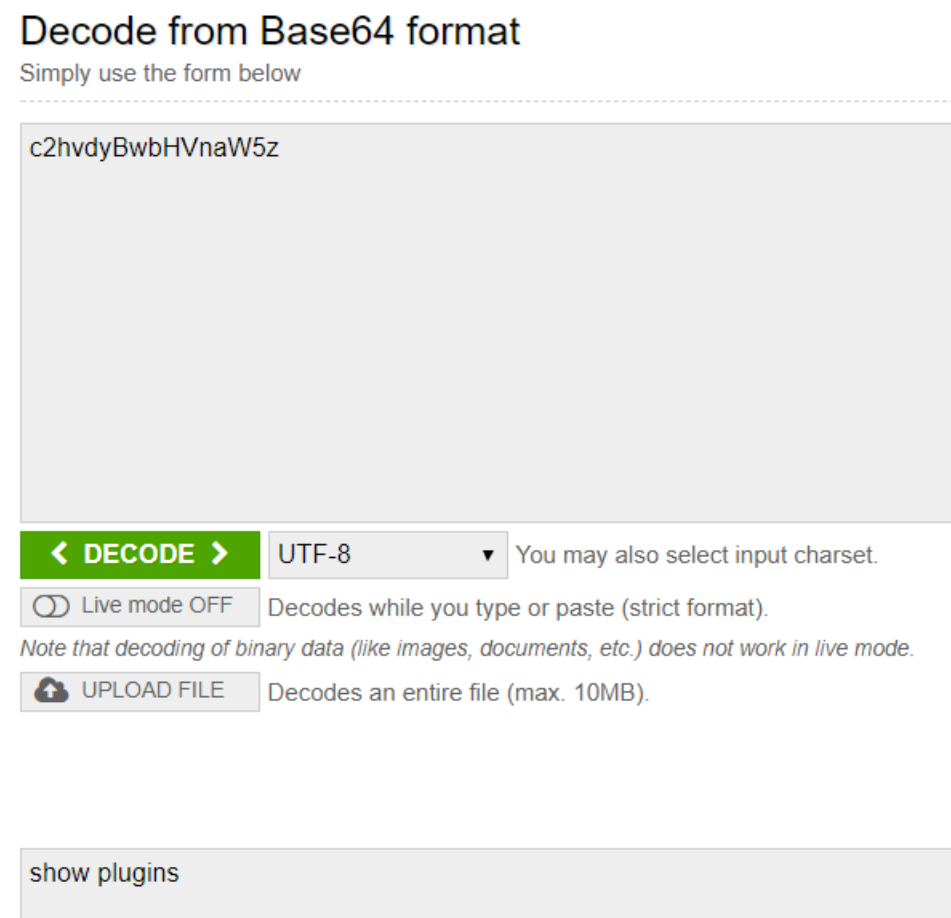
Figure 5 AWS Kinesis Stream Records Part 3 This binary information is hard to understand without a converter, so go to any base64 converter website such as https://www.base64decode.org , paste the AWS Kinesis stream blob into the website, and decode it. See Figure 6 Decoding Base64 to Text below.
Figure 6 Decoding Base64 to Text
Summary of Functional Requirements
The project design was to create a MySQL plugin to stream database server activity to AWS Kinesis. This plugin is very important for backing up data or old states of MYSQL. The plugin I developed was designed using C++. Among several capabilities, the plugin creates an AWS Kinesis stream and then inserts information in base 64 of any activity going on in the MySQL database. Base64 characters are then easily translatable which allows a user to know exactly what has been executed on the MySQL server. This capability is important to know if a user has done anything bad like inserting a broken plugin into MySQL crashing the event. The stream is easily viewable on the Amazon Web Services (AWS) Console so can see a history of all queries run on MySQL.
Primary Constraints
There were many challenges encountered during the project. Obstacles included research on how to find the best basic plugin architecture to insert into MySQL, and having to be constrained on building the environment with an AWS Educate Program Free Tier. Other obstacles included familiarization with the AWS console, figuring out how to link the AWS SDK libraries with MySQL, how to set up a VNC Server and fix it when it crashed. Researching what basic plugin architecture to use and determining which MySQL version to install took longer than expected. The approach used was impacted by the amount of time spent researching the right plugin to capture server activity. After finding out the best plugin is the audit plugin, next step was to find where it was supported in MySQL. After trying several MySQL versions, the correct version to use to support the audit plugin is the MySQL Community Server 5.7.20. Another challenge faced on this project was using the free tier for AWS. The amount of RAM available for t2.micro is small, which constrained the choices made on how to build objects and on how to compile shared objects and libraries. For example, it is not possible to build and compile the entire library of any SDK with a small amount of RAM, while the VNC is running. As a workaround to this problem, you may have to execute an instance reboot. The AWS Console was used to create EC2 instance and manage security groups to allow for port forwarding so that VNC can. Additionally, the command line interface was used to test when objects and streams are generated.
Maintenance
Maintenance of this project requires downloads of a compatible version of MySQL that has access to the audit plugin feature. This plugin should be able to work on MariaDB and other databases similar to MySQL. Another issue that can break the plugin is if the MySQL community decides to create new libraries which might make some plugin structures and datatypes invalid in the future. Although outdated libraries are rare (i.e., they are statically built and referenced within the plugin and symbol table), the SDK and API might change in later versions of MySQL compatible databases such as Aurora, MySQL, and MariaDB. However, developers know that changing structures and datatypes can break a plethora of existing plugins using their SDKs. Future security restrictions may be introduced that may break a plugin that isn't updated. In other words, a later version of MySQL might require a plugin to be digitally signed before it can be loaded. Requiring to digitally signed plugins is also not likely to happen because it would make it harder for most plugins to be approved or it could invalidate many old plugins. This project could be enhanced to notify users outside of stream console when the AWS Kinesis stream receives any MySQL activity. Additionally, this project can customize user notification such that it will only notify the user when the AWS Kinesis stream receives certain tables/statements activities. For example, notify only in cases when a user deletes or does something that may severely impact the MySQL system. Another example is to provide all information given by MySQL like the IP address, hostname, username and other data. There are helper functions within the audit plugin that can be used to grab MySQL data and be placed into the AWS Kinesis stream. Another upgrade to this project would be to use AWS Lambda to gather analytics in real time. This effort would require adding one more SDK and updating the CMAKE files that are needed to link to additional libraries statically. References
- https://dev.mysql.com/doc/refman/5.5/en/audit-log-installation.html (How to Install Plugin)
- https://sdk.amazonaws.com/cpp/api/LATEST/index.html (How to use C++ AWS SDK )
- http://docs.aws.amazon.com/streams/latest/dev/fundamental-stream.html (How to use AWS Command Line Interface for testing)
- https://dev.mysql.com/doc/refman/5.7/en/writing-plugins.html (How to write MySQL plugins)
- https://dev.mysql.com/doc/refman/5.5/en/mysql-plugin.html (How to configure MySQL plugins)
- http://docs.aws.amazon.com/AmazonRDS/latest/UserGuide/CHAP_SettingUp.html (How to set up AWS IAM User)
- https://aws.amazon.com/console/ (Where to setup ec2 and create AWS Free tier)
- https://www.base64decode.org/ (How to decode the base64 data that is in the AWS Kinesis stream)
- https://docs.microsoft.com/en-us/nuget/guides/install-nuget (How to install nuget Package manager for Visual Studio)


