Turns your Python functions into microservices with web API, interactive GUI, and more.
Getting Started • Features • Examples • Support • Report a Bug • Contribution • Changelog
Instantly turn your Python functions into production-ready microservices. Deploy and access your services via HTTP API or interactive UI. Seamlessly export your services into portable, shareable, and executable files or Docker images. Opyrator builds on open standards - OpenAPI, JSON Schema, and Python type hints - and is powered by FastAPI, Streamlit, and Pydantic. It cuts out all the pain for productizing and sharing your Python code - or anything you can wrap into a single Python function.
Alpha Version: Only suggested for experimental usage.
Try out and explore various examples in our playground here.
- 🪄 Turn functions into production-ready services within seconds.
- 🔌 Auto-generated HTTP API based on FastAPI.
- 🌅 Auto-generated Web UI based on Streamlit.
- 📦 Save and share as self-contained executable file or Docker image.
- 🧩 Reuse pre-defined components & combine with existing Opyrators.
- 📈 Instantly deploy and scale for production usage.
Requirements: Python 3.6+.
pip install opyrator-
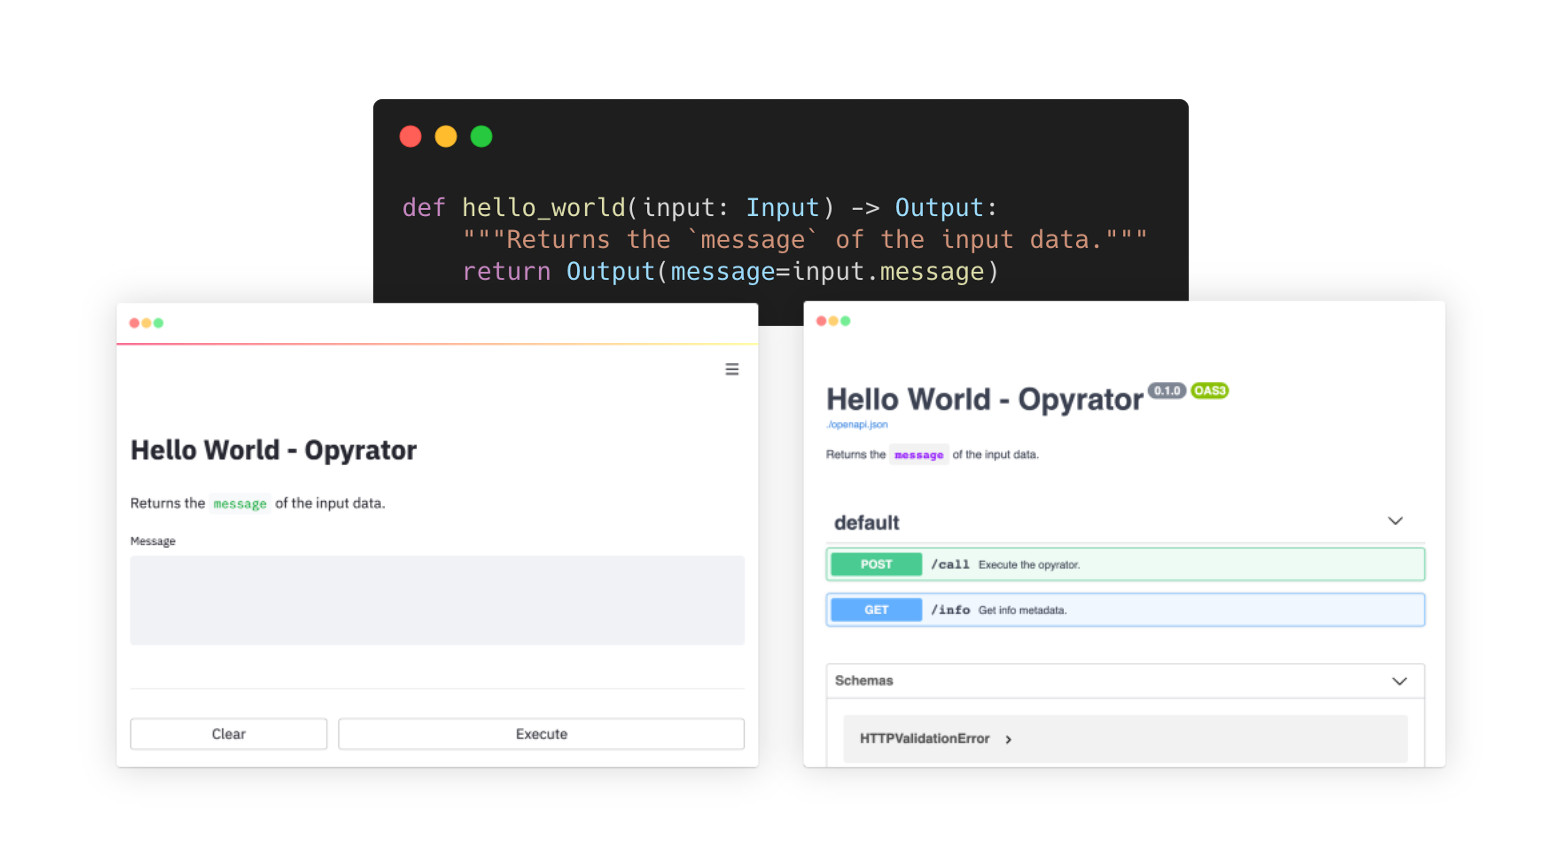
A simple Opyrator-compatible function could look like this:
from pydantic import BaseModel

class Input(BaseModel):
    message: str

class Output(BaseModel):
    message: str

def hello_world(input: Input) -> Output:
    """Returns the `message` of the input data."""
    return Output(message=input.message)
💡 An Opyrator-compatible function is required to have an
inputparameter and return value based on Pydantic models. The input and output models are specified via type hints. -
Copy this code to a file, e.g.
my_opyrator.py -
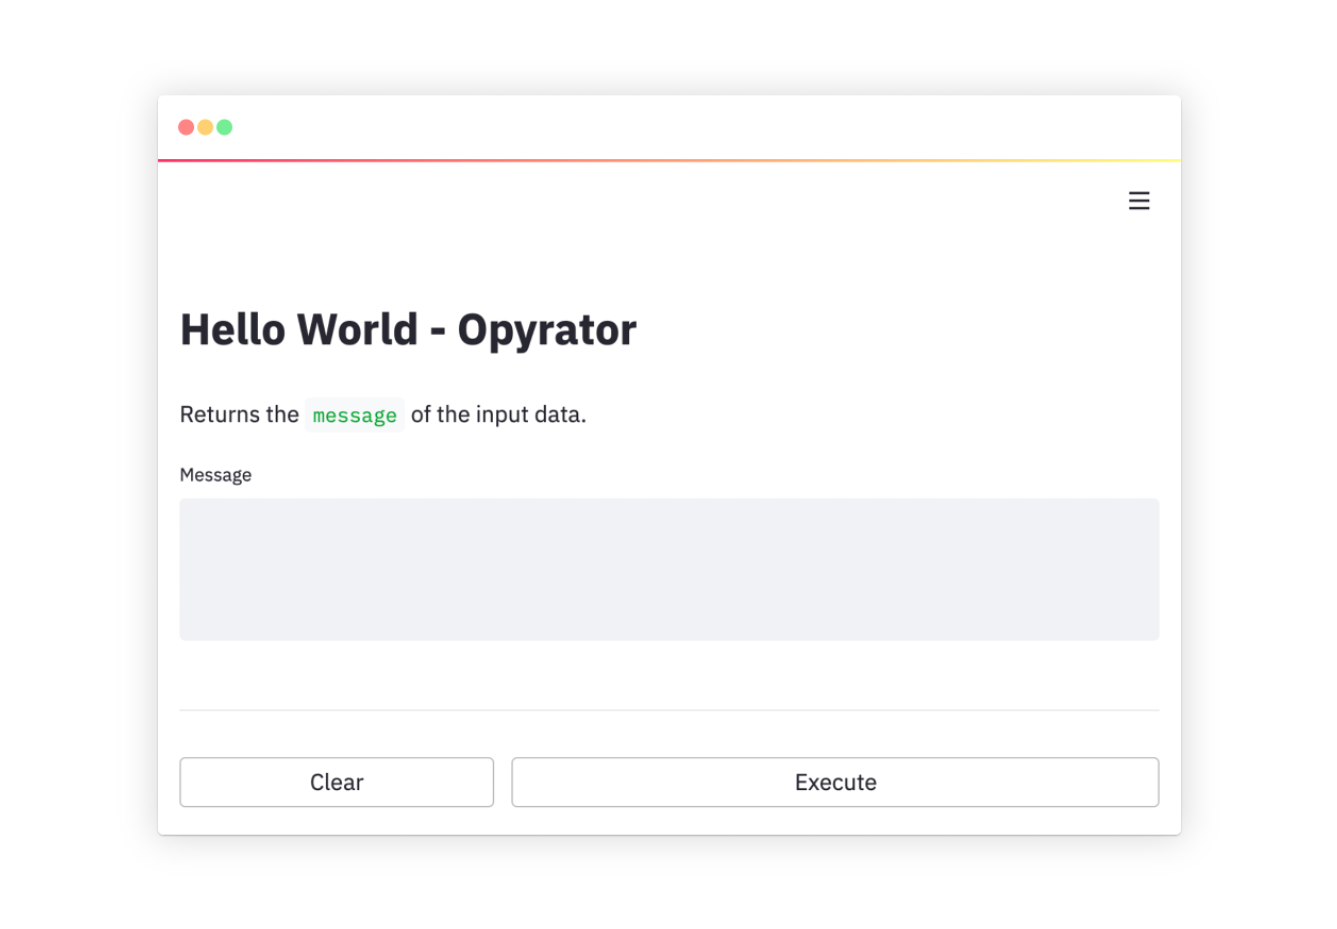
Run the UI server from command-line:
opyrator launch-ui my_opyrator:hello_world
In the output, there's a line that shows where your web app is being served, on your local machine.
-
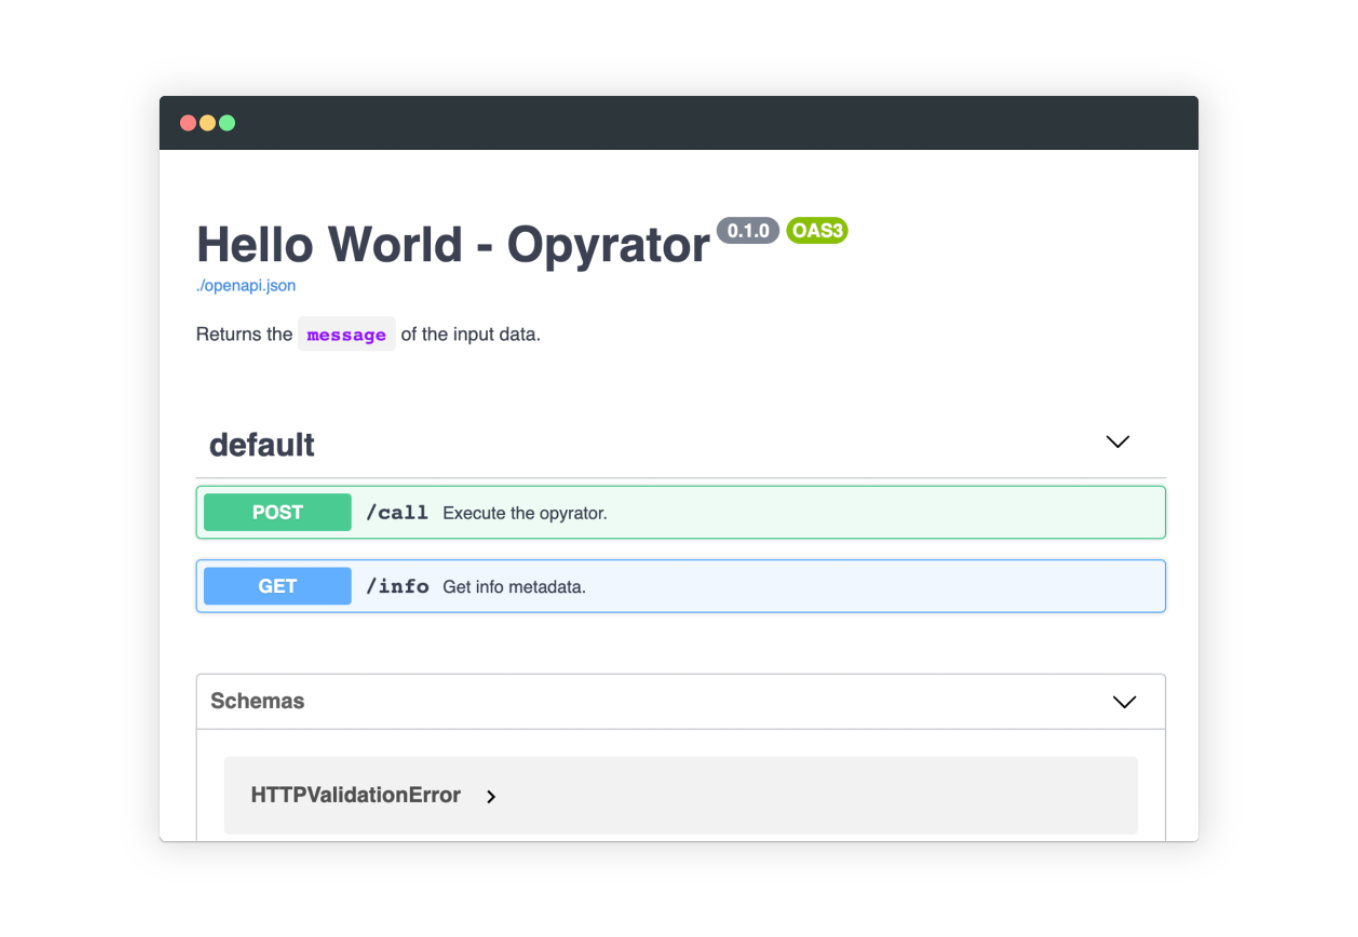
Run the HTTP API server from command-line:
opyrator launch-api my_opyrator:hello_world
In the output, there's a line that shows where your web service is being served, on your local machine.
-
Find out more usage information in the Features section or get inspired by our examples.
👉 Try out and explore these examples in our playground here
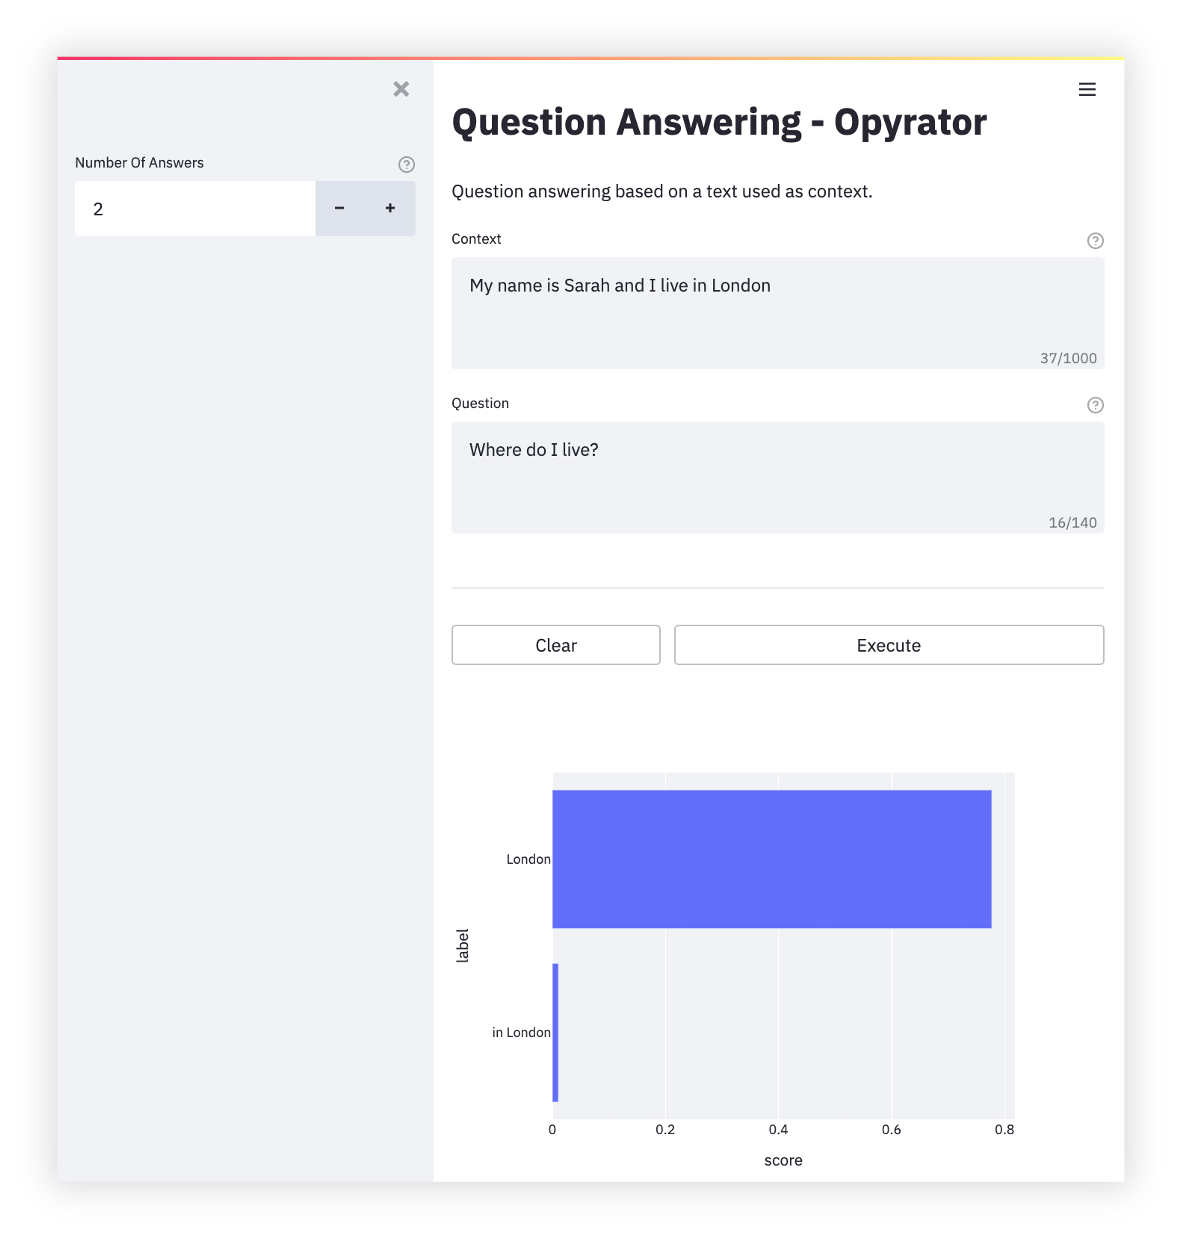
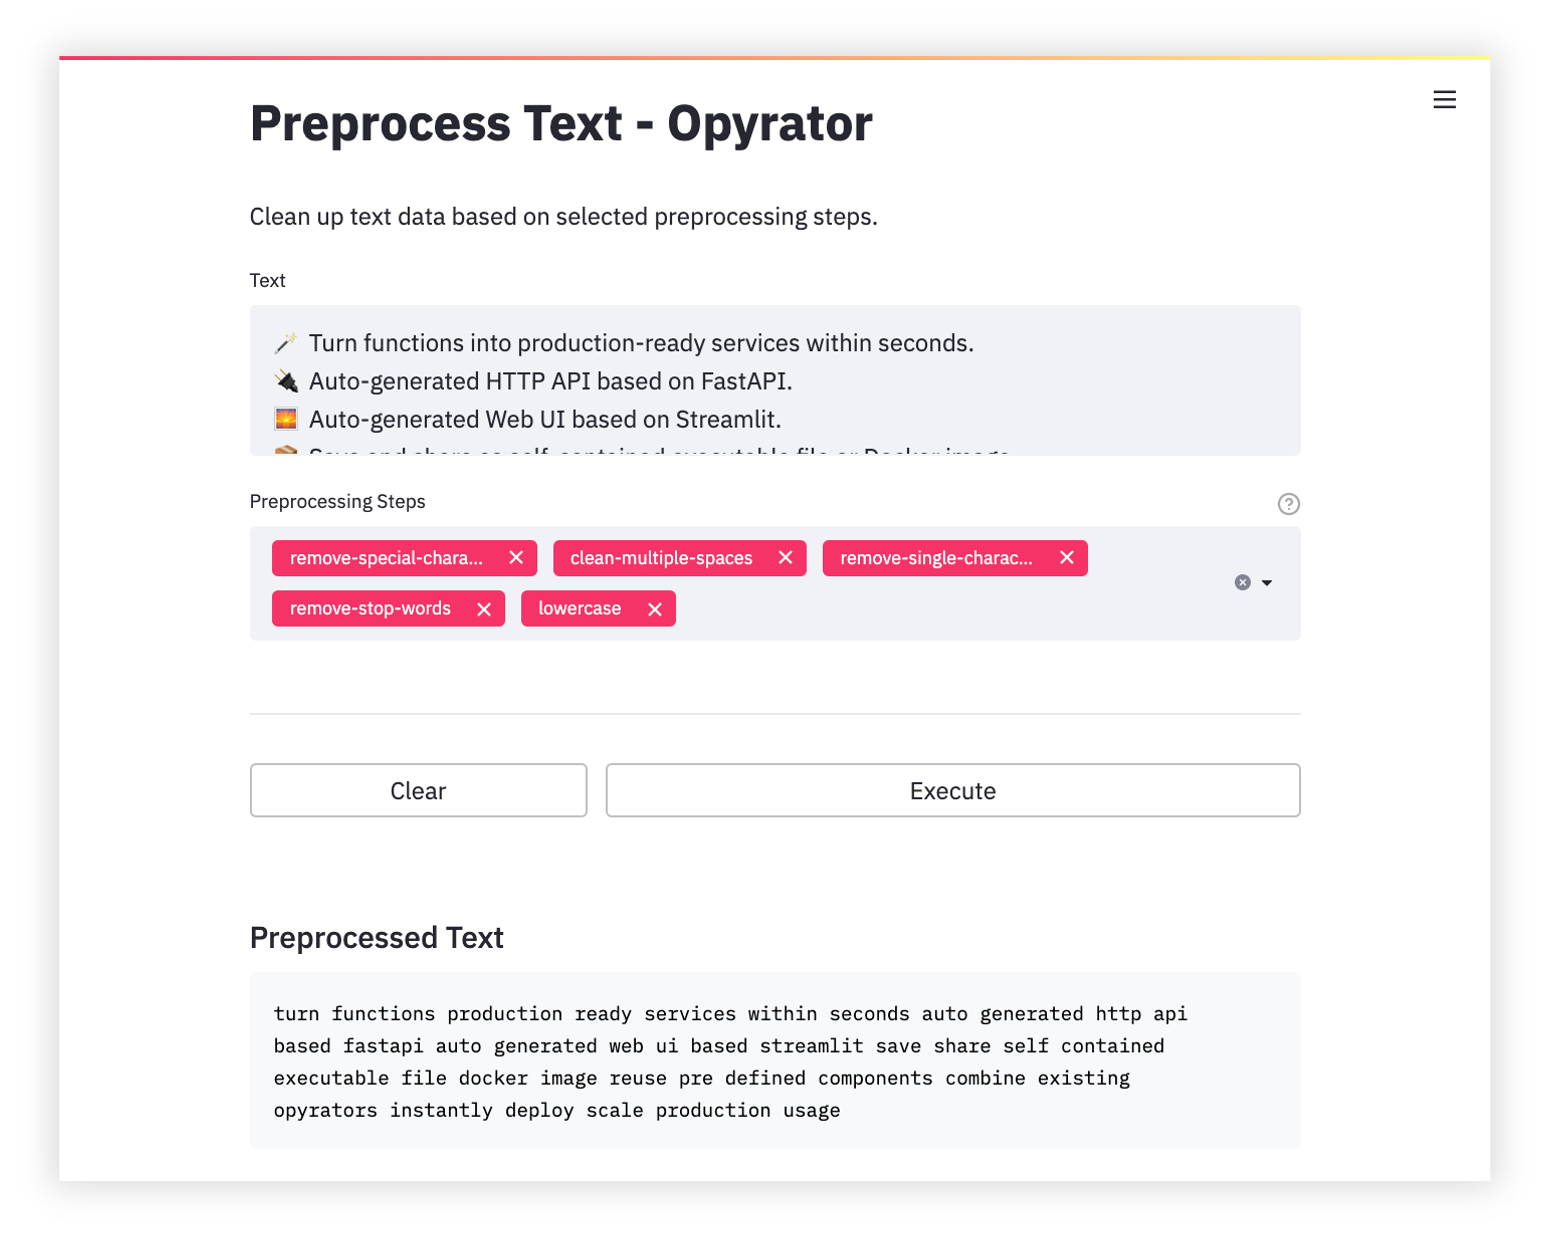
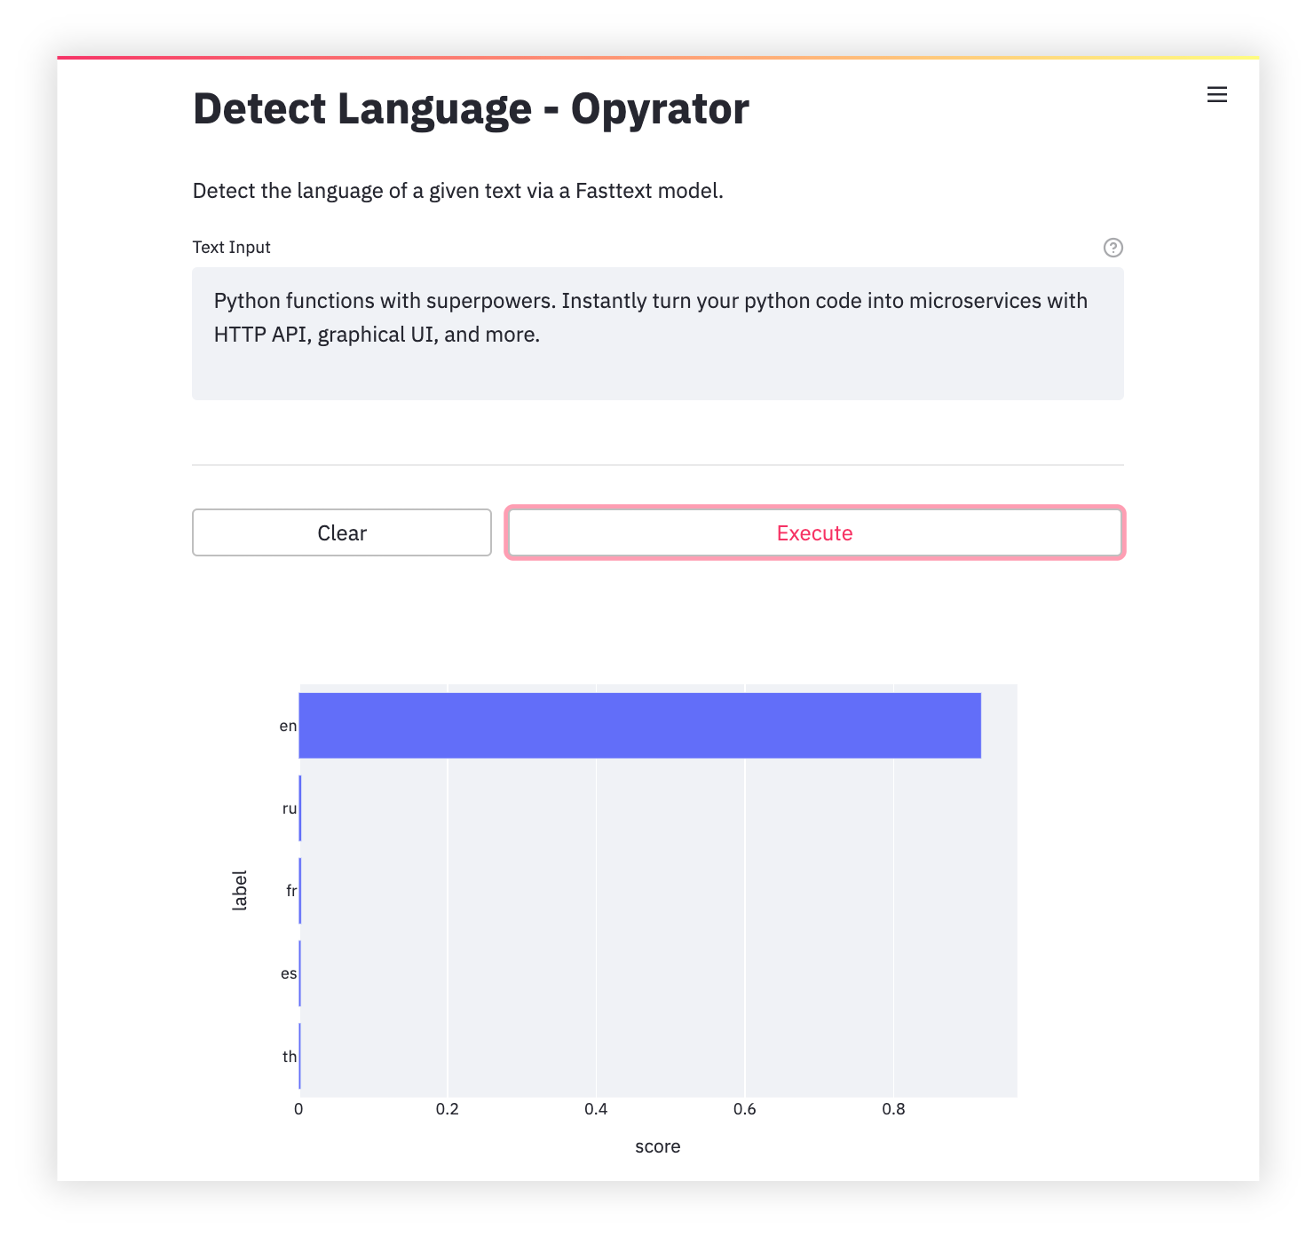
The following collection of examples demonstrate how Opyrator can support a variety of different tasks and use-cases. All these examples are bundled into a demo playground which you can also deploy on your own machine via Docker:
docker run -p 8080:8080 mltooling/opyrator-playground:latest- 📄 Source Code
- 🌅 UI Demo
- 🔌 OpenAPI Spec
Run this demo on your machine (click to expand...)
To run the demo on your local machine just execute the following commands:
git clone https://github.com/ml-tooling/opyrator
cd ./opyrator/examples/generate_text/
pip install -r requirements.txt
opyrator launch-ui app:generate_text --port 8051
Visit http://localhost:8051 in your browser to access the UI of the demo. Use launch-api instead of launch-ui to launch the HTTP API server.
- 📄 Source Code
- 🌅 UI Demo
- 🔌 OpenAPI Spec
Run this demo on your machine (click to expand...)
To run the demo on your local machine just execute the following commands:
git clone https://github.com/ml-tooling/opyrator
cd ./opyrator/examples/question_answering/
pip install -r requirements.txt
opyrator launch-ui app:question_answering --port 8051
Visit http://localhost:8051 in your browser to access the UI of the demo. Use launch-api instead of launch-ui to launch the HTTP API server.
- 📄 Source Code
- 🌅 UI Demo
- 🔌 OpenAPI Spec
Run this demo on your machine (click to expand...)
To run the demo on your local machine just execute the following commands:
git clone https://github.com/ml-tooling/opyrator
cd ./opyrator/examples/image_super_resolution/
pip install -r requirements.txt
opyrator launch-ui app:image_super_resolution --port 8051
Visit http://localhost:8051 in your browser to access the UI of the demo. Use launch-api instead of launch-ui to launch the HTTP API server.
- 📄 Source Code
- 🌅 UI Demo
- 🔌 OpenAPI Spec
Run this demo on your machine (click to expand...)
To run the demo on your local machine just execute the following commands:
git clone https://github.com/ml-tooling/opyrator
cd ./opyrator/examples/preprocess_text/
pip install -r requirements.txt
opyrator launch-ui app:preprocess_text --port 8051
Visit http://localhost:8051 in your browser to access the UI of the demo. Use launch-api instead of launch-ui to launch the HTTP API server.
- 📄 Source Code
- 🌅 UI Demo
- 🔌 OpenAPI Spec
Run this demo on your machine (click to expand...)
To run the demo on your local machine just execute the following commands:
git clone https://github.com/ml-tooling/opyrator
cd ./opyrator/examples/detect_language/
pip install -r requirements.txt
opyrator launch-ui app:detect_language --port 8051
Visit http://localhost:8051 in your browser to access the UI of the demo. Use launch-api instead of launch-ui to launch the HTTP API server.
- 📄 Source Code
- 🌅 UI Demo
- 🔌 OpenAPI Spec
Run this demo on your machine (click to expand...)
To run the demo on your local machine just execute the following commands:
git clone https://github.com/ml-tooling/opyrator
cd ./opyrator/examples/separate_audio/
pip install -r requirements.txt
opyrator launch-ui app:separate_audio --port 8051
Visit http://localhost:8051 in your browser to access the UI of the demo. Use launch-api instead of launch-ui to launch the HTTP API server.
- 📄 Source Code
- 🌅 UI Demo
- 🔌 OpenAPI Spec
Run this demo on your machine (click to expand...)
To run the demo on your local machine just execute the following commands:
git clone https://github.com/ml-tooling/opyrator
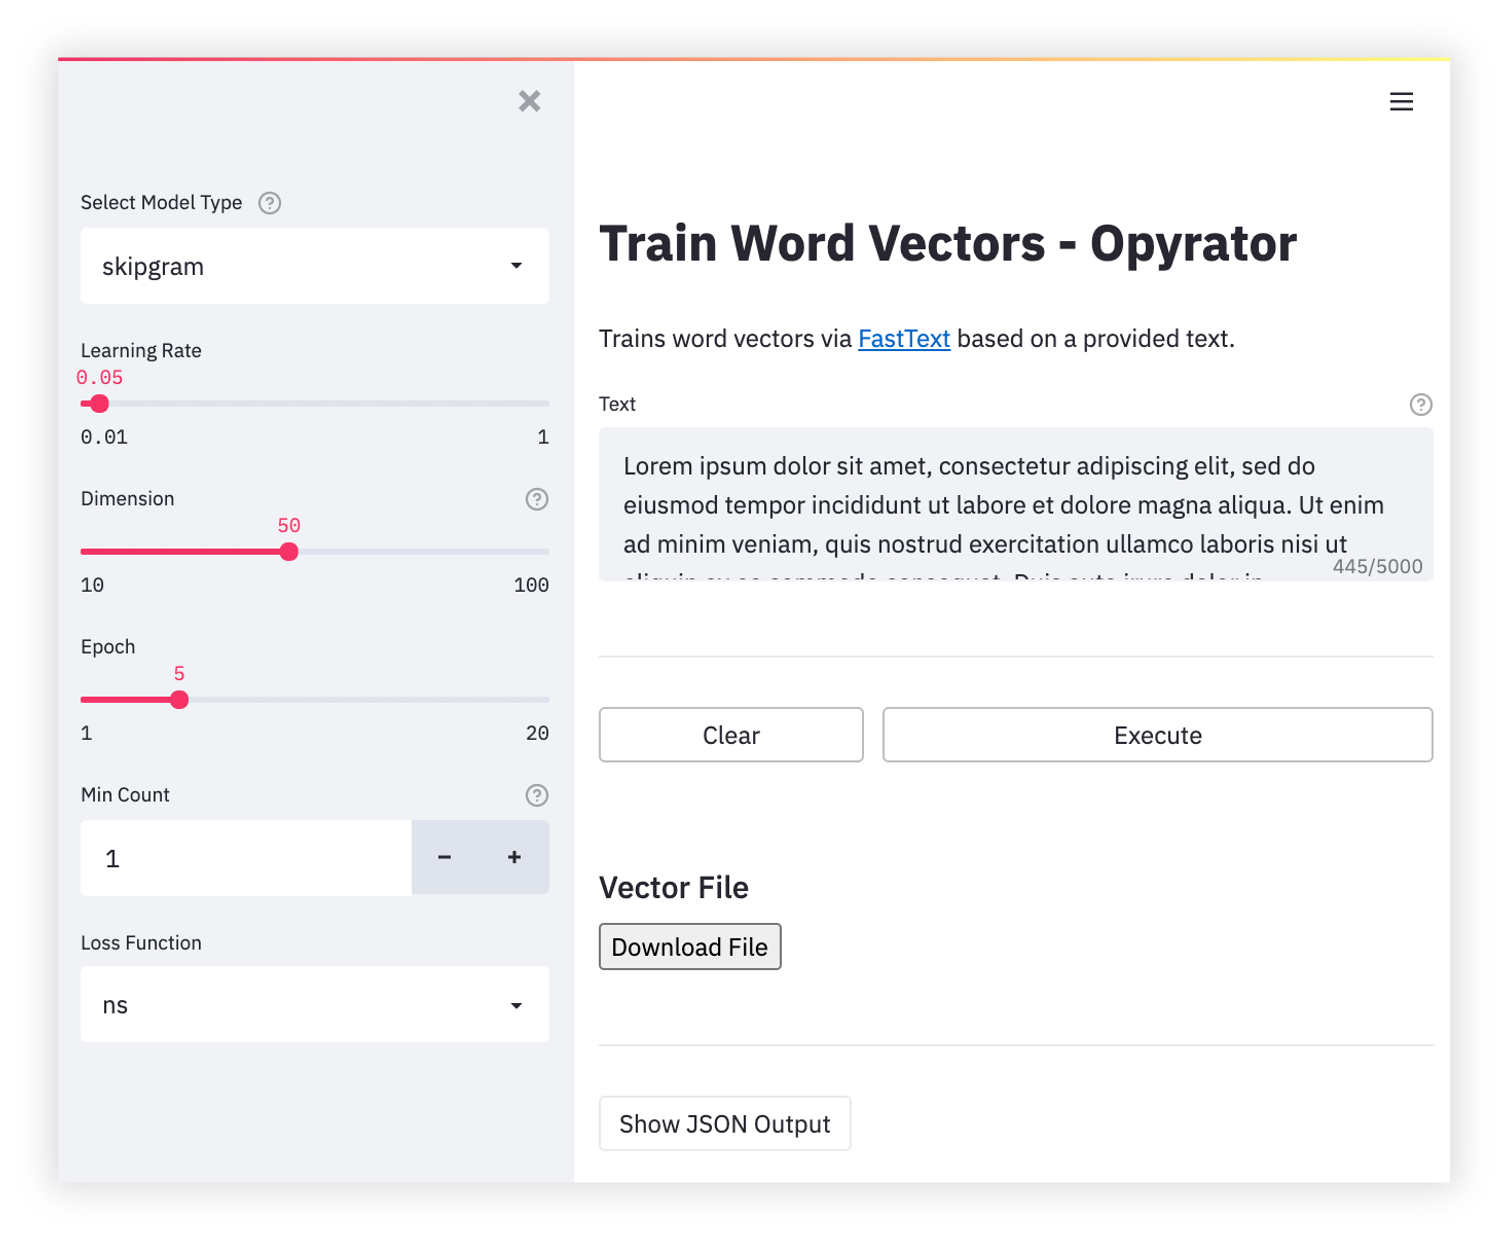
cd ./opyrator/examples/train_word_vectors/
pip install -r requirements.txt
opyrator launch-ui app:train_word_vectors --port 8051
Visit http://localhost:8051 in your browser to access the UI of the demo. Use launch-api instead of launch-ui to launch the HTTP API server.
- 📄 Source Code
- 🌅 UI Demo
- 🔌 OpenAPI Spec
Run this demo on your machine (click to expand...)
To run the demo on your local machine just execute the following commands:
git clone https://github.com/ml-tooling/opyrator
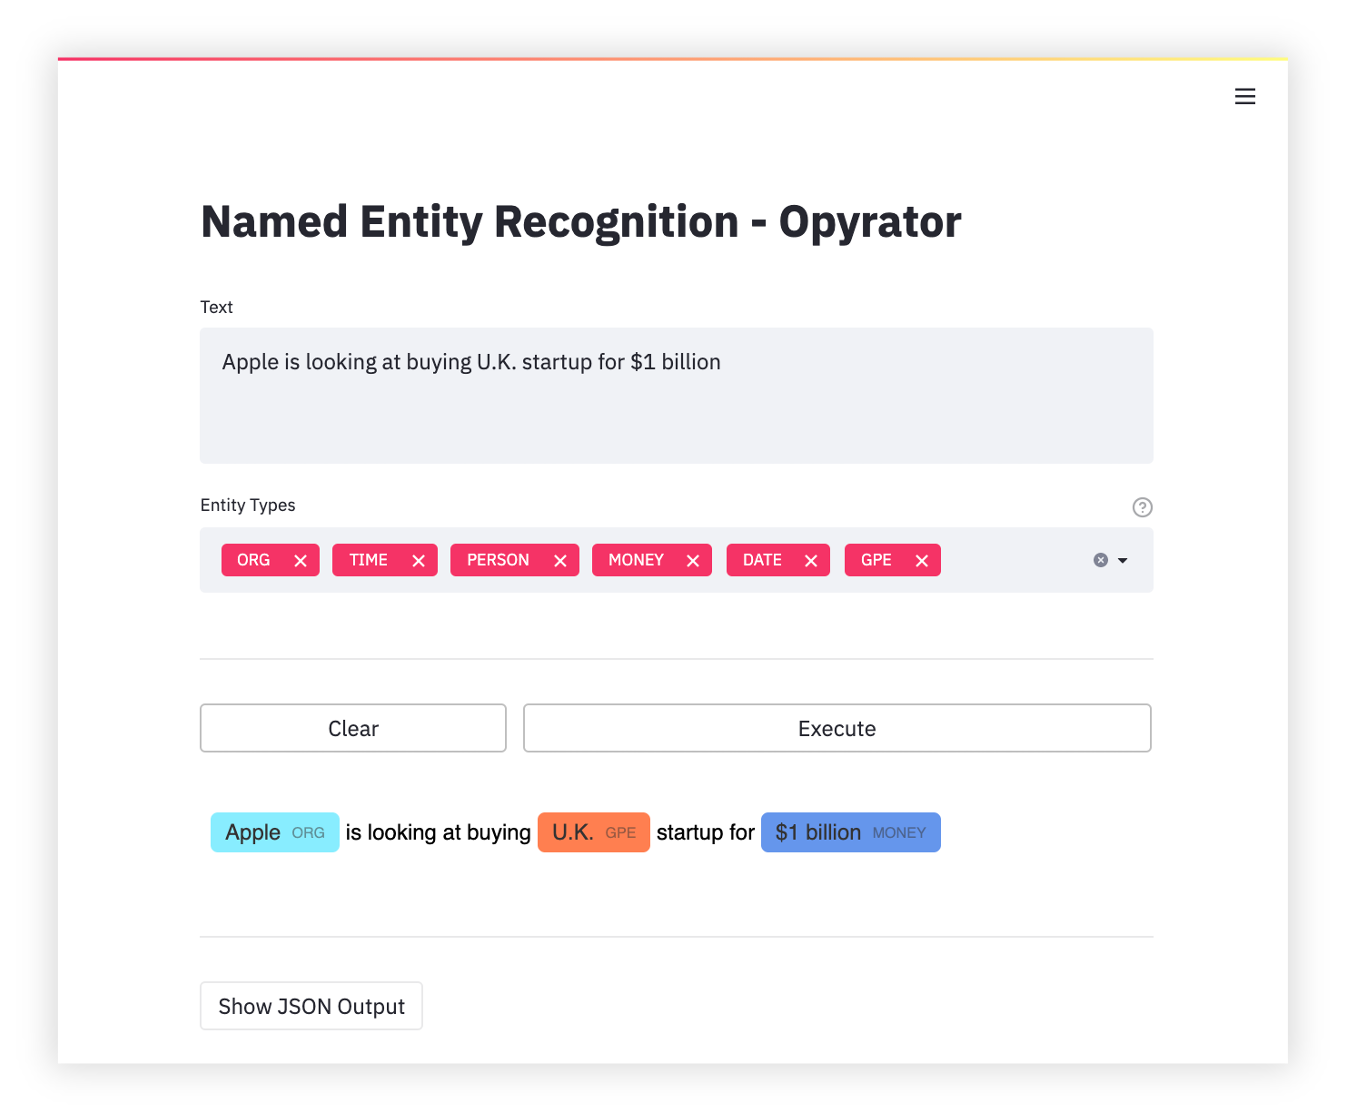
cd ./opyrator/examples/named_entity_recognition/
pip install -r requirements.txt
opyrator launch-ui app:named_entity_recognition --port 8051
Visit http://localhost:8051 in your browser to access the UI of the demo. Use launch-api instead of launch-ui to launch the HTTP API server.
- 📄 Source Code
- 🌅 UI Demo
- 🔌 OpenAPI Spec
Run this demo on your machine (click to expand...)
To run the demo on your local machine just execute the following commands:
git clone https://github.com/ml-tooling/opyrator
cd ./opyrator/examples/showcase_components/
pip install -r requirements.txt
opyrator launch-ui app:showcase_components --port 8051
Visit http://localhost:8051 in your browser to access the UI of the demo. Use launch-api instead of launch-ui to launch the HTTP API server.
This project is maintained by Benjamin Räthlein, Lukas Masuch, and Jan Kalkan. Please understand that we won't be able to provide individual support via email. We also believe that help is much more valuable if it's shared publicly so that more people can benefit from it.
| Type | Channel |
|---|---|
| 🚨 Bug Reports |  |
| 🎁 Feature Requests |  |
| 👩💻 Usage Questions |  |
| 📢 Announcements |  |
| ❓ Other Requests |  |
HTTP API • Graphical UI • CLI • Zip Export • Docker Export • Pre-defined Components • Production Deployment
With Opyrator, you can instantly launch a local HTTP (REST) API server for any compatible function:
opyrator launch-api my_opyrator:hello_worldThis will launch a FastAPI server based on the OpenAPI standard and with an automatic interactive documentation.
💡 Make sure that all requirements of your script are installed in the active Python enviornment.
The port used by the API server can be provided via CLI arguments:
opyrator launch-api my_opyrator:hello_world --port 8080The API server can also be started via the exported zip-file format (see zip export section below).
opyrator launch-api my-opyrator.zipYou can launch a graphical user interface - powered by Streamlit - for your compatible function. The UI is auto-generated from the input- and output-schema of the given function.
opyrator launch-ui my_opyrator:hello_world💡 Make sure that all requirements of your script are installed in the active Python environment.
You can influence most aspects of the UI just by changing and improving the input- and output-schema of your function. Furthermore, it is also possible to define custom UIs for the function's input and output. For more details, refer to the input- and output-schema section.
The port used by the UI server can be provided via CLI arguments:
opyrator launch-ui my_opyrator:hello_world --port 8080The UI server can also be started via the exported zip-file format (see zip export section below).
opyrator launch-ui my-opyrator.zipIn addition, the UI server can be started by using an already running Opyrator API endpoint:
opyrator launch-ui http://my-opyrator:8080 Thereby, all Opyrator calls from the UI will be executed via the configured HTTP endpoint instead of the Python function running inside the UI server.
An Opyrator can also be executed via command-line:
opyrator call my_opyrator:hello_world '{"message": "hello"}'The CLI interface also works using the zip export format:
opyrator call my-opyrator.zip '{"message": "hello"}'Or, by using an already running Opyrator API endpoint:
opyrator call http://my-opyrator:8080 '{"message": "hello"}'Thereby, the function call is executed by the Opyrator API server, instead of locally using the Python function.
Opyrator allows you to package and export a compatible function into a self-contained zip-file:
opyrator export my_opyrator:hello_world my-opyrator.zipThis exported zip-file packages relevant source code and data artifacts into a single file which can be shared, stored, and used for launching the API or UI as shown above.
External requirements are automatically discovered from the working directory based on the following files: Pipfile (Pipenv environment), environment.yml (Conda environment), pyproject.toml (Poetry dependencies), requirements.txt (pip-requirements), setup.py (Python project requirements), packages.txt (apt-get packages), or discovered via pipreqs as fallback. However, external requirements are only included as instructions and are not packaged into the zip-file. If you want to export your Opyrator fully self-contained including all requirements or even the Python interpreter itself, please refer to the Docker or pex export options.
As a side note, Opyrators exported as zip-files are (mini) Python libraries that can be pip-installed, imported, and used from other Python code:
pip install my-opyrator.zipWIP: This feature is not finalized yet. You can track the progress and vote for the feature here
In addition to the ZIP export, Opyrator also provides the capability to export to a Docker image:
opyrator export my_opyrator:hello_world --format=docker my-opyrator-image:latest💡 The Docker export requires that Docker is installed on your machine.
After the successful export, the Docker image can be run as shown below:
docker run -p 8080:8080 my-opyrator-image:latestRunning your Opyrator within this Docker image has the advantage that only a single port is required to be exposed. The separation between UI and API is done via URL paths: http://localhost:8080/api (API); http://localhost:8080/ui (UI). The UI is automatically configured to use the API for all function calls.
WIP: This feature is not finalized yet. You can track the progress and vote for the feature here.
Opyrator also provides the capability to export to a pex-file. Pex is a tool to create self-contained executable Python environments that contain all relevant python dependencies.
opyrator export my_opyrator:hello_world --format=pex my-opyrator.pexWIP: This feature is not finalized yet. You can track the progress and vote for the feature here.
Every deployed Opyrator provides a Python client library via an endpoint method which can be installed with pip:
pip install http://my-opyrator:8080/clientAnd used in your code, as shown below:
from my_opyrator import Client, Input
opyrator_client = Client("http://my-opyrator:8080")
result = opyrator_client.call(Input(text="hello", wait=1))
WIP: This feature is not finalized yet. You can track the progress and vote for the feature here.
Opyrator provides a growing collection of pre-defined components (input- and output models) for common tasks. Some of these components also provide more advanced UIs and Visualizations. You can reuse these components to speed up your development and, thereby, keep your Opyrators compatible with other functionality improvements or other Opyrators.
You can find some of the available interfaces in the examples section or in this source code package.
WIP: This feature is not finalized yet. You can track the progress and vote for the feature here.
Rolling out your Opyrators for production usage might require additional features such as SSL, authentication, API tokens, unlimited scalability, load balancing, and monitoring. Therefore, we provide capabilities to easily deploy your Opyrators directly on scalable and secure cloud platforms without any major overhead:
opyrator deploy my_opyrator:hello_world <deployment-provider> <deployment-provider-options>WIP: This feature is not finalized yet. You can track the progress and vote for the feature here.
A function is compatible with Opyrator if it fulfills the following requirements:
- A single parameter called
inputwhich MUST be a subclass of the Pydantic BaseModel. - A single return value that MUST be a subclass of the Pydantic BaseModel.
- The
inputparameter and return value MUST be annotated with Python typing hints.
WIP
WIP
- Pull requests are encouraged and always welcome. Read our contribution guidelines and check out help-wanted issues.
- Submit Github issues for any feature request and enhancement, bugs, or documentation problems.
- By participating in this project, you agree to abide by its Code of Conduct.
- The development section below contains information on how to build and test the project after you have implemented some changes.
Refer to our contribution guides for information on our build scripts and development process.
Licensed MIT. Created and maintained with ❤️ by developers from Berlin.


