-
Notifications
You must be signed in to change notification settings - Fork 6
Master Setup AWS Account Configuration
Here's how to create a Platform.mu master in an Amazon AWS account. Most of the steps involve setting up the account to contain all the security and operational artifacts the master needs -- setting up the master itself is very straightforward.
Note that a Mu master doesn't have to run in AWS, but that's the currently tested and supported configuration. In theory a Mu master can run anywhere that it can issue appropriate provisioning calls to its target environment.
You'll need an AWS account with a few artifacts that give the Mu master and the deployments it creates the permissions it needs.
##Create Policies and Roles Mu needs a pair of security configurations -- one to grant privileges to the Mu master to carry out AWS operations, and the other to create a baseline set of permissions that nodes can carry out once provisioned by the master.
Both configurations may vary across use cases, so feel free to tailor to create policies that suit your situation. In this example we'll use a very expansive policy that lets the Mu master do any AWS operation in its account, and a more restricted policy that lets nodes do a key subset of operations typical of node configurations.
Note that while a Mu master keeps its configuration, the node security configuration is a starting point for all nodes, and can be modified by means of deployment descriptors.
###Create Mu Master Role AWS uses the concept of Roles to manage what instances can do. Roles are preferred to giving instances actual AWS credentials for a number of reasons, chief among which is freedom from storing credentials on an instance.
AWS roles reference AWS Policies, which in turn contain JSON-based policy language defining resources and permissions. See Amazon Documentation for a detailed description of roles and policies.
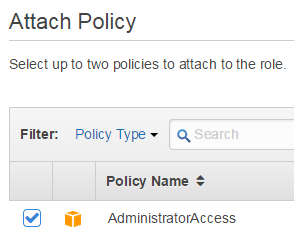
Set up our simple master role with admin permissions by creating a role with a name like mu-master-role and referencing the preexisting AWS admin policy along these lines:

The Administrator policy will already exist. If you want to tailor the policy later, see the node example below for custom policies.
###Create Mu Node Role The Mu node role is a starting place for node permissions, and should represent the minimum set of permissions to carry out AWS operations that you expect for all of your nodes. You can always modify in the BOK as noted.
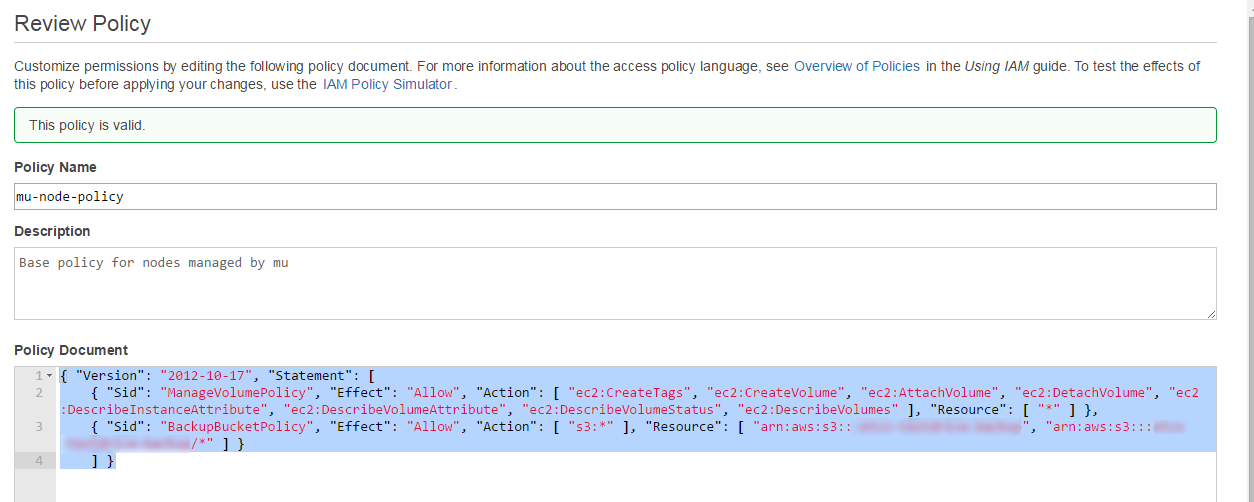
Start by using the AWS console to create a custom policy for nodes, called something like mu-node-policy. Tailor the actual policy language to suit your needs -- the example below contains a ManageVolume statement that gives nodes useful permissions on volumes, and a second BackupBucketPolicy that defines access to a S3 bucket. Tailor to your needs.

And a copyable example:
"Version": "2012-10-17",
"Statement": [
{
"Sid": "ManageVolumePolicy",
"Effect": "Allow",
"Action": [
"ec2:CreateTags",
"ec2:CreateVolume",
"ec2:AttachVolume",
"ec2:DetachVolume",
"ec2:DescribeInstanceAttribute",
"ec2:DescribeVolumeAttribute",
"ec2:DescribeVolumeStatus",
"ec2:DescribeVolumes"
],
"Resource": [
"*"
]
},
{
"Sid": "BackupBucketPolicy",
"Effect": "Allow",
"Action": [
"s3:*"
],
"Resource": [
"arn:aws:s3:::somebucketorother",
"arn:aws:s3:::somebucketorother/*"
]
}
]
}```
Now create your mu-node role, and associate the new policy:

* Identify or create an AWS Policy
### Create certificate
You'll probably already have an SSH certificate created or registered in the account. If not, you should make one
### Identify or Create VPC
You'll need a VPC to launch the master in. This is a different VPC than the demo VPC. Generally the default VPC, if your account has one, will do fine. If not, create one and identify the public subnet.
Note that there's a great deal of flexibility in VPC setup. The only necessary criteria is that
the master must be reachable from the nodes it deploys. Typically this means launching the master in a public subnet or setting up a bastion host.
## Create and configure Platform.Mu Master
Now let's launch and configure a Platform.mu master:
###Launch the Master Instance
1. Launch an instance in your target VPC with the mu-master role you created.

1. Use at least a t2.medium instance size, and a relatively recent CentOS 6 AMI. We recommend using our public pre-hardened CentOS6 AMI listed in the [repository] (https://github.com/eGT-Labs/mu/blob/demo_update/modules/mu/defaults/amazon_images.yaml) but any recent CentOS or RHEL 6 should do with minor differences.
1. When launching, be sure to include your own IP in the Mu.master security group so you can connect
1. Be sure to specify an SSH public key that you have the corresponding private key for
### Configure the Master
1. Before connecting, find or create a VPC-type Elastic IP and associate it with your launching or launched master. This will give you a consistent IP address for the master across stops and starts, which is important so the nodes can find momma.
1. SSH into the master as root
1. Import the mu_setup script -- you can either install wget and pull it from the Mu repository or copy and paste it in an editor
1. Make the script executable
1. Execute the script
1. Fill in the key variables in the configuration dialog. At minimum you will need to specify the admin email and password.
1. Additional variables include additional chef repositories (for your personal platform deployment code if you have any yet), a friendly hostname, and whether you want this master to be able to "invade" deploys created by other masters in this account, usually for cleanup or migration purposes. Here's a typical example:

1. Enter "O" (the letter oh) to configure
1. In a minute you'll be asked to paste in a github key. Paste one in that can access the Platform.mu repository and end with CTRL-D
1. The rest of the setup is automatic and takes about a half hour. At the end you should see:

Don't forget to source your environment as stated. You're done and ready to work.
You can test by deploying something simple:
