-
Notifications
You must be signed in to change notification settings - Fork 5
How to manage assets
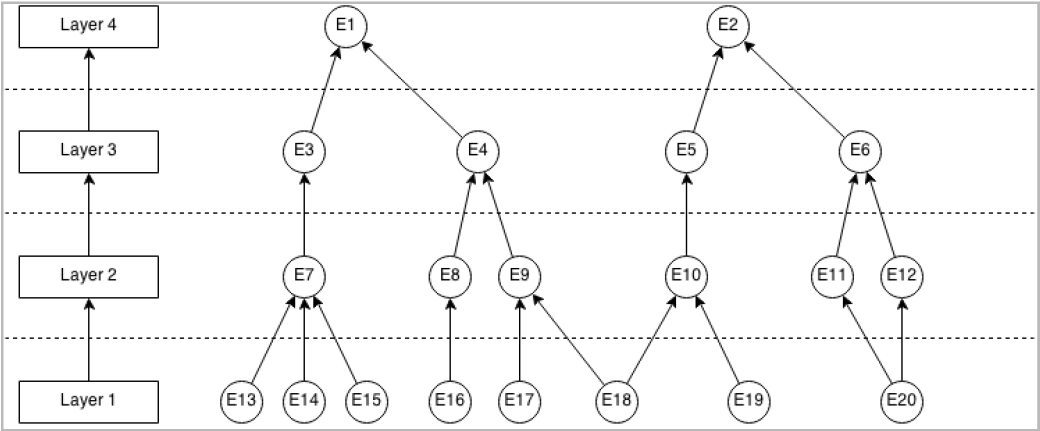
Producers (see RISCOSS Platform) need to create the Entities to be analysed. These Entities can be organised in Layers. A Layer defines a logical group of entities, their structure, and a parent-child relationship with another layer. This parent-child relationship is implicitly defined for all the entities belonging to a layer and allows the user to create a hierarchy of entities. In addition to the hierarchy of entities, layers also defines the attributes associated to the entities belonging to it.

In this example, there are 4 layers and 20 entities in our knowledge base.
The assets management is centralised in the Layers and Entities pages inside the Configure menu

RISCOSS can run risk assessment at different levels. Therefore, the first step is specifying your own organization structure, defining the different organisational units (layers) of analysis to be put under RISCOSS’ supervision. RISCOSS uses as essential organizational unit the OSS Component, in the sense of the Product produced by an OSS Project to be adopted in any of the company's organizational units.
Layers can be created from the Layers management page by entering the new layer's name and the layer's parent in the form that appears.

After clicking the New layer button, you can add/modify some details about the layer:
- The layer name (Name field)
- The parent-child relation to other existing layers (Parent field).
- A description of the layer (Description field)
- The layer information that describes the entities belonging to this layer (Layer information panel)

The layer is stored in the platform using the Save button below the description field. The layer can be deleted - if there are no restrictions such as the existence of associated entities - using the Delete button next to it.
#Step 2: Creating Entities There are 3 options to create entities. The first 2 options are meant to create entities manually and the last one to import them from a file.
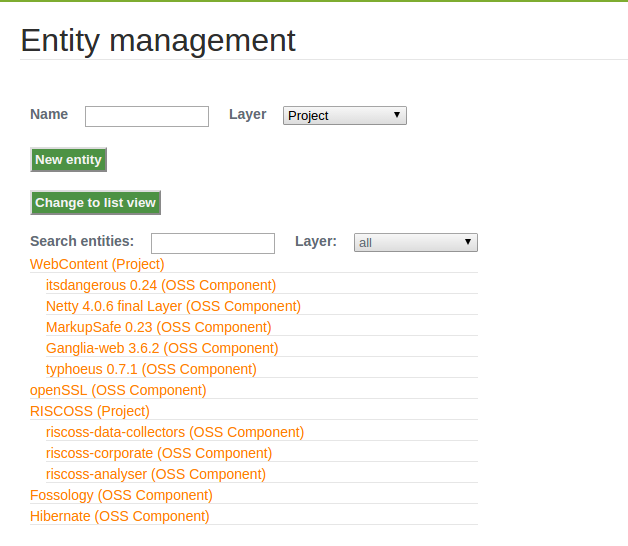
Choosing Layers from the Configure menu. The platform will show the list of all layers defined in the domain. Choosing a layer from the list will show the list of all entities defined in the domain associated to the selected layer.

Enter the new entity name in the Name form field and click on the New entity button next to it to create the new entity.
Enter the entity’s name in the form that appears and select the entity's layer from the list.

After clicking the New entity button, you can add/edit some details about the entity:
- The entity's layer (Layer field)
- The entity's description (Description field)
- Layer information values and parent/children relationships between entities (Properties tab panel)
- The entity's custom information (Custom information tab panel)
- Configuration of entity's data collectors (Data collectors tab panel)
- The entity's collected data (Data repository tab panel)
- A list of existing Risk Analysis Session in the domain associated to the entity (Analysis Sessions tab panel)

The entity is stored in the platform using Save button below the Description field
A set of defined entities and its information can be imported using an XLSX file. This file collects the following information:
- Entities to be created
- Relationships between entities
- Custom information about the entities
An example of this XLSX file would look like the following:

Each row of this file defines a relationship between a parent entity and its children. Different columns are used to set custom information of each entity, according to the configuration file (see below). Note: The first entity should be placed in row number 7 (being the first row number 1).
Clicking in the Import entities option inside the Configure menu will display a file navigator, from where the user will select the XLSX to be imported.

Once the importation has finished, the application will be redirected to the Entities management page.
Note: The imported file can be customised using an XML file. Details about the configuration of the imported file in How to configure entities import file
In the Entity Management page (when the entity is created or edited), there is a tab panel Data collectors with a list of available data collectors. The available data collectors are those that have been configured in the system by a system administrator, and the parameters the user has to fill depend on the nature of the data collector.
The data collector is selected using the tick of the data collector, and depending on the data collector some configuration data is needed.

For example, the user is associating a Jira data collector that is able to retrieve bug tracking data from a JIRA system, and he has to provide the URI where this system is installed and the credentials for accessing to it. Once the entity is saved, the Data Collector Manager will start to schedule the data collectors associated to the different entities, and run them for populating the Risk Data Repository with risk data that can be then used when the actual risk analysis will be performed.
#Step 4: Exploring Layers and Entities Layers and Entities can also be browsed by choosing the corresponding menu items in the Configure menu - Layers and Entities.


RISCOSS Governance
Get Involved
How to read analysis results
How to manage domains
How to manage assets
How to manage risk configurations
How to manage risk sessions
How to configure entities import file
How to contribute
How to setup RISCOSS workspace
How to build RISCOSS platform
How to deploy RISCOSS platform