-
Notifications
You must be signed in to change notification settings - Fork 14
Deployment guide
To begin, you will need:
-
User account to sign in Badgr website (preferrably an email enabled service account as it will be further used as owner).
-
An Azure subscription where you can create the following kinds of resources:
-
App service
-
App service plan
-
Bot channels registration
-
Azure Key Vault
-
Application Insights
-
A copy of the Badgr app GitHub repo URL
-
User account to sign in Badgr website
- If this is the first time you are setting up an account in Badgr, then please Sign up
- Sign in to Badgr website with user account (aka super user)
-
After successful sign in, please go to Issuer menu and add Create new issuer. For more help, please refer
- Please add details in Issuer form
- Name (for e.g. Fabrikam University). Please make sure that the issuer name is not used before to avoid unwanted conflicts.
- Website URL (for e.g. https://www.fabrikam.com/)
- Contact Email - please select the same email account you have signed up
- Description - Add your group description
- Please read the policy and click Create Issuer
- Please copy the name of Issuer as it will be used at later steps
- Please add details in Issuer form
-
We recommend to create few badges after this step. These badges will be available for all users in your company once they sign in via Open Badges teams application. - tip: Please upload badges images instead of random images
-
Client Id and client secret from Badgr (latest guidance here)
- To get client id and client secret, please send email to Badgr support team with following details
- Mail address : [email protected]
- Subject : : Client Id and secret for Open Badges Microsoft Teams app
- Body: Please make sure to add below information in email
- Badgr account email - (Your Badgr account email)
- Redirect URL - https://token.botframework.com/.auth/web/redirect
- Website URL - https://open-badges-{yourcompanyname}.azurewebsites.net (please make sure to use the same URL you are planning for deployment)
- Service name
- Application logo (optional)
- Privacy policy URL of your organization
- Terms of service URL of your organization
- Badgr support team will revert back within 2-3 business day with link to access client id and secret
- Please copy and save the client id and secret as it will be used while setting up the authentication in later steps
- To get client id and client secret, please send email to Badgr support team with following details
By this time, you should have following details :
- User account and password of Issuer owner
- Issuer name
-
Open the Azure Active Directory panel in the Azure portal. If you are not in the correct tenant, click Switch directory to switch to the correct tenant. (For instruction on creating a tenant, see Access the portal and create a tenant.)
-
Open the App registrations panel.
-
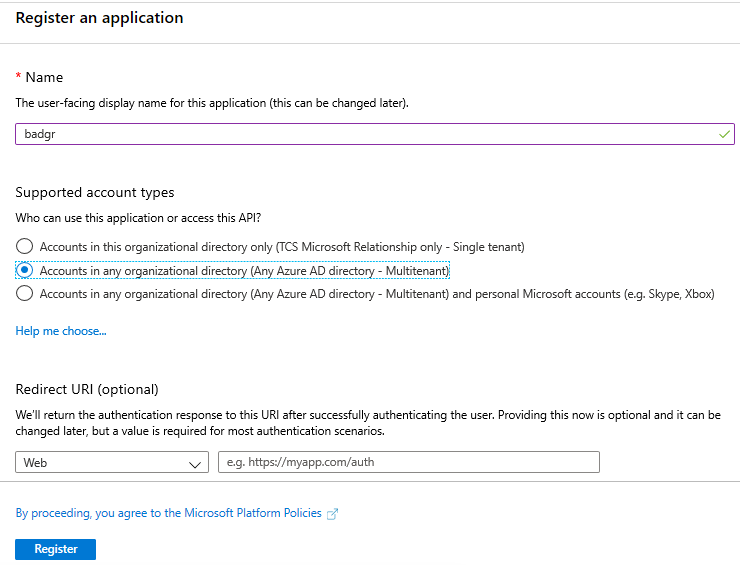
In the App registrations panel, click New registration.
-
Fill in the required fields and create the app registration.
-
Name your application - if you are following the template for a default deployment, we recommend "Open Badges".
-
Select the Supported account type as Accounts in any organizational directory.
-
For the Redirect URI
-
Select Web
-
Set the URL to https://token.botframework.com/.auth/web/redirect.
-
Click Register
-
Once it is created, Azure displays the Overview page for the app.
-
Record the Application (client) ID value. You will use this value later as the Client ID when you register your Microsoft Azure Active Directory application with your bot.
-
Also record the Directory (tenant) ID value. You will also use this to register this application with your bot.
- In the navigation pane, click Certificates & secrets to create a secret for your application.
-
Under Client secrets, click New client secret.
-
Add a description to identify this secret from others you might need to create for this app, such as bot login.
-
Set Expires to Never
-
Click Add
-
Before leaving this page, record the secret. You will use this value later as the Client secret when you register your Microsoft Azure Active Directory application with your bot.
You now have an application registered in Microsoft Azure Active Directory.
- Click on the "Deploy to Azure" button below.
-
When prompted, log in to your Azure subscription.
-
Azure will create a "Custom deployment" based on the ARM template and ask you to fill in the template parameters.
-
Select a subscription and resource group.
-
We recommend creating a new resource group.
-
The resource group location MUST be in a data center that supports: Application Insights; Key Vault. For an up-to-date list, click here, and select a region where the following services are available:
-
Application Insights
-
Key Vault
- Enter a "Base Resource Name", which the template uses to generate names for the other resources.
-
The app service name [Base Resource Name] must be available. For example, if you select Open Badges as the base name, the name Open Badges must be available (not taken); otherwise, the deployment will fail with a Conflict error.
-
Remember the base resource name that you selected. We will need it later.
-
Fill in the various IDs in the template:
a. Bot client ID: The application (client) ID of the Microsoft Teams bot app
b. Bot client secret: The client secret of the Microsoft Teams bot app
c. Tenant ID: Tenant ID where application is hosted (from step 2)
d. Badge provider base URL: https://api.badgr.io
e. Issuer entity name: User need to provide Issuer group entity name (created in Step 1)
f. Superuser username: User need to provide issuer group owners user id (Owner account used in Step 1)
g. Superuser Password: User need to provide issuer group owners password (Owner account password used in Step 1)
Make sure that the values are copied as-is, with no extra spaces. The template checks that GUID are exactly 36 characters.
-
If you wish to change the app name, description, and icon from the defaults, modify the corresponding template parameters.
-
Agree to the Azure terms and conditions by clicking on the check box "I agree to the terms and conditions stated above" located at the bottom of the page.
-
Click on "Purchase" to start the deployment.
-
Wait for the deployment to finish. You can check the progress of the deployment from the "Notifications" pane of the Azure Portal. It can take up to 20 minutes for the deployment to finish.
-
Once the deployment has finished, you would be directed to a page that has the following fields:
-
BotId - This is the Microsoft Application ID for the Open Badges.
-
AppDomain - This is the base domain for the Open Badges.
-
Note the name of the bot that you deployed, which is [BaseResourceName].
-
Go to azure portal here and search for your bot.
-
Click on the bot in the application list. Under "Configuration", click on "Add OAuth Connection Setting".
-
Fill in the form as follows:
a. For Name, enter "BadgrAuth". You'll use it in your bot code.
b. For Service Provider, select Oauth 2 Generic Provider.
c. For Client ID, enter the application (client) ID that Badgr team has provided.
d. For Client secret, enter the secret that you have received from Badgr team.
e. For Authorization URL, use https://badgr.io/auth/oauth2/authorize
f. For Token URL, use https://api.badgr.io/o/token
g. For Refresh URL, use https://api.badgr.io/o/token
h. For Scopes, enter the names of the permission you chose from application registration: rw:backpack rw:profile rw:issuer
-
Click Save.
Create Teams app package:
-
Open the Manifest\manifest.json file in a text editor.
-
Change the placeholder fields in the manifest to values appropriate for your organization.
-
developer.name (What's this?)
-
developer.websiteUrl
-
developer.privacyUrl
-
developer.termsOfUseUrl
-
Change the
<<botId>>placeholder to your Azure Active Directory application's ID from above. This is the same GUID that you entered in the template under "Bot Client ID". -
In the "validDomains" section, replace the
<<appDomain>>with your bot App Service's domain. This will be [BaseResourceName].azurewebsites.net. For example if you chose "contosoBadgr" as the base name, change the placeholder to contosoBadgr.azurewebsites.net.
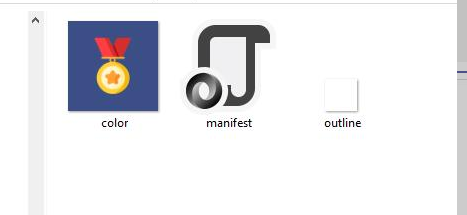
- Create a ZIP package with the manifest.json,color.png, and outline.png. The two image files are the icons for your app in Teams.
-
Name this package OpenBadges.zip.
-
Make sure that the 3 files are the top level of the ZIP package, with no nested folders.
-
If your tenant has sideloading apps enabled, you can install your app by following the instructions here
-
You can also upload it to your tenant's app catalog, so that it can be available for everyone in your tenant to install. See here
-
Install the end-user app (the OpenBadges.zip package) to your users.
Please see our Troubleshooting page.


