-
Notifications
You must be signed in to change notification settings - Fork 448
Rollback
(For those rare occasions when something goes wrong).
Very rarely an upgrade might go wrong, or you may have tweaked something and need to revert to a backup etc. This document is intended to walk you through the three most likely rollback scenarios:
- Rolling back a failed upgrade
- Restoring a broken database from backup
- Moving a site from one server to another (which is VERY similar to #1)
ChurchCRM has a simple architecture requiring a web server and a database server. This is ostensibly a "two-tier" system and consequently only has two potential restore points. Depending on the nature of the problem you are attempting to resolve, you may need to revert just the web server files (the ChurchCRM application files etc), the database, or possibly both.
ChurchCRM endeavors to keep as much site/church-specific information as possible in the database, leaving the application files on the web server as simply a means to retrieve and render the information etc. This is a good thing from a rollback/restore perspective, as there would be very few modifications to the ChurchCRM files you might need to carry over during a rollback/restore. Most commonly, image files for church members and logos/letterheads will need to be transferred, but that is about it.
As there are almost infinite permutations of web servers and database hosting setups this document will address the rollback/restore or these two components as generally as possible but provide indicative guidance to assist you in arriving at a solution for your particular setup.
This document assumes you are familiar with your own hosting platform and have a working knowledge of:
- MySQL management tools (PHPMyAdmin, and/or command line tools)
- Suggested tutorials and information:
- File system management (navigate, copy, move, files and unpack compressed files etc)
- Suggested tutorials and information:
- Wikipedia: Remote Administration
- Remote access via SSH - skip to the "Remotely Accessing a Linux Server via SSH"
- Command line tutorial even though it is based on Linux, there is a lot of commonality with macOS and BSD command lines too. Most Hosting providers use Linux though. In particular, check out the manipulating file and working with commands sections.
- Suggested tutorials and information:
For the purpose of this document we will be assuming:
- Your MySQL database:
- Named
churchcrm - Running on
localhost - Accessed on port
3306 - Username
ccrmdbuser - Password
password4ccrm
- Named
- Your ChurchCRM web server has the application installed at
/var/www/html/churchcrm
There is a built-in backup tool which is automatically called during the upgrade process and generates an archive for you to download. This file contains everything you need to restore a ChurchCRM system to a specific point in time and includes not just a copy of the database but a copy of the /Images folder too. This file cannot be simply "fed" into database restore utilities as it contains non-SQL information. If you wish to manually restore your database, you need to separate the /Images folder and the ChurchCRM-Database.sql file in the generated archive.
The file generated by ChurchCRM is a compressed "tar" archive, specifically a .tar.gz file. This style of file is analogous to a more common "zip" file as it usually contains multiple files and directories. There are many different ways to expand/decompress these files:
-
Windows: Most decompression tools support
.tar.gzor.tgzarchives. Free tools such as 7Zip do a great job and provide an intuitive interface. -
macOS: Finder supports
.tar.gzarchives natively. You simply need to double-click the archive and it will be extracted into a new directory in the same location as thetar.gzfile with the same name as the.tar.gzfile. e.g.,- Double click
ChurchCRM-YYYYMMDD-hhmmss.tar.gz - Finder expands it into a new directory called
ChurchCRM-YYYYMMDD-hhmmss
- Double click
-
Linux/BSD/macOS (command line): The standard
tarcommand line utility will handle.tar.gzfiles and is included as part of the base install on practically every Unix-like operating system. Be aware, unlike macOS finder and Windows GUI tools, thetarutility does not create a new directory to dump the expanded files into; they will be extracted into the current directory. To recreate the behavior of these GUI tools is a two step process:mkdir ChurchCRM-YYYYMMDD-hhmmss tar -zxf ChurchCRM-YYYYMMDD-hhmmss.tar.gz -C ChurchCRM-YYYYMMDD-hhmmss
taroptions explained:- -z this is a compressed archive
- -x eXtract this archive (
-twill show you the contents instead) - -f archive file name (the next element MUST be the file name)
- -C expand the archive into this target directory (directory MUST exist, and MUST be the next element)
with the exception of
-fand-Coptions can be bundled, so-zxf file.tar.gzis the same as-z -x -f file.tar.gz
├── ChurchCRM-Database.sql   <--- Copy of the database
└── Images
    ├── Family
    │   ├── 1.png
    │   ├── 2-initials.png
    │   ├── 3-initials.png
    │   ├── 4-initials.png
    │   ├── 5-initials.png
    │   ├── ...etc...
    │   └── thumbnails
    │       ├── 1.jpg
    │       └── index.html
    ├── Person
    │   ├── 1-initials.png
    │   ├── 1.png
    │   ├── 2.png
    │   ├── 3.png
    │   ├── 4.png
    │   ├── 5-initials.png
    │   ├── 5-remote.png
    │   ├── ...etc...
    │   ├── index.html
    │   └── thumbnails
    │       ├── 1.jpg
    │       ├── 2.jpg
    │       ├── 3.jpg
    │       ├── 5.jpg
    │       ├── ...etc...
    │       └── index.html
    ├── OurCustomisedLogo.png        <--- Customised image for letters/logos etc.
    ├── OurCustomisedLetterHead.jpg  <--- Customised image for letters/logos etc.
    ├── Spacer.gif
    ├── calendar.gif
    ├── church_letterhead.jpg
    ├── church_letterhead.png
    ├── downarrow.gif
    ├── index.html
    ├── uparrow.gif
    └── x.gif
As stated above, ChurchCRM only has two components (web server files and a database) so a full rollback to an earlier version has two prerequisites:
- A copy of your database (preferably a backup generated by ChurchCRM).
- A copy of the ChurchCRM application files for a specific release that matches exactly the database.
For instance, if your ChurchCRM database backup is from ChurchCRM 2.10.4, you will need the ChurchCRM release from 2.10.4 as well. Thankfully, all our releases are readily available.
During the upgrade process, ChurchCRM will force you to download a copy of your database. Make sure you keep it safe until you have verified any new versions installed are working!
This process requires the following steps:
-
Ensure your previous ChurchCRM-generated backup is available.
-
Move the broken files to a temporary location. For instance, if you have shell access to your web server, the following commands would be appropriate:
cd /var/www/html mv churchcrm churchcrm-broken -
Drop existing database tables (leave the database though; this avoids having to create a new database and re-grant permissions in MySQL).
If you have shell access to your web server you can use this trick:
mysqldump -u ccrmdbuser -ppassword4ccrm -h localhost --add-drop-table --no-data churchcrm |\
grep ^DROP |\
mysql -u ccrmdbuser -ppassword4ccrm -h localhost -D churchcrm
If you are using phpMyAdmin
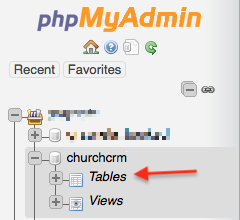
a. expand the
churchcrmdatabase and click on the "Tables" - this will populate the right panel with all the tables in the database:
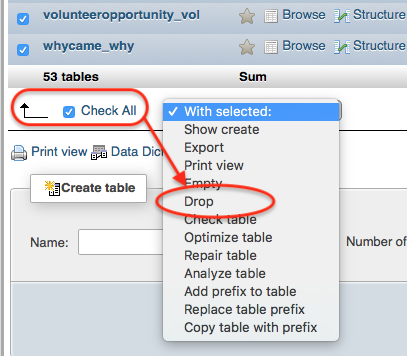
b. Scroll to the bottom of the tables list on the right.
c. Check the box for "Check All"
d. Drop down the "With selected:" option list.
e. Select "Drop"

-
Deploy the desired version of the ChurchCRM zip file - essentially, treat this as a "new" installation and follow the relevant installation instructions for your hosting setup.
-
Open the URL for your ChurchCRM instance and run through the ChurchCRM setup process.
-
Restore the ChurchCRM backup (from #1) using the "Restore Database" in the admin menu.
You should now have a restored ChurchCRM system as it was running prior to the failed upgrade.
There are a number of reasons why you may want to restore the database, leaving the existing ChurchCRM application as-is. These could be situations such as, importing a CSV file with incorrect data, messing up permissions for a bunch of users and not sure how to fix it, etc.
The critical thing here is, you need a recent backup of your database! If you haven't set up a regular backup strategy, for your ChurchCRM system, please review the "Backup" section in the Administration menu for ChurchCRM.
-
Ensure your desired database backup is available, which should be a
.sqlfile (you may need to extract it from the default backup if it was generated with ChurchCRM - see Anatomy of a ChurchCRM-generated Backup above) -
Restore the database over the existing one. This is ONLY possible if you are restoring a database backup from the SAME version of ChurchCRM. DO NOT try this for a rollback situation.
If you have shell access to your web server:
a. Copy the
.sqlfile to your web server:scp ChurchCRM-Database.sql user@webserver:b. Restore the database using the
mysqlcommand line tool:mysql -u churchcrm -ppassword4ccrm -h localhost -D churchcrm < ChurchCRM-Database.sqlIf you are using phpMyAdmin:
a. Select the
churchcrmdatabase in the list on the leftb. Select "Import" from the tabs at the top
c. From the phpMyAdmin form, click the "Choose file" button and select the
.sqlfile on your local machine.d. Accept the defaults (unless you know what you are doing)
e. Click the "Go" button at the bottom of the phpMyAdmin form.
You should now have a restored ChurchCRM system as it was running when the database backup was taken.
Essentially, this is the same process as a rollback, but without rolling back to an earlier version. It needs to be pointed out though, relocating your ChurchCRM system must maintain the same version from the original installation, e.g., you shouldn't relocate a 2.10.4 install to 3.0.2. Relocate in a like-for-like manner, then upgrade if you need to afterward etc.
To be clear, it is possible to relocate to a newer version, but it introduces a new set of variables to manage. Relocating like-for-like means the only source of problems would be the new location, not the newer version. If you are confident in your administration skills, relocating from an earlier version to a newer release is possible.
This process requires the following steps:
- Ensure your previous ChurchCRM generated backup is available.
- Deploy the desired version of the ChurchCRM zip file - essentially, treat this as a "new" installation and follow the relevant installation instructions for your hosting setup.
- Open the URL for your ChurchCRM instance and run through the ChurchCRM setup process.
- Restore the ChurchCRM backup (from #1) using the "Restore Database" in the admin menu.
You should now have an exact copy of your original ChurchCRM system running in a new location.