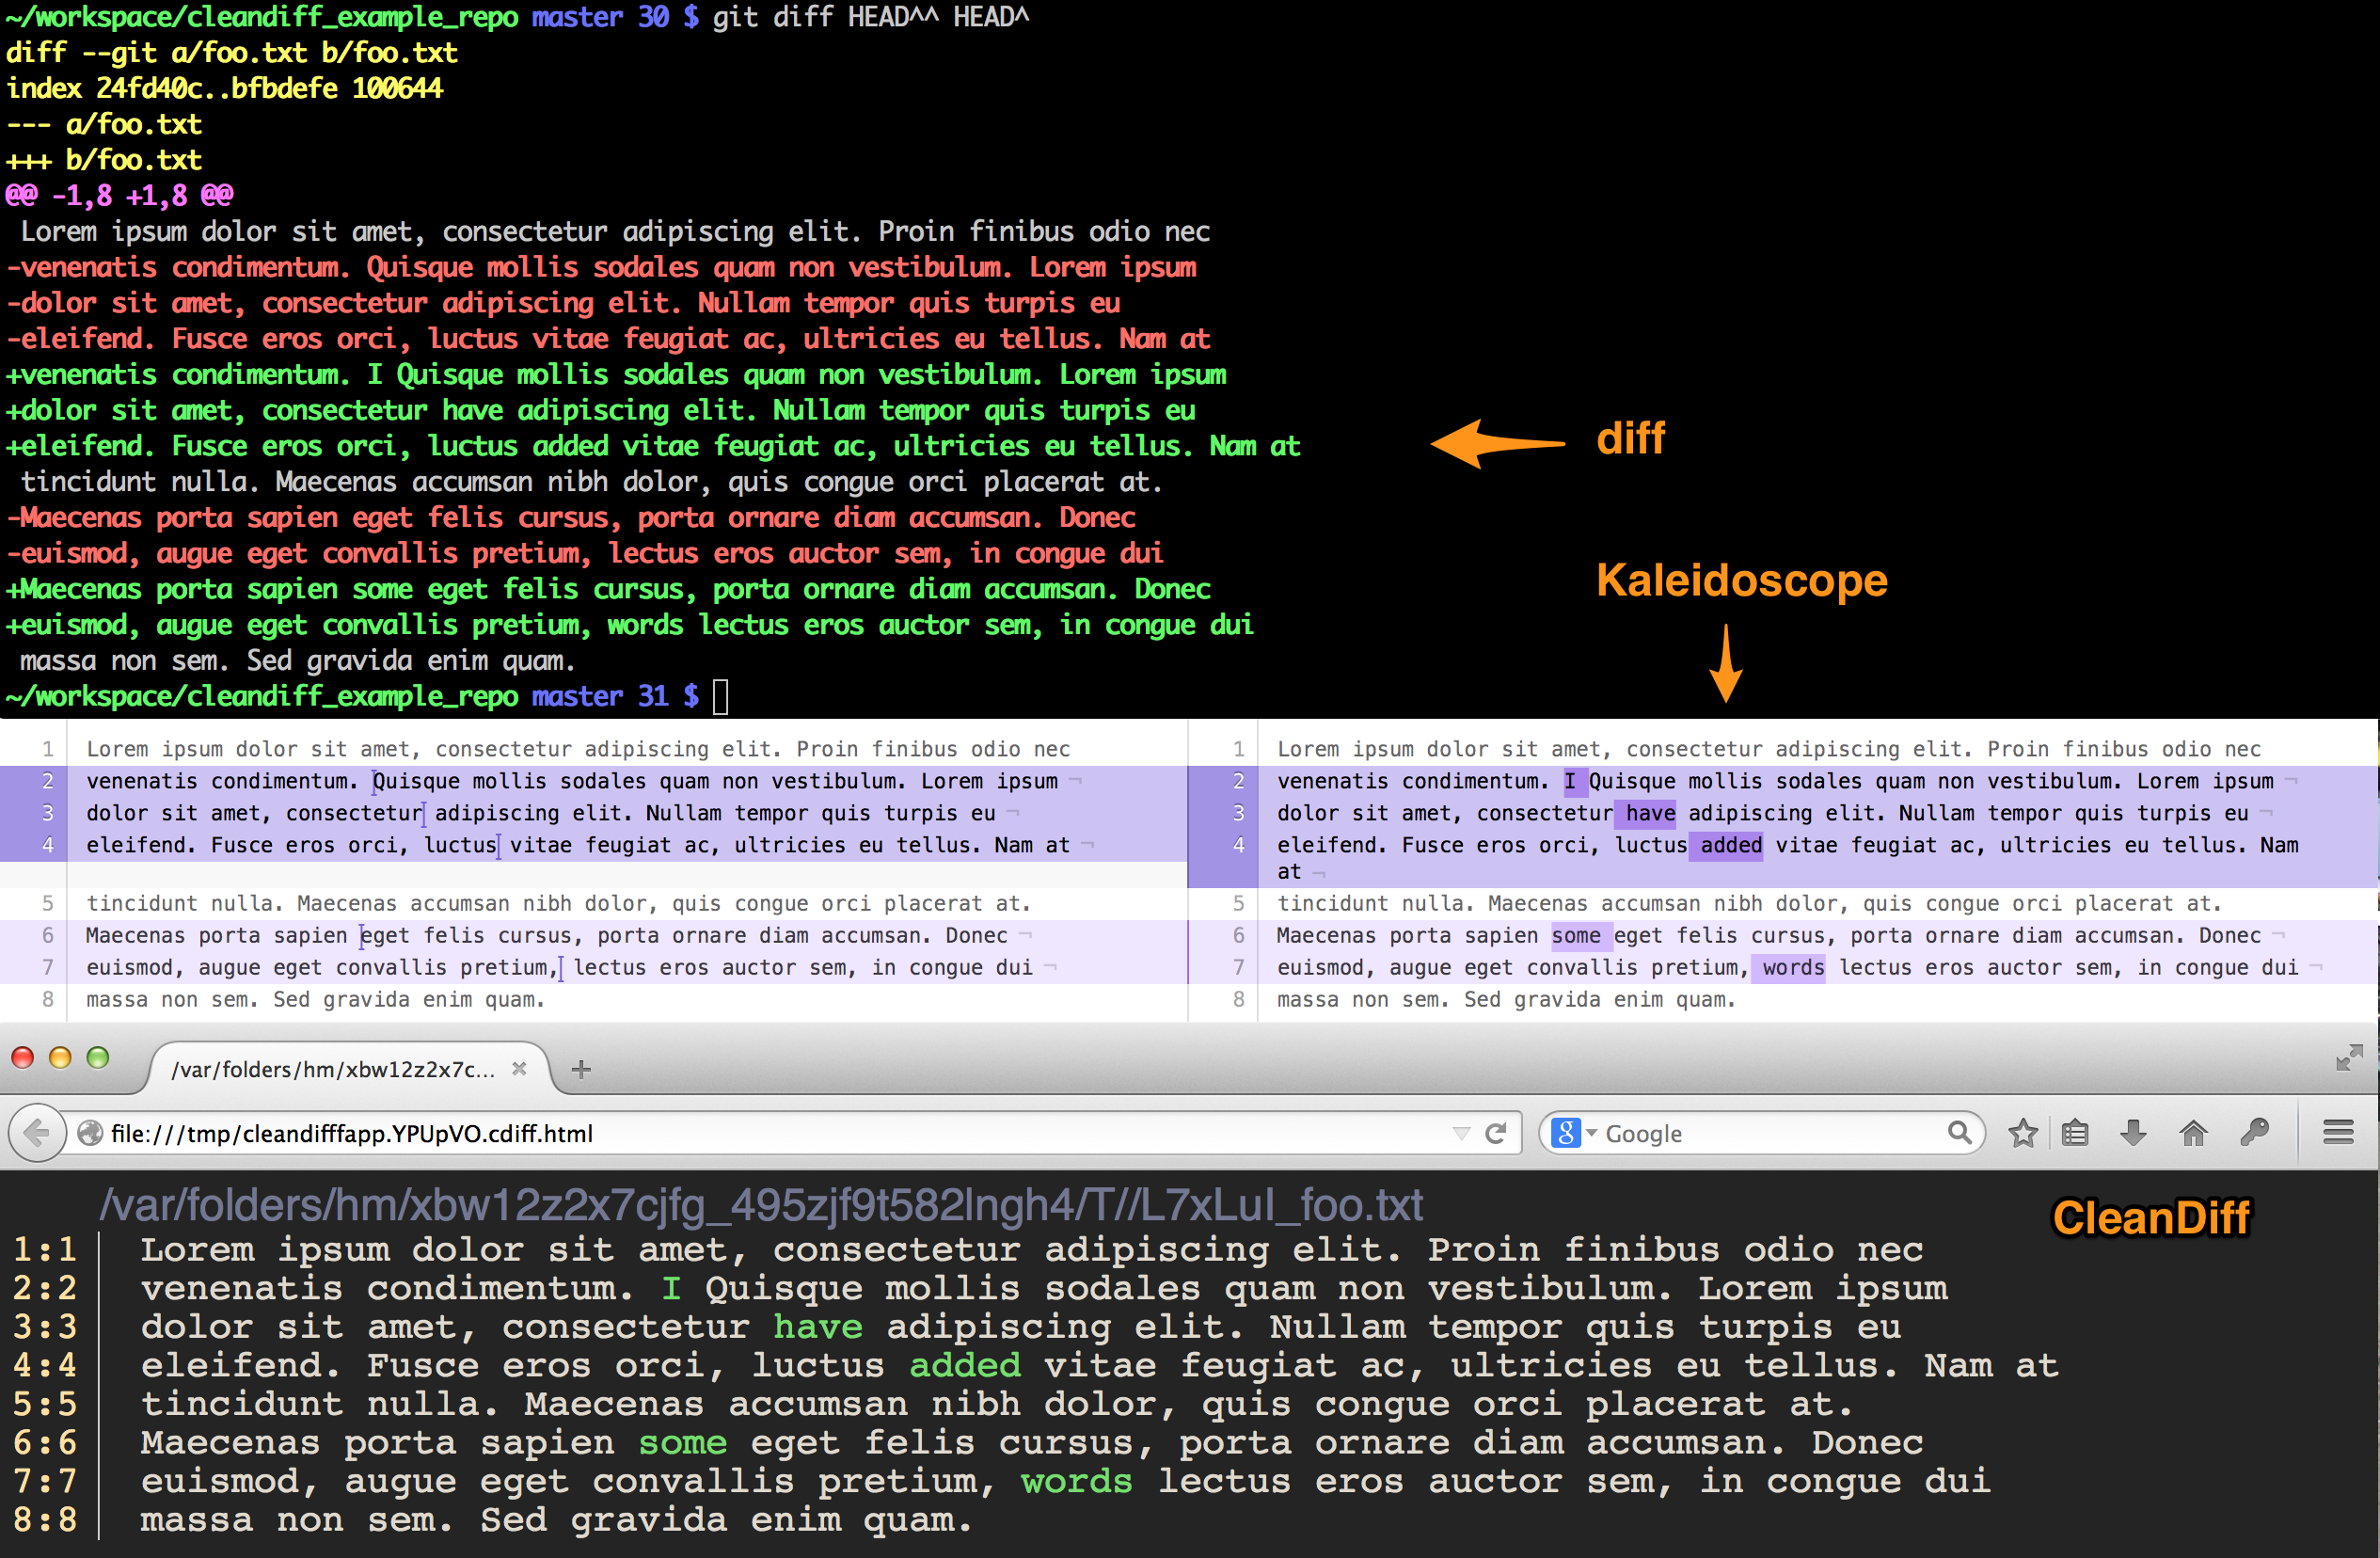
(A better way to diff)
CleanDiff removes the unnecessary noise from diffs so that your brain can focus on the important bits.
Pass it any two files, or use it in conjunction with git diff or git difftool
Imagine you add a few words to a file, then want to see the diff. The screenshot below shows how nigh-impossible it is to see what's changed when you use diff. Kaleidoscope definitely improves on the situation, but CleanDiff makes it even clearer.
(as opposed to just adding it)
CleanDiff can show you what's been removed, in addition to what's been added. In the example below I changed a couple words in the previous text. The output from diff and Kaleidoscope look very similar to the screenshot above.
This app, while stable, and safe, is still rough around the edges. It should work fine on OS X and Linux, but not Windows.
CleanDiff currently requires 2 *nix utilities which most of you are unlikely to have installed: dwdiff and aha. On OS X we'd recommend you install them via Homebrew.
# on OS X (after Homebrew has been installed)
$ brew install dwdiff
$ brew install aha
Linux people should use whatever the package manager is for your distro.
Next up, fork this repo, then clone it locally:
$ git clone https://github.com/<your username>/cleandiff.git
# or
$ git clone [email protected]:<your username>/cleandiff.git


# For those who don't feel like forking, or don't have GitHub accounts
# (Luddites!)

$ git clone https://github.com/masukomi/cleandiff.git
# or
$ git clone [email protected]:masukomi/cleandiff.git
and add the cdiff executable to your $PATH.
# at the bottom of your ~/.bashrc or ~/.bash_profile
PATH=$PATH:/path/to/cleandiff/folder
Please note. The Term::AnsiColor gem installs a script called cdiff at /usr/bin. If you've installed this then you'll want to make sure that cleandiff's directory comes before /usr/bin in your path, or just get rid of their cdiff because really, why would you need it when you've got this?
You can View CleanDiff changes in Fenestro if you're a mac user. Otherwise you'll need to view it's output in your favorite browser.
By Default it will attempt to load its changes in Firefox.
To use Fenestro:
edit ~/config/cdiff/cdiff1.sh and add USE_FENESTRO=true
To change the browser:
edit ~/config/cdiff/cdiff1.sh and add BROWSER=MyFavoriteBrowser Whatever you
enter will be called with open -a $BROWSER path/to/cdiff_output.html
Your choices are:
- Your favorite web browser
- Your favorite text editor (probably)
You'll also need to tell git how to use it as a graphical difftool.
Configuring your favorite browser
At the bottom of the cdiff file you'll see some comments about Chrome, Safari, Firefox. Uncomment / tweak the one that makes you most smiley.
Configuring yor favorite text editor
cdiff generates files with ANSI escape codes for coloring, so you'll need to install the appropriate plugin in your favorite editor to enable support for colorizing text with ANSI escape codes. Without that it'll probably display the raw codes, and it'll look like poo (not litterally. There's no brown in our code.)
VIM:
First we need to enable filetype detection so that it'll automatically recognize .cdiff files (and thus enable us to auto-colorize them).
To do this just run the integration/vim_setup.sh script which will add a line to your ~/.vim/filetypes.vim and create a ~/.vim/ftdetect/cdiff.vim file.
Next install the Colorizer Plugin and add this to your ~/.vimrc
let g:colorizer_auto_filetype='cdiff'
Now that you've got Vim configured to handle files with ANSI escape codes, and it knows how to detect .cdiff files, you'll want to uncomment the appropriate line at the bottom of our cdiff script.
#MacVim
mvim $TEMP_FILE
Note / Rant
Unfortunately, when using this with git difftool it will open a new window for every file you're diffing, which sucks.
There's no real way to determine if your receiving one request for diffs in a series, or just one request, but in the future we can work to hack a solution by queueing up the requests to vim (and other editors) if they happen with very little time in between.
If you've got a better solution, please file an issue or Pull Request.
EMACS:
Instructions to follow as soon as an Emacs geek tells us how. ;)
Configuring Git
Configuring git is pretty simple. Just run the integration/git_setup.sh script.
And if you haven't done it already you'll really want to disable the prompting, because it's really annoying.
$ git config --global difftool.prompt false
While we're at it diffing with any git tool will be better for most folks with this
$ git config --global diff.algorithm patience
(bet you thought we'd never get here, eh?)
Pretty much the same as diff, only without any options.
$ cdiff path/to/file/a.txt path/to/file/b.txt
If you've configured it as your default difftool then all you need to say is:
$ git difftool <anything you could pass to git diff>

#Ex.
$ git difftool HEAD^
$ git difftool fe0438
$ git difftool HEAD^..HEAD
# etc...
If you have not configured it as your default difftool then it's not very different. Just add in the --tool option like this:
$ git difftool --tool=cdiff <anything you could pass to git diff>

