After installation, you can try to run an example script of voice conversion (VC) in "/sprocket/example". Note: Please use NOT Python2 BUT Python3.
cd example
To run the example script, you need to first prepare a parallel speech dataset of a source speaker and a target speaker in the "data/wav" directory. In this tutorial, we use VCC2016 speech database. You can download it by executing the following command.
python download_vcc2016dataset.py
Now, you can find speech samples in "data/wav" directory in each speaker.
As the initialization step, you need to perform the following 3 steps.
- Prepare lists for training and evaluation in each source and target speaker
- Prepare configure files for the source and target speakers and a speaker-pair
- Modify an F0 search range for each of the source and target speakers
To create lists of the source speaker (e.g., "SF1") and target speaker (e.g., "TF1"), run the following command in the example directory.
python initialize.py -1 SF1 TF1 16000
where "16000" is the sampling rate of .wav file. "-1" option indicates a flag to generate training and evaluation lists of the source and target speakers.
You can change the number of speech samples to be used in the training and evaluation process by editing the lists in "list" directory. Here, we make these lists shorter by manually modifying them. For instance, you can set the number of training speech samples to 30 and the number of evaluation speech samples to 10 as shown below.
list/SF1_train.list:
SF1/100001
SF1/100002
SF1/100003
SF1/100004
SF1/100005
SF1/100006
SF1/100007
SF1/100008
SF1/100009
SF1/100010
SF1/100011
SF1/100012
SF1/100013
SF1/100014
SF1/100015
SF1/100016
SF1/100017
SF1/100018
SF1/100019
SF1/100020
SF1/100021
SF1/100022
SF1/100023
SF1/100024
SF1/100025
SF1/100026
SF1/100027
SF1/100028
SF1/100029
SF1/100030
list/SF1_eval.list:
SF1/100031
SF1/100032
SF1/100033
SF1/100034
SF1/100035
SF1/100036
SF1/100037
SF1/100038
SF1/100039
SF1/100040
list/TF1_train.list:
TF1/100001
TF1/100002
TF1/100003
TF1/100004
TF1/100005
TF1/100006
TF1/100007
TF1/100008
TF1/100009
TF1/100010
TF1/100011
TF1/100012
TF1/100013
TF1/100014
TF1/100015
TF1/100016
TF1/100017
TF1/100018
TF1/100019
TF1/100020
TF1/100021
TF1/100022
TF1/100023
TF1/100024
TF1/100025
TF1/100026
TF1/100027
TF1/100028
TF1/100029
TF1/100030
list/TF1_eval.list:
TF1/100031
TF1/100032
TF1/100033
TF1/100034
TF1/100035
TF1/100036
TF1/100037
TF1/100038
TF1/100039
TF1/100040
Note that you need to match the length and order of the lists between the source and target speakers.
Next, to generate configure files of the speakers, run the following command.
python initialize.py -2 SF1 TF1 16000
where "-2" option indicates a flag to generate configure files for the source and target speakers and the speaker-pair. By executing this script, speaker-dependent YAML files (e.g., "conf/speaker/SF1.yml") and a speaker-pair dependent YAML file (e.g., "conf/pair/SF1-TF1.yml") are generated. Several parameters, such as the F0 search range, the order of mel-cepstrum, and the number of mixture components of a GMM, are described in these YAML files, which are used for the training and conversion steps.
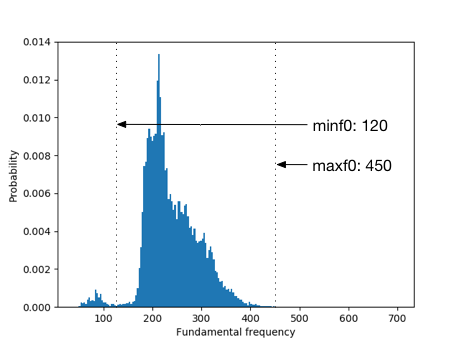
To achieve good sound quality and conversion accuracy of the converted speech, it is necessary to carefully set some parameters. One of them is the F0 search range. In this step, we describe how to determine the F0 search range. First you run the following command to generate F0 histogram in each of the source and target speakers.
python initialize.py -3 SF1 TF1 16000
where "-3" option indicates a flag to generate the F0 histograms of the source and target speakers. After finishing this command, you can find the histograms in "conf/figure" directory (e.g., "conf/figure/SF1_f0histogram.png").
Based on this figure, you can manually change the values of "minf0" and "maxf0" in the speaker-dependent YAML file (e.g., "conf/speaker/TF1.yml").
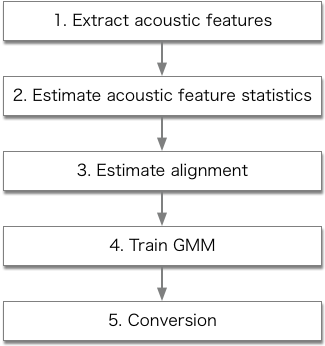
Now you can build the traditional VC system using "run_sprocket.py"
python run_sprocket.py -1 -2 -3 -4 -5 SF1 TF1
The procedures of "run_sprocket.py" are described in the following figure.
Consequently, converted speech samples are generated in "data/pair/SF1-TF1/test/SF1" directory as wav files "*_VC.wav" (e.g., data/pair/SF1-TF1/test/SF1/100031_VC.wav).
Note that the generated waveforms labeled "*_DIFFVC.wav" indicates converted speech samples by vocoder-free VC system (i.e., DIFFVC without F0 transformation).
If you want to build the vocoder-free VC system with F0 transformation, you need to first perform F0 transformation of speech samples of the source speaker. To do so, you need to run the following command after performing the modification of the F0 search range of the source and target speakers.
python run_f0_transformation.py SF1 TF1
After finishing this command, you can find F0 transformed wav files in "data/wav/SF1_{f0ratio}" directory (e.g., "SF1_1.02"). Then, you need to perform initializations for the F0 transformed source speaker and target speaker (i.e., "TF1") again. By running "run_sprocket.py" with the F0 transformed source speaker and the target speaker, you can build the vocoder-free VC system with F0 transformation and generate the converted speech samples.
Consequently, converted speech samples are generated in "data/pair/SF1_1.02-TF1/test/SF1_1.02" directory as wav files "*_DIFFVC.wav" (e.g., data/pair/SF1_1.02-TF1/test/SF1_1.02/100031_DIFFVC.wav).

