-
Notifications
You must be signed in to change notification settings - Fork 602
New issue
Have a question about this project? Sign up for a free GitHub account to open an issue and contact its maintainers and the community.
By clicking “Sign up for GitHub”, you agree to our terms of service and privacy statement. We’ll occasionally send you account related emails.
Already on GitHub? Sign in to your account
安卓用Termux装Ubuntu20.04并部署zhenxun botの流程分享 #974
Comments
Closed
可以了,但再次运行会显示占用😖Collage_20220807_153739.jpg |
不需要再次运行, 它是挂后台的 放到后台 回到gocq的窗口 回到zhenxun的窗口 |
解决啦,感谢大佬😘 |
你要用你的女装照答谢(说着玩的) |
Sign up for free
to join this conversation on GitHub.
Already have an account?
Sign in to comment

前言:
Ubuntu20.04的默认python是3.8, 所以就用Ubuntu20.04了 (22.04默认python 3.10也可以用但有个依赖要更换版本) ; 另外, 之前在Ubuntu里尝试过安装PostgreSQL不能用, 所以就直接在Termux装PostgreSQL了
关于签名服务器
HuggingFace的QQSign集体暴毙, 所以还是用其他方法吧
有个Koyeb具体流程不便公开并且试了两三次没跑起来
这里有本地(或服务器)搭建的相关文件和简单的使用方法
https://gitee.com/KudouShinnyan/qsign
(之前试了Termux+CentOS⑨最高貌似只有1.1.0正常用, 后续版本比如有些水土不服, 1.1.9是被尝试连接之后它就卡了, 1.2.1版好像直接不兼容arm, 你试下Termux改用其它Linux容器装jre跑1.1.9, 或直接在Termux装jdk不通过容器跑1.1.9, 莪现在是在一个熟人服务器跑1.1.9了)
签名服务器地址本地运行的是
http://127.0.0.1:8081在服务器运行则是
http://服务器IP地址:8081(比如服务器用宝塔面板需要在安全那里放行8081端口)
准备工作:
下载并安装Termux
(现在的爪机一般下载arm64版即可, 其它Android设备自己判断, universal是通用的但安装包会大很多)
装完后启动它
获取唤醒锁 (防止Termux后台运行和锁屏后休眠)
点击通知栏Termux那里的
Acquire wakelock, 也可以在Termux的命令行输入termux-wake-lock, 弹出询问始终在后台运行点允许, 然后通知栏显示wake lock held然后在Termux的命令行输入下面的命令
Termux换源并更新 (一整行一起执行)
sed -i "[email protected]@mirrors.bfsu.edu.cn/termux@g" $PREFIX/etc/apt/sources.list && apt update && apt upgrade -y(解包过程大概有6次询问有关换回默认源的, 直接回车默认否)
(Android12~13有也许要解决杀进程的问题, 可以考虑现在解决了再继续, 往后面翻有相关流程)
安装PostgreSQL、git和proot
apt install postgresql git proot -y创建postgresql目录
mkdir -p $PREFIX/var/lib/postgresql初始化
initdb $PREFIX/var/lib/postgresql后台运行postgresql
nohup postgres -D $PREFIX/var/lib/postgresql/ &(以后关掉重开Termux需要先执行它)
查看Termux使用的用户名
whoami连接数据库
(自己把u0_a774换成上一行命令查看到的用户名)
psql -U u0_a774 -d postgres(连接成功后会显示 postgres=# )
连接失败的话修改配置文件 (没失败就不用改)
(解决报错FATAL: could not map shared memory segment "xxxxxxxxxx")
nano $PREFIX/var/lib/postgresql/postgresql.conf按ctrl+w搜
dynamic_shared_memory_type回车, 假如等号右边是sysv那就改成mmap完成后Ctrl+O保存, 然后不改文件名直接回车
Ctrl+X离开, 然后再次后台运行postgresql和连接数据库
创建用户和设置密码
create user oyama with password 'mahiro';创建数据库
create database oyamadb owner oyama;将oyamadb的所有权赋予oyama
grant all privileges on database oyamadb to oyama;退出
\q之前备份过postgresql数据库的话现在就还原它然后再继续后续流程 (没备份过就不用管)
往后面翻有备份还原的流程, 为了不让第一次安装的人感到混乱就不放在这了
克隆Ubuntu20.04的安装文件
(默认arm64, 其它架构的设备视情况把这行命令的ubuntu20.04改成ubuntu20.04-armhf或ubuntu20.04-amd64)
git clone --depth=1 -b ubuntu20.04 https://gitee.com/KudouShinnyan/ubuntu-in-termux.git ~/ubuntu/执行安装脚本
cd ~/ubuntu && chmod +x ubuntu.sh && ./ubuntu.sh -y删掉git缓存、README以及安装脚本 (不删也可以, 但文件一般用不到了)
rm -rf .git README.md ubuntu.sh创建Termux命令行的输入记录
(Termux没用exit或logout命令正常退出的话不会保存输入记录, 好像很少会这么退出, 干脆直接创建记录算了)
echo -e "nohup postgres -D \$PREFIX/var/lib/postgresql/ &\ncd ~/ubuntu && ./startubuntu.sh" > ~/.bash_history创建之后, 以后打开Termux就可以按方向↑和↓直接找到后台运行postgresql的命令和启动Ubuntu命令了
启动Ubuntu (这次先手动复制粘贴执行吧)
./startubuntu.sh启动后会显示 root@localhost:~#
Ubuntu换源 (arm64/aarch64、arm/armhf, 爪机执行这个即可)
sed -i 's/ports.ubuntu.com/mirrors.bfsu.edu.cn/g' /etc/apt/sources.listUbuntu换源 (amd64/x86_x64、i386/x86, 爪机不执行这个)
sed -i "s@http://.*archive.ubuntu.com@http://mirrors.bfsu.edu.cn@g" /etc/apt/sources.listsed -i 's/security.ubuntu.com/mirrors.bfsu.edu.cn/g' /etc/apt/sources.list更新源并更新Ubuntu中的软件
apt update && apt upgrade -y安装各个软件
apt install screen wget nano git python3 python3-pip ffmpeg -y(假如出现区域选择那就选亚洲上海吧)
创建gocq的会话
screen -S gocq安装gocq
用浏览器点这里获取新版本go-cqhttp的deb包下载链接
以1.2.0版为例, 用wget获取 (用arm64的版本举例, 其它架构的设备自己另外获取链接)
wget https://hub.gitmirror.com/https://github.com/Mrs4s/go-cqhttp/releases/download/v1.2.0/go-cqhttp_1.2.0_linux_arm64.deb安装
dpkg -i go-cqhttp_1.2.0_linux_arm64.deb删除安装包
rm go-cqhttp_1.2.0_linux_arm64.deb创建存放gocq配置文件夹 (以便和其它东西区分)
mkdir ~/gocq首次启动gocq
cd ~/gocq && go-cqhttp选3, 生成配置之后回车会退出
编辑配置文件
nano config.yml按方向↑↓←→移到账号相关那里, 把1233456改成机器人的QQ号, 密码的话填在单引号里面
把没加#号的
sign-server下边url右边单引号里的横杠改成签名服务器链接(就是前面说的http://IP地址:8081)(假如没有
sign-server和114514那就安装新版gocq然后执行rm config.yml删除文件然后按刚装完gocq的流程重来)Ctrl + \ (反斜杠)搜索, 然后输入下面内容
universal: ws://your_websocket_universal.server回车然后输入下面内容替换
universal: ws://127.0.0.1:8080/onebot/v11/ws/回车然后输入A全部替换 (其实也就一处)
完成后Ctrl+O保存, 然后不改文件名直接回车
Ctrl+X离开
(后续改其它文件也是这样保存离开)
再次启动gocq
go-cqhttp提示生成设备虚拟设备信息(以及一些目录)后先ctrl+c退出
获取特定QQ版本号文件
点进这里(点链接), 网页开PC模式, 然后点进想用的QQ版本(要和签名服务器一致), 再按需求点开
android_pad.json或android_phone.json, 在右上方原始数据的按钮长按或右键复制链接复制后按下面的例子执行 (用8.9.90举例)
curl -o ./data/versions/6.json https://gitee.com/KudouShinnyan/qsign/raw/protocol/8.9.90/android_pad.jsoncurl -o ./data/versions/1.json https://gitee.com/KudouShinnyan/qsign/raw/protocol/8.9.90/android_phone.json(6.json是Android Pad, 1.json是Android爪机)
修改登录设备 (可跳过, 默认Android Pad)
nano device.json按ctrl+w搜
protocol回车, 按方向→把后面数字改成想要的设备 (首选6, 次选1)1 Android爪机、2 Android手表(不能接收notify、口令红包、不能撤回)、3 macOS、4 企点(普通账号不能用)、5 iPad、6 Android Pad
ctrl+o(保存)回车
ctrl+x(离开)
完成后再次启动gocq
go-cqhttp登录成功后连接错误先不用管
Ctrl+A然后D放到后台继续后续步骤
(可以在不同的会话在不同的目录启动gocq同时登录多个QQ共用一份zhenxun)
创建真寻会话
screen -S zhenxun获取真寻
git clone --depth=1 -b main https://mirror.ghproxy.com/https://github.com/HibiKier/zhenxun_bot.git进入真寻目录
cd ~/zhenxun_bot克隆插件集 (可选)
git clone --depth=1 -b master https://mirror.ghproxy.com/https://github.com/zhenxun-org/nonebot_plugins_zhenxun_bot.git ./extensive_plugin/(现在跳过的话后续可能要用下面的方法了)
获取另一组插件 (可选)
git clone https://mirror.ghproxy.com/https://github.com/CRAZYShimakaze/zhenxun_extensive_plugin.git ./extensive_plugin/temp/移到插件目录(排除某些文件)
find ./extensive_plugin/temp -maxdepth 1 ! -name 'README.md' ! -name 'LICENSE' ! -name '.git' -exec mv {} ./extensive_plugin/ \;删除临时目录
rm -rf ./extensive_plugin/temp升级pip
python3 -m pip install -i https://mirrors.bfsu.edu.cn/pypi/web/simple --upgrade pippip换源 (默认源能稳定下载的话可不换)
pip config set global.index-url https://mirrors.bfsu.edu.cn/pypi/web/simple安装 poetry
pip install poetry(假如是用Ubuntu22.04默认的python 3.10那就需要在pyproject.toml文件把PyYAML的版本改成6.0.1, poetry.lock文件就删掉吧)
(Ubuntu20.04默认的python3.8不需要改不需要删)
安装依赖
poetry install(执行后等待它完成, 假如有安装失败的那就再次执行直到成功)
进入虚拟环境
poetry shell安装Chromium
playwright install chromiumplaywright install-deps chromium设置机器人的主人以及机器人的昵称
nano .env.dev在SUPERUSERS右边引号内输入自己QQ
ctrl+o(保存)回车
ctrl+x(离开)
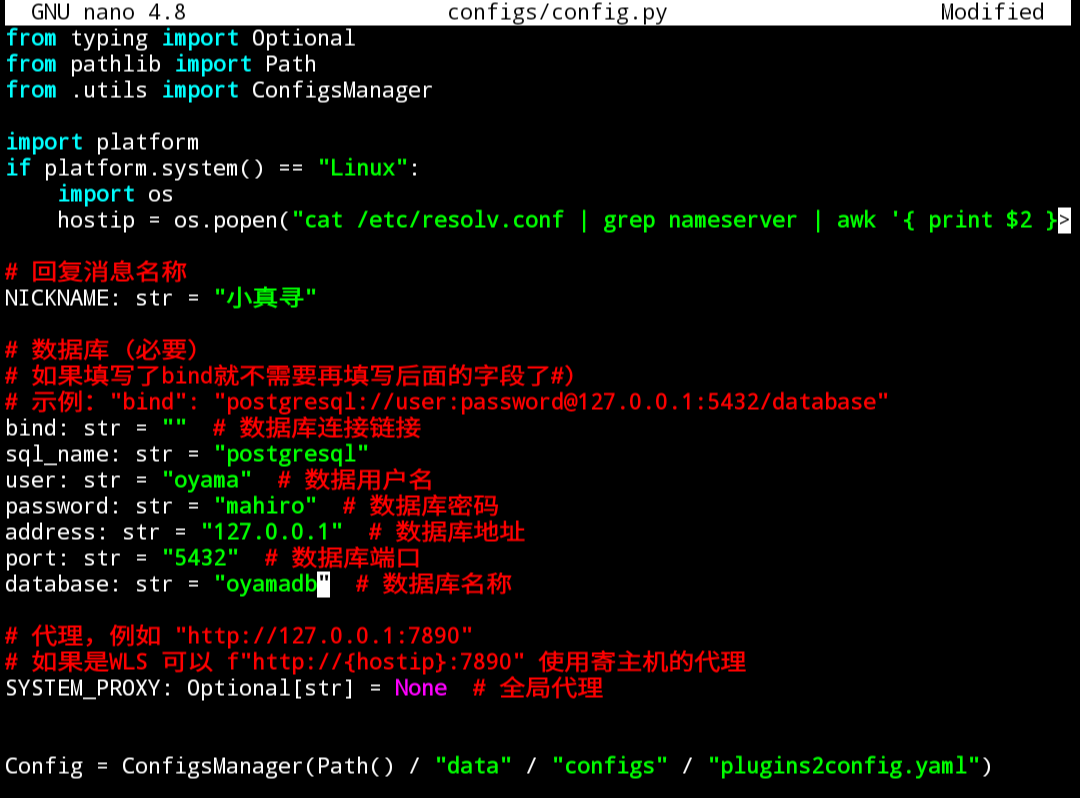
填写数据库

nano configs/config.py修改下面内容, 机器人的昵称按需求修改, 其它的保持默认
user: str = "oyama"
password: str = "mahiro"
address: str = "127.0.0.1"
port: str = "5432"
database: str = "oyamadb"
ctrl+o(保存)回车
ctrl+x(离开)
首次启动真寻
python3 bot.py要是提示没某个模块比如nonebot.adapter.onebot并且自动退出运行的话尝试输入这个
pip install nonebot-adapter-onebot完成后再次启动真寻
自动退出后配置插件 (可选)
nano configs/config.yaml各个插件有注释说明, true为启用、false为禁用
(这里有个坑, 比如API_KEY这里, 冒号后面要加空格再填写API)
改完之后ctrl+o(保存)回车
ctrl+x(离开)
再次启动真寻
python3 bot.py稍微等亿点时间下载完一些数据和图片包什么的就能用了
帮助菜单: '真寻帮助' 或 '管理员帮助'
真寻使用文档
可以到真寻bot的插件库或NoneBot商店找一些插件安装
(具体的安装流程查看插件的Gayhub仓库)
以后关闭Termux重开后这样操作:
点状态栏的Acquire wakelock或者在Termux的命令行输入
termux-wake-lock然后执行下列命令 (外面可用方向↑↓找到命令, 在screen会话里面不可以)
nohup postgres -D $PREFIX/var/lib/postgresql/ &cd ~/ubuntu && ./startubuntu.shscreen -S gocqcd ~/gocq && go-cqhttpctrl+a然后d
screen -S zhenxuncd ~/zhenxun_botpoetry shellpython3 bot.py附加screen的常规用法:
将该screen会话放后台
Ctrl+A然后D
回到zhenxun会话
screen -r zhenxun回到gocq会话
screen -r gocq进入回滚模式(查看日志)
Ctrl+A然后Esc
(再次按Esc则是退出该模式)
关闭该screen会话
exit或 Ctrl+A然后K再y
备份还原PostgreSQLの方法:
备份和还原都需要先设置存储目录
termux-setup-storage(执行一次即可, 之前执行过的话就不用再次执行)
(授予存储权限后可通过~/storage/这个目录访问内置存储的一部分文件夹)
将oyamadb这个数据库备份到内置存储的下载(Download)文件夹
(等以后想要备份的时候再执行, 是在后台运行postgresql之后、启动CentOS之前执行)
pg_dump oyamadb > ~/storage/downloads/oyamadb.sql把内置存储下载(Download)文件夹的oyamadb.sql文件还原到oyamadb数据库
(之前备份过的话把文件放到对应位置执行这个还原, 要建完数据库之后再还原)
psql oyamadb < ~/storage/downloads/oyamadb.sql解决Android12~13因为杀进程导致Termux出现[Process completed (signal 9) - press Enter]
用数据线连PC并开启USB调试, PC需要装adb驱动 (应该可以用MiFlash的驱动)
然后PC下载platform-tools并解压
进去解压后的文件夹在地址栏输入cmd回车
Android13或12L执行这一行即可
adb shell "settings put global settings_enable_monitor_phantom_procs false"Android12无谷歌服务执行这一行
adb shell "/system/bin/device_config put activity_manager max_phantom_processes 2147483647"Android12有谷歌服务执行这一行
adb shell "/system/bin/device_config set_sync_disabled_for_tests persistent; /system/bin/device_config put activity_manager max_phantom_processes 2147483647"执行完后把爪机重启
没PC的话可以尝试开启无线调试然后在分屏或窗口用Termux进行配对(不自带分屏或窗口可以用米窗, 用Shizuku激活它), 在Termux里输入
apt install android-tools -y安装android-tools, 然后输入adb pair 127.0.0.1:某端口配对, 输入六位配对码, 然后输入adb connect 127.0.0.1:某端口连接, 然后执行上述命令The text was updated successfully, but these errors were encountered: